Photo AI
Last Updated Sep 26, 2025
Core practical: Investigating refraction Simplified Revision Notes for GCSE Edexcel Physics Combined Science
Revision notes with simplified explanations to understand Core practical: Investigating refraction quickly and effectively.
412+ students studying
Core practical: Investigating refraction
What is Refraction?
Refraction occurs when light changes direction as it passes from one medium to another due to a change in speed. The amount of bending depends on the optical density of the materials. Air has a low optical density, while glass has a higher optical density, so light slows down and bends towards the normal when entering glass and bends away when leaving.
This experiment investigates how light is refracted when it passes through a rectangular glass block.
Apparatus Required
- Ray box: An enclosed box with a bulb inside and a thin slit to produce a narrow beam of light.
- Rectangular glass block: A transparent object used to demonstrate the refraction of light.
- Protractor: To measure angles of incidence, refraction, and emergence.
- Ruler: For accurate tracing.
- Paper and pencil: For tracing and recording results.
Steps for Investigating Refraction:
- Set up the Glass Block:
- Place the rectangular glass block flat on a piece of paper.
- Trace around the block with a pencil to mark its position on the paper.
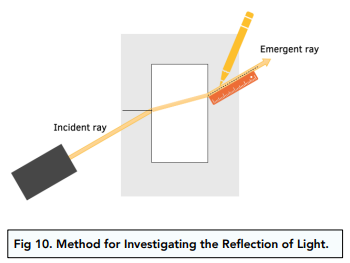
- Shine the Light:
- Use the ray box to direct a thin ray of light at the middle of one side of the block.
- Trace the Rays:
- Trace the incident ray (the ray of light before it enters the block) on the paper.
- Once the ray emerges on the opposite side of the block, trace the emergent ray (the ray of light as it exits the block).
- Remove the Block and Draw the Refracted Ray:
- After removing the glass block, join the incident and emergent rays by drawing the path of the refracted ray through the block.
- Draw the Normal:
- At the point where the incident ray meets the block, draw a normal line perpendicular (90 degrees) to the surface of the glass.
- Repeat this at the point where the light ray exits the block.
- Measure the Angles:
- Use a protractor to measure the angle of incidence (the angle between the incident ray and the normal) and the angle of refraction (the angle between the refracted ray and the normal inside the block).
- Also, measure the angle of emergence (the angle between the emergent ray and the normal at the point where the ray exits the block).
- Repeat the Experiment:
- Repeat the process three times, keeping the angle of incidence the same for consistency.
- Average the angles measured for more accurate results.
Expected Results:
- When light enters the glass block: The angle of refraction is less than the angle of incidence because light slows down as it passes from air (lower optical density) to glass (higher optical density). The light ray bends towards the normal.
- When light exits the glass block: The light ray bends away from the normal as it passes from glass back to air. This is because light speeds up when moving from a denser medium (glass) to a less dense medium (air).
Why Refraction Happens:
- Optical Density: Refraction occurs because different materials have different optical densities, which affect the speed of light. For example, glass has a higher optical density than air, causing the light to slow down and bend when it enters the block.
Key Observations:
- The ray bends towards the normal when it enters the glass block because light slows down.
- The ray bends away from the normal when it exits the block as the light speeds up.
- You should notice that the angle of refraction is always less than the angle of incidence when light enters a denser medium like glass.
Important Points to Remember:
- All electromagnetic waves, including visible light, can be refracted.
- The greater the difference in optical density between two materials, the greater the amount of refraction.

500K+ Students Use These Powerful Tools to Master Core practical: Investigating refraction For their GCSE Exams.
Enhance your understanding with flashcards, quizzes, and exams—designed to help you grasp key concepts, reinforce learning, and master any topic with confidence!
10 flashcards
Flashcards on Core practical: Investigating refraction
Revise key concepts with interactive flashcards.
Try Physics Combined Science Flashcards1 quizzes
Quizzes on Core practical: Investigating refraction
Test your knowledge with fun and engaging quizzes.
Try Physics Combined Science Quizzes4 questions
Exam questions on Core practical: Investigating refraction
Boost your confidence with real exam questions.
Try Physics Combined Science Questions27 exams created
Exam Builder on Core practical: Investigating refraction
Create custom exams across topics for better practice!
Try Physics Combined Science exam builder28 papers
Past Papers on Core practical: Investigating refraction
Practice past papers to reinforce exam experience.
Try Physics Combined Science Past PapersOther Revision Notes related to Core practical: Investigating refraction you should explore
Discover More Revision Notes Related to Core practical: Investigating refraction to Deepen Your Understanding and Improve Your Mastery
Load more notes