The 3D graphic on the right shows a design for a podium for this year’s Olympic Games - Leaving Cert DCG - Question B-1 - 2012
Question B-1
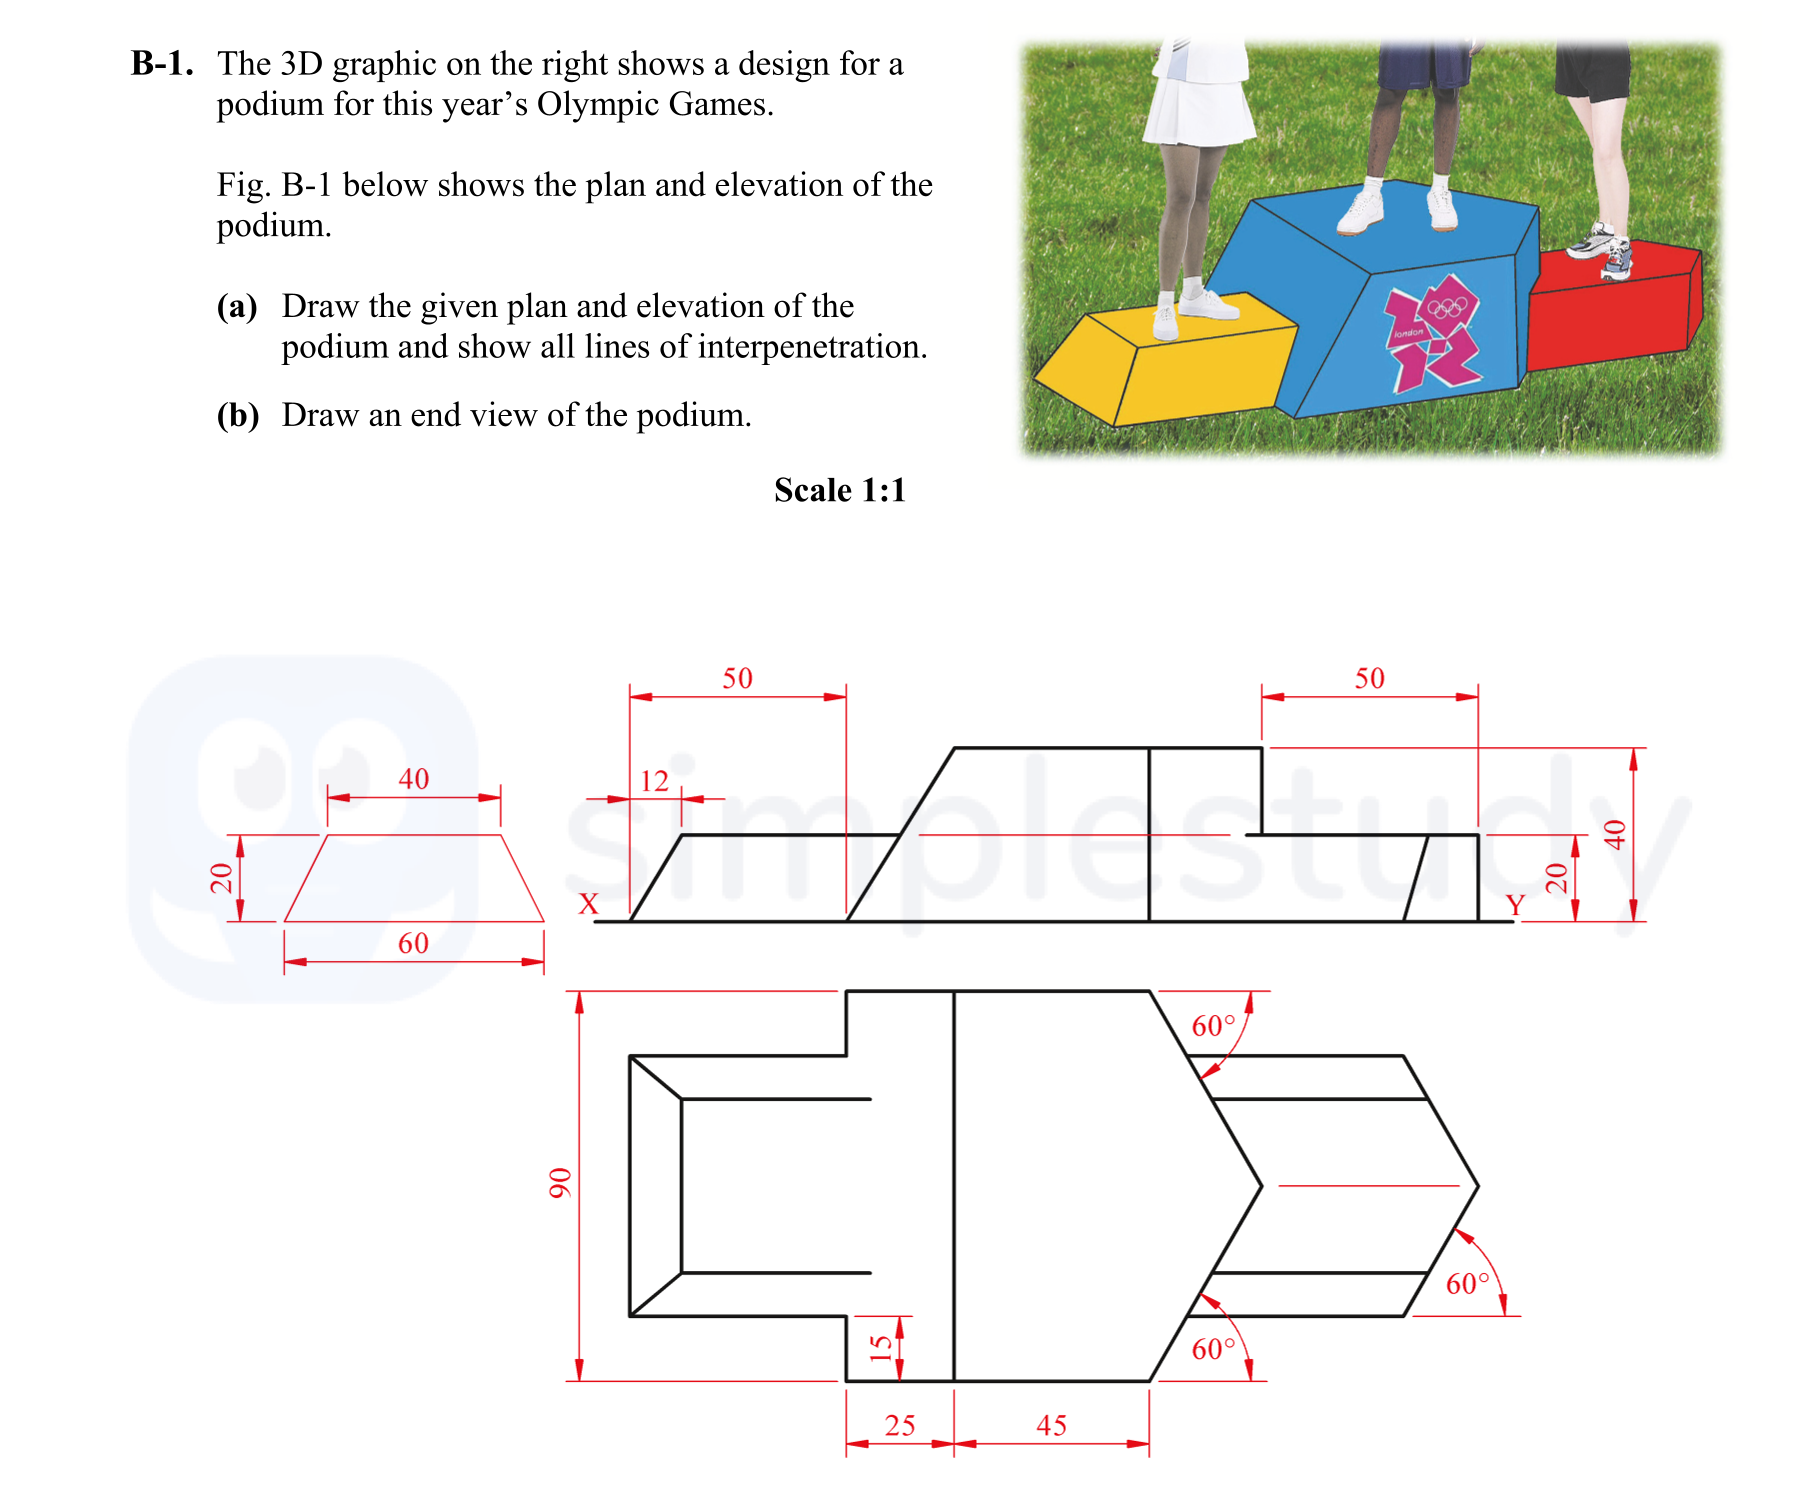
The 3D graphic on the right shows a design for a podium for this year’s Olympic Games.
Fig. B-1 below shows the plan and elevation of the podium.
(a) Draw the give... show full transcript
Worked Solution & Example Answer:The 3D graphic on the right shows a design for a podium for this year’s Olympic Games - Leaving Cert DCG - Question B-1 - 2012
Step 1
Draw the given plan of the podium as given
96%
114 rated
Only available for registered users.
Sign up now to view full answer, or log in if you already have an account!
Answer
Begin by accurately drawing the plan view of the podium as depicted in the image. Use the provided dimensions to ensure a 1:1 scale representation. Start with the outer edges, clearly marking the base and the steps.
Step 2
Complete the plan as given
99%
104 rated
Only available for registered users.
Sign up now to view full answer, or log in if you already have an account!
Answer
Once the basic structure is in place, focus on adding any necessary internal lines and details that represent the design features, ensuring they correspond with the elevation view for consistency.
Step 3
Draw the elevation of the podium as given
96%
101 rated
Only available for registered users.
Sign up now to view full answer, or log in if you already have an account!
Answer
Next, draw the elevation of the podium by following the provided outline. Pay attention to the heights of different sections and ensure that they correspond accurately to the scaling from the plan.
Step 4
Complete the elevation as given
98%
120 rated
Only available for registered users.
Sign up now to view full answer, or log in if you already have an account!
Answer
Finalize the elevation by adding details that were not included in the initial drawing, such as line shading to depict the different surfaces.
Step 5
Projection from LHS of elevation
97%
117 rated
Only available for registered users.
Sign up now to view full answer, or log in if you already have an account!
Answer
Project the left-hand side elevation from the original plan ensuring the lines are perpendicular to the horizontal plane, letting the viewer see the left profile.
Step 6
Locate points on LHS in plan
97%
121 rated
Only available for registered users.
Sign up now to view full answer, or log in if you already have an account!
Answer
Identify key reference points on the left-hand side in the plan view that correspond to the sections previously drawn in the elevation.
Step 7
Complete LHS of plan
96%
114 rated
Only available for registered users.
Sign up now to view full answer, or log in if you already have an account!
Answer
Using the reference points, complete the left-hand side representation in the plan ensuring all lines are accurately represented and aligned.
Step 8
Projections from RHS of plan
99%
104 rated
Only available for registered users.
Sign up now to view full answer, or log in if you already have an account!
Answer
From the right-hand side, initiate projections from the plan to enhance the understanding of the dimensions and angles present in the design.
Step 9
Locate points on RHS in elevation
96%
101 rated
Only available for registered users.
Sign up now to view full answer, or log in if you already have an account!
Answer
Similar to the LHS, locate important points from the right-hand side elevation, clearly marking their positions relative to the other features.
Step 10
Complete RHS of elevation
98%
120 rated
Only available for registered users.
Sign up now to view full answer, or log in if you already have an account!
Answer
Finalize the right-hand side elevation by connecting the located points with straight lines to give a complete representation of the podium.
Step 11
Transfer of widths from plan
97%
117 rated
Only available for registered users.
Sign up now to view full answer, or log in if you already have an account!
Answer
Begin the end view by transferring the relevant widths obtained from the plan. Ensure width representation is clear and precise to maintain the integrity of the design.
Step 12
Projection of heights from elevation
97%
121 rated
Only available for registered users.
Sign up now to view full answer, or log in if you already have an account!
Answer
Project the heights directly from the elevation view to define the vertical aspects of the podium in the end view accurately.
Step 13
End view of centre prism
96%
114 rated
Only available for registered users.
Sign up now to view full answer, or log in if you already have an account!
Answer
Draw the center prism of the podium, ensuring that proportions and perspectives align with the previously drawn views.
Step 14
Complete end view
99%
104 rated
Only available for registered users.
Sign up now to view full answer, or log in if you already have an account!
Answer
Finalize the end view by detailing any remaining lines and shapes needed to provide a clear view of the podium. Ensure that the presentation is neat and all sections are aligned properly.
Join the Leaving Cert students using SimpleStudy...