The 3D graphic on the right shows a climbing pole from a children's playground - Leaving Cert DCG - Question B-2 - 2018
Question B-2
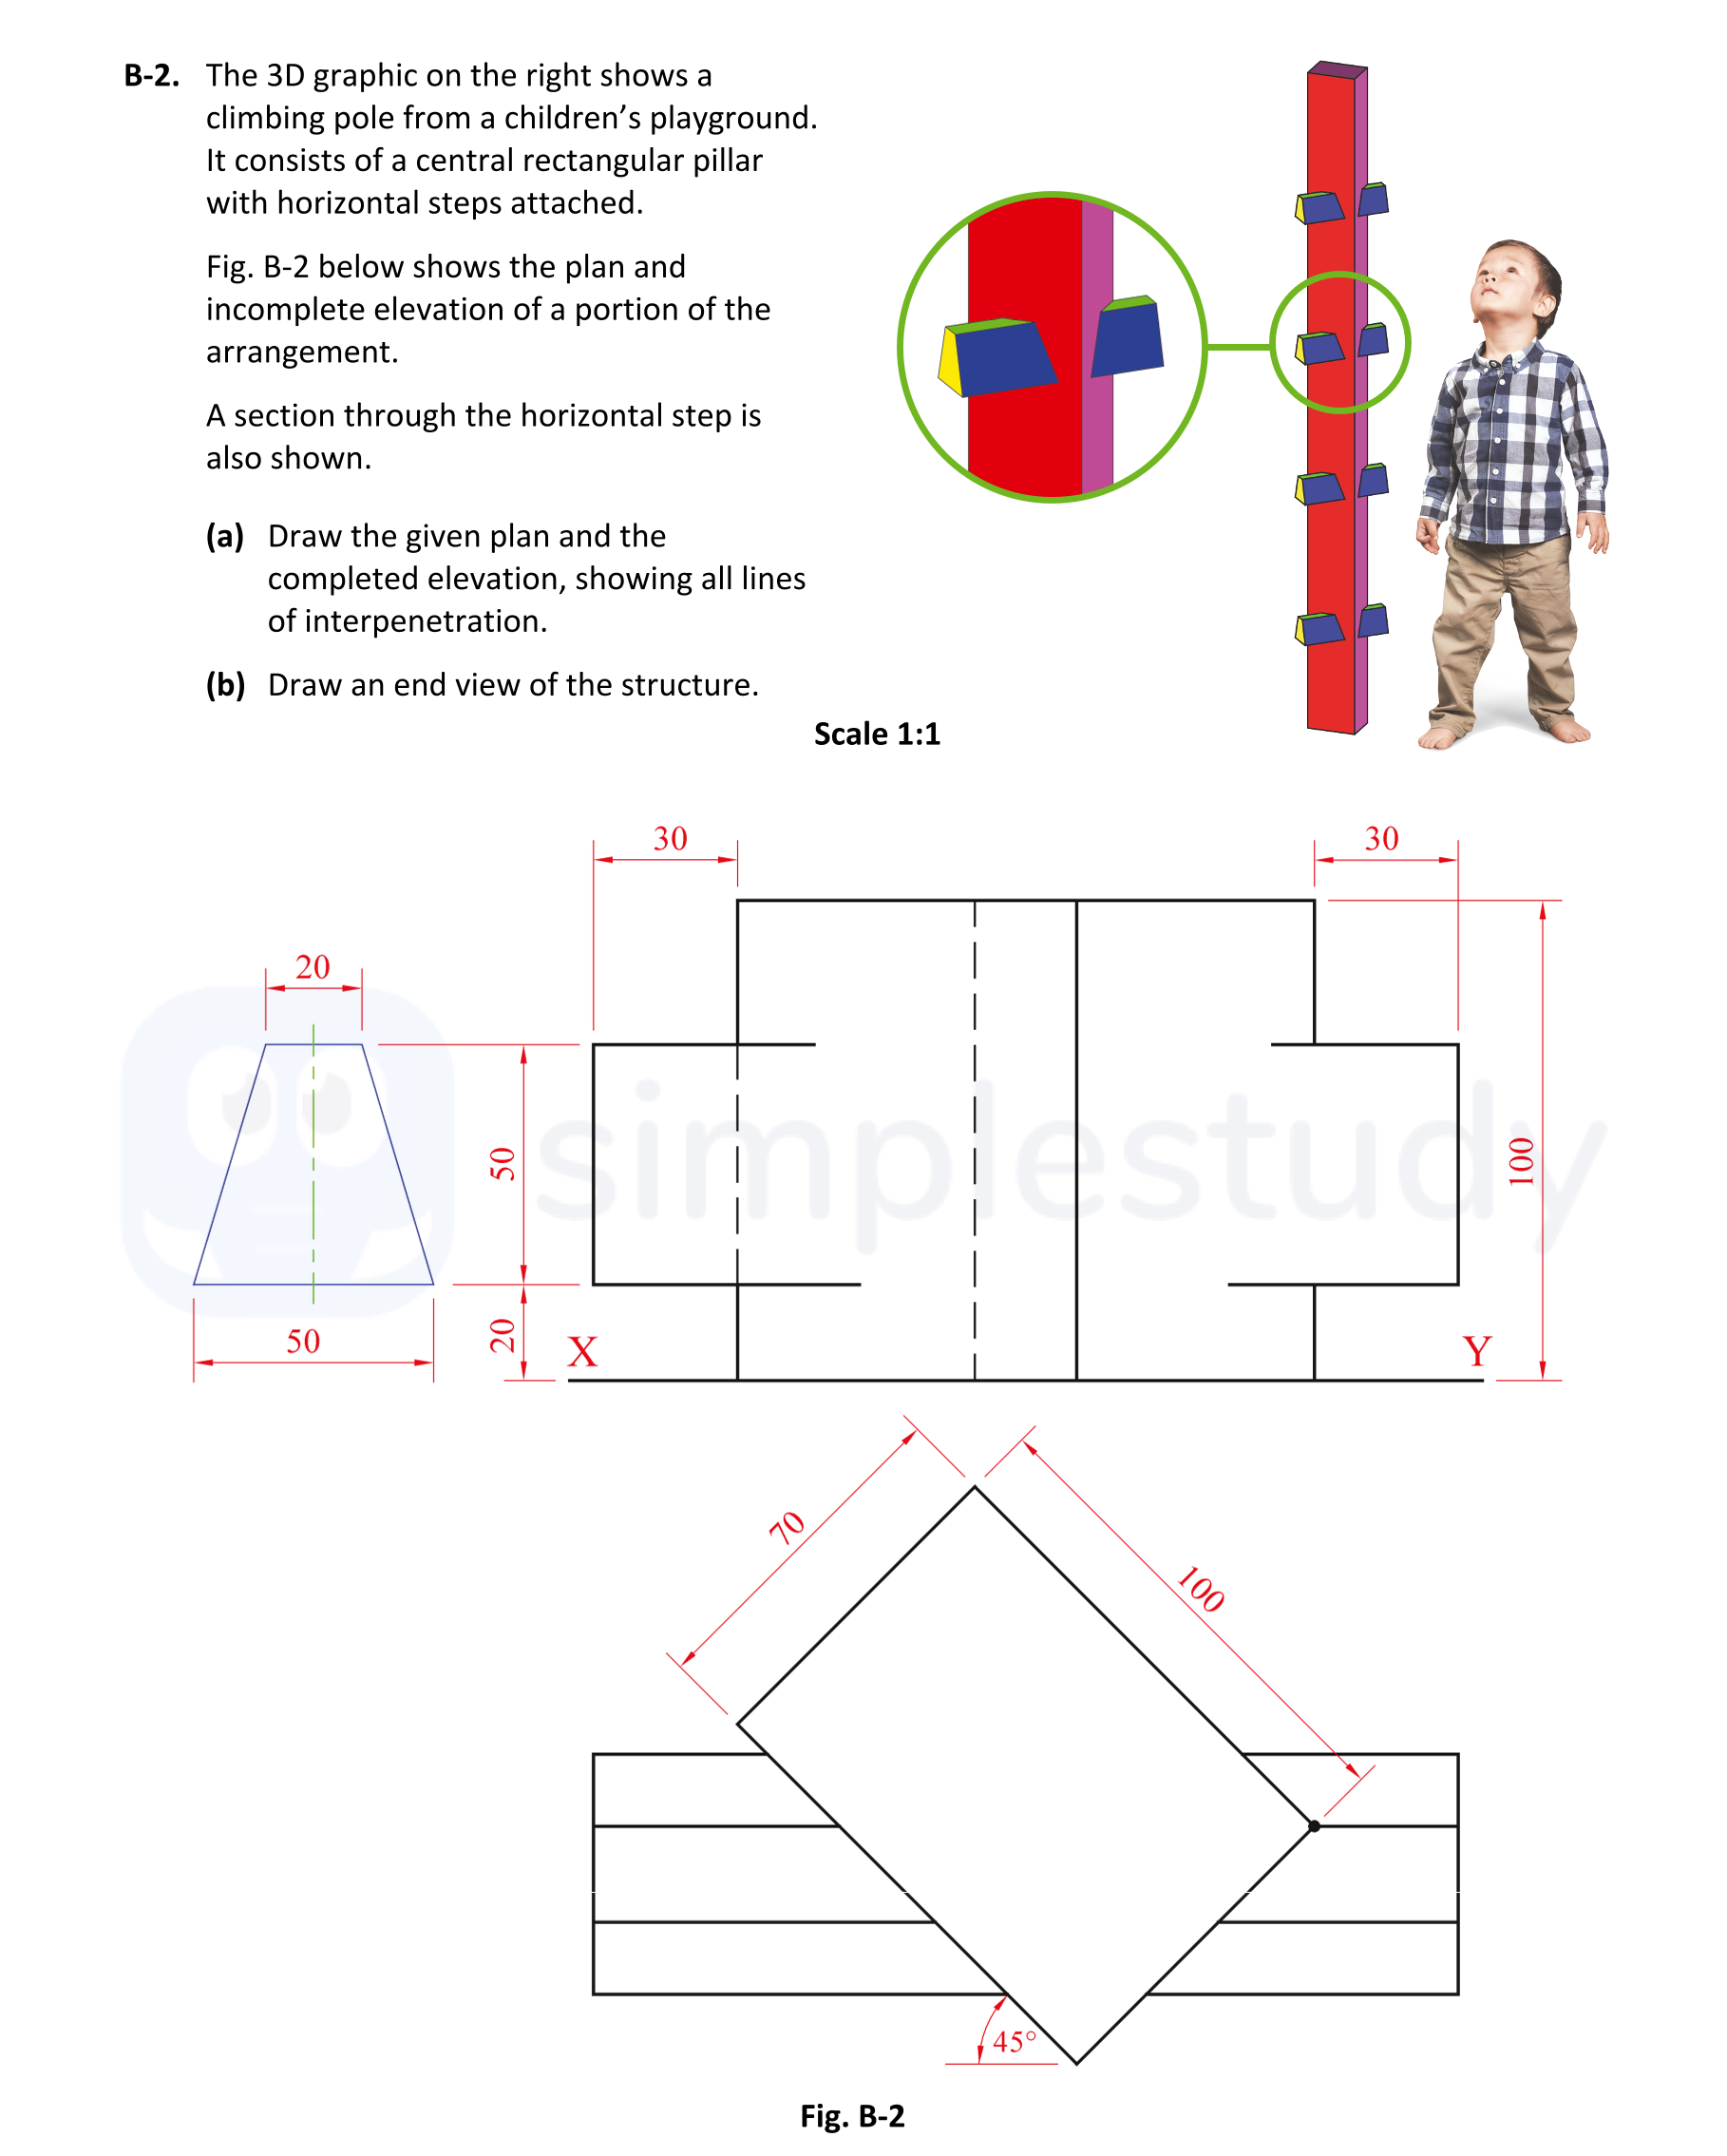
The 3D graphic on the right shows a climbing pole from a children's playground. It consists of a central rectangular pillar with horizontal steps attached.
Fig. B-2... show full transcript
Worked Solution & Example Answer:The 3D graphic on the right shows a climbing pole from a children's playground - Leaving Cert DCG - Question B-2 - 2018
Step 1
Draw the given plan as given
96%
114 rated
Only available for registered users.
Sign up now to view full answer, or log in if you already have an account!
Answer
Start by drawing the plan of the climbing pole. Use accurate measurements from the figure, ensuring the central rectangular pillar is properly represented with the noted dimensions.
Step 2
Draw the plan of step as given
99%
104 rated
Only available for registered users.
Sign up now to view full answer, or log in if you already have an account!
Answer
Next, illustrate the plan of the horizontal step. This should be drawn directly adjacent to the central pillar, maintaining the specified dimensions for clarity.
Step 3
Draw the elevation of the pillar as given
96%
101 rated
Only available for registered users.
Sign up now to view full answer, or log in if you already have an account!
Answer
Create the elevation view of the pillar, placing it in the correct position relative to the steps from the plan. Ensure the height and proportions match the given specifications.
Step 4
Draw the elevation of the step as given
98%
120 rated
Only available for registered users.
Sign up now to view full answer, or log in if you already have an account!
Answer
Draw the elevation view of the horizontal step, ensuring it aligns properly with the elevation view of the pillar to maintain consistency.
Step 5
Projections from LHS of plan
97%
117 rated
Only available for registered users.
Sign up now to view full answer, or log in if you already have an account!
Answer
Project lines from the left-hand side (LHS) of the plan to assist in developing the elevation view, including horizontal and vertical projections.
Step 6
Locate points on LHS in elevation
97%
121 rated
Only available for registered users.
Sign up now to view full answer, or log in if you already have an account!
Answer
Mark key points on the LHS of the elevation based on projections established from the plan, ensuring accuracy in distance and height.
Step 7
Complete LHS of elevation
96%
114 rated
Only available for registered users.
Sign up now to view full answer, or log in if you already have an account!
Answer
Finish the left-hand side of the elevation by connecting all projected lines and marking the features of the structure clearly.
Step 8
Projections from RHS of plan
99%
104 rated
Only available for registered users.
Sign up now to view full answer, or log in if you already have an account!
Answer
Similar to the LHS, add projections from the right-hand side (RHS) of the plan to guide the elevation development.
Step 9
Locate points on RHS in elevation
96%
101 rated
Only available for registered users.
Sign up now to view full answer, or log in if you already have an account!
Answer
Identify and mark the relevant points on the RHS of the elevation drawing, using the projections to maintain proportion.
Step 10
Complete RHS of elevation
98%
120 rated
Only available for registered users.
Sign up now to view full answer, or log in if you already have an account!
Answer
Finalize the right-hand side elevation by linking projected points and detailing the structural elements accordingly.
Step 11
Transfer of widths from plan
97%
117 rated
Only available for registered users.
Sign up now to view full answer, or log in if you already have an account!
Answer
For the end view, start by transferring the widths noted in the plan accurately, ensuring the representation maintains scale.
Step 12
Projection of heights from elevation
97%
121 rated
Only available for registered users.
Sign up now to view full answer, or log in if you already have an account!
Answer
Use the elevation drawing to project heights onto the end view, ensuring vertical accuracy reflects the structure.
Step 13
End view of pillar
96%
114 rated
Only available for registered users.
Sign up now to view full answer, or log in if you already have an account!
Answer
Create the end view of the pillar, reflecting the rectangular shape and height identified in the previous views.
Step 14
Complete end view
99%
104 rated
Only available for registered users.
Sign up now to view full answer, or log in if you already have an account!
Answer
Finish the end view by adding the complete definition of both the pillar and the steps, ensuring alignment and proportions match.
Step 15
Presentation
96%
101 rated
Only available for registered users.
Sign up now to view full answer, or log in if you already have an account!
Answer
Ensure that the final drawings are clear, neat, and properly labeled to enhance overall presentation.
Join the Leaving Cert students using SimpleStudy...