Page Setup (Grade 10 NSC Matric Computer Application Technology): Revision Notes
Page Setup
Page setup in word processing allows you to improve your document's appearance and layout after you've finished writing and reviewing your content. These formatting options help make your document more professional and easier to read by organising text into columns, adding visual elements like watermarks, customising background colours, and creating clickable links.
Columns
Columns are particularly useful for creating professional-looking documents that are easy to read. Think about how newspapers organise their content - they use columns because this layout improves readability and allows more text to fit on a single page without overwhelming the reader.
Why Columns Work So Well
Newspapers are an example of a publication using columns. Columns improve the readability and a lot more text can be fitted onto one page. The narrower text width makes it easier for readers' eyes to track from line to line, reducing fatigue and improving comprehension.
Creating columns in your document
To set up columns in your document, you'll work with the Layout tab in Word's ribbon interface. First, select the text you want to format into columns. Then navigate to the Layout tab and look for the Columns command in the Page Setup group.
When you click on Columns, you'll see a dropdown menu with preset options like One, Two, Three, Left, and Right. These presets give you quick access to the most common column layouts. If you need more control over your columns, select More Columns to open the Columns dialogue box.
Customising column appearance
The Columns dialogue box provides detailed control over your column formatting. You can specify exactly how many columns you want and adjust both the width and spacing between columns. The preview section shows you how your changes will look before you apply them.
Worked Example: Creating Custom Column Widths
Step 1: Open the Columns dialogue box
- Select your text and go to Layout > Columns > More Columns
Step 2: Customise the layout
- Deselect "Equal column width" checkbox
- Adjust individual column widths as needed
- Set spacing between columns (typically 0.5" works well)
Step 3: Apply and review
- Click OK to apply changes
- Use Print Preview to check the final appearance
For documents where you need different column widths, you can deselect the Equal column width checkbox. This allows you to create custom layouts where one column might be wider than others, which is useful for newsletters or brochures.
Fine-tuning with ruler markers
Once you've created your columns, you can make precise adjustments using the indent markers on the ruler. These markers allow you to control column alignment and spacing visually, making it easy to create exactly the layout you need.
Managing column content
Column breaks are essential when you want specific content to appear at the top of a new column. You can insert column breaks through the Layout tab under Page Setup, then selecting Breaks and choosing Column Break. This ensures important headings or sections start fresh in a new column rather than appearing partway down.
To remove columns entirely, simply place your cursor in the columned text, access the Columns menu, and select One to return to a single-column layout.
Hyphenation
Hyphenation helps solve the problem of awkward gaps that can appear at the end of lines when words are too long to fit properly. When hyphenation is enabled, long words are broken into smaller parts with a hyphen connecting them across line breaks.
Word offers two hyphenation options:
Automatic hyphenation means the programme automatically inserts hyphens where needed as you type. This creates more even text spacing without any effort on your part.
Manual hyphenation gives you control over which words get hyphenated. The programme will suggest places where hyphens could be inserted, but you decide whether to accept each suggestion.
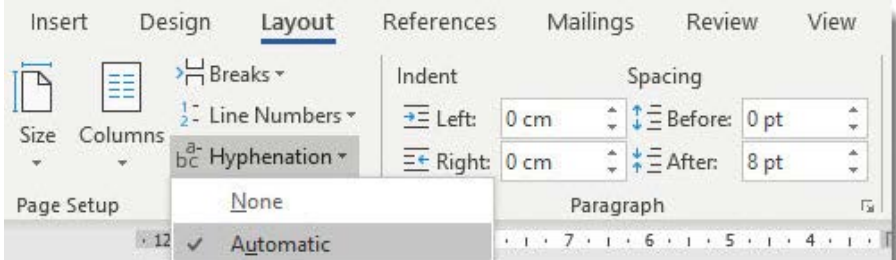
Default Hyphenation Setting
By default, Word sets hyphenation to "None," so you'll need to actively enable it if you want to use this feature. Access hyphenation settings through the Layout tab in the Page Setup group, where you can choose between Automatic, Manual, or turn hyphenation off entirely.
Watermarks and page colour
Understanding watermarks
A watermark is a faded image or text that sits behind your document's main content. Watermarks are commonly used to mark documents as Confidential, Draught, or to add company logos without interfering with the document's readability.
What Makes a Good Watermark
A watermark is a faded image that can be text or a picture. The watermark appears behind the text in the document. The key is ensuring it's light enough not to interfere with reading the main document text while still being visible enough to serve its purpose.
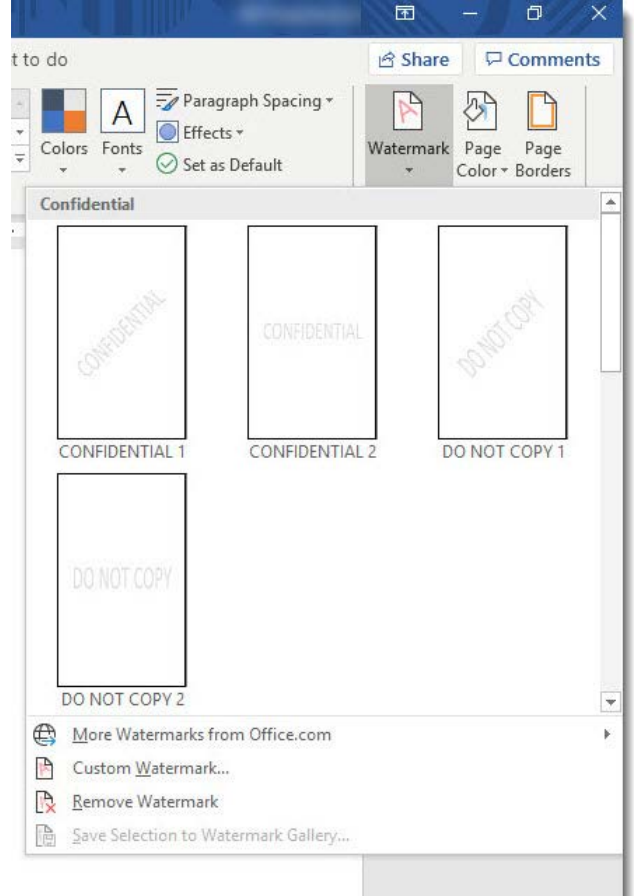
Word provides built-in watermark designs including Confidential and Do Not Copy options, or you can create custom watermarks using your own images or text. When choosing or creating a watermark, ensure it's light enough not to interfere with reading the main document text.
Creating custom watermarks
For image watermarks, select Custom Watermark from the Watermark dropdown menu, then choose Picture watermark. You can browse to select any image from your computer. The dialogue box allows you to adjust the scale (how large the watermark appears) and whether it should be washed out (made transparent) for better text readability.
Worked Example: Adding a Text Watermark
Step 1: Access the watermark options
- Go to Design tab > Page Background > Watermark
Step 2: Create custom text watermark
- Select "Custom Watermark"
- Choose "Text watermark"
- Enter your text (e.g., "CONFIDENTIAL")
Step 3: Format the watermark
- Select font and size
- Choose colour (light grey recommended)
- Set layout to diagonal or horizontal
- Check "Semitransparent" for best results
Text watermarks give you even more customisation options. You can specify the text content, font, size, colour, and layout orientation. Whether you choose diagonal or horizontal orientation depends on your document's needs and aesthetic preferences.
To remove any watermark, simply return to the Watermark menu and select Remove Watermark.
Adding page background colours
Page background colours can make your document more visually appealing or help it align with brand colours. Access this feature through the Page Colour option in the Page Background group on the Design tab.
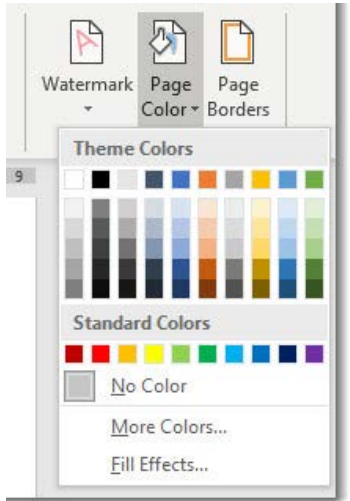
The colour menu provides Theme Colours that coordinate with your document's overall design scheme, as well as Standard Colours for basic options. If you need a specific colour not shown, select More Colours for an expanded colour palette.
Advanced background effects
For more sophisticated backgrounds, explore the Fill Effects option. This opens additional possibilities including gradients (smooth colour transitions), textures, patterns, or even pictures as backgrounds. These effects can add visual interest while maintaining document professionalism.
To remove a background colour, return to the Page Colour menu and select No Colour.
Hyperlinks
Hyperlinks transform static documents into interactive experiences by creating clickable connections to other documents, websites, or different parts of the same document. A hyperlink consists of two main components: the address (URL) that specifies where the link goes, and the display text that appears in your document.
Understanding Hyperlinks
Hyperlinks are used to link a word processing document to an external document, file or website. They create a bridge between your document and other resources, making information more accessible and documents more dynamic.
Creating effective hyperlinks
The simplest way to create a hyperlink is to type a web address and press Enter or the spacebar. Word automatically converts recognisable URLs into clickable links. However, for more control over how links appear and function, you can manually create hyperlinks through the Insert tab.
When manually creating hyperlinks, select the text you want to make clickable, then choose Hyperlink from the Links group on the Insert tab. This opens the Insert Hyperlink dialogue box where you can specify exactly where the link should go and how it should appear.
Internal document linking
Hyperlinks aren't limited to external websites - you can create links that jump to different sections within the same document. This is particularly useful for long documents with tables of contents or cross-references. Choose Place in This Document when creating the hyperlink to see available internal destinations.
Managing hyperlinks
After creating hyperlinks, it's important to test them to ensure they work correctly. Click on any hyperlink to verify it opens the intended destination. If a hyperlink doesn't work as expected, check that you've entered the correct address or file path.
Hyperlink Maintenance
Always test your hyperlinks after creation and before sharing your document. Broken links can frustrate readers and make your document appear unprofessional.
To remove a hyperlink while keeping the display text, right-click on the link and select Remove Hyperlink from the context menu. This converts the clickable text back to regular formatting while preserving the words themselves.
Key Points to Remember:
-
Columns improve readability - Use them to create professional layouts that make text easier to scan and read, especially for longer documents
-
Hyphenation creates even spacing - Enable automatic hyphenation to eliminate awkward gaps at line endings and create more polished-looking text
-
Watermarks add professional branding - Use them for document status (like "Draught" or "Confidential") or to subtly include logos without disrupting content
-
Background colours enhance visual appeal - Choose colours that complement your content and maintain readability, using fill effects for more sophisticated designs
-
Test hyperlinks after creation - Always verify that links work correctly and lead to the intended destinations before sharing your document