Exam skills 5 (AQA GCSE Design and Technology): Revision Notes
Exam skills 5: Technical drawing and calculations
This section focuses on essential skills for completing technical drawings and performing related calculations in your GCSE exams. These questions test your ability to interpret, create, and work with different types of technical drawings.
Technical drawing questions are common in GCSE exams and combine both visual interpretation skills and mathematical calculation abilities. Success requires understanding both the theory behind different drawing techniques and practical application skills.
Complete the drawing
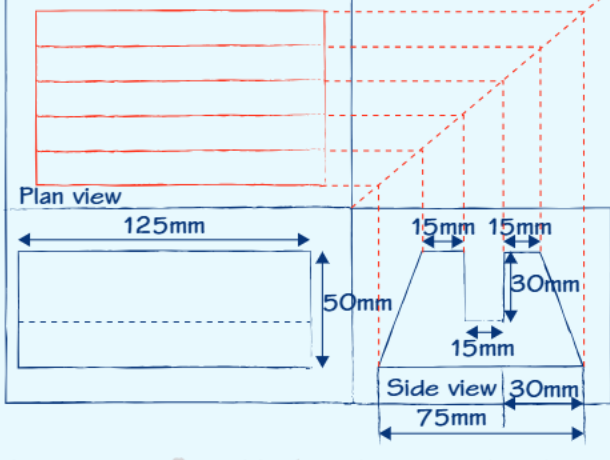
When you encounter questions asking you to complete a drawing, you're being tested on your understanding of orthographic projections. These questions typically involve converting between 3D objects and their 2D representations.
Understanding orthographic projection means recognising how a three-dimensional object appears when viewed from different angles. The most common views you'll work with are:
- Plan view: Looking down at the object from above
- Front view: Looking at the object straight-on from the front
- Side view: Looking at the object from the side
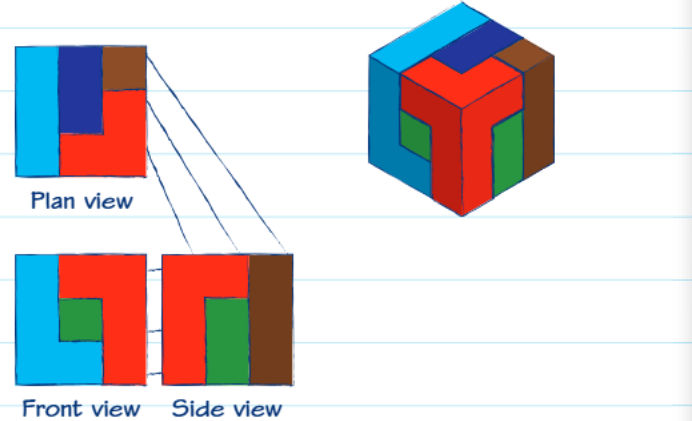
The key to success with these questions is carefully analysing the given views and understanding how they relate to each other. Each view shows specific faces and edges of the same object, so you need to match up corresponding features across different projections.
When completing missing views, pay attention to:
Essential elements to consider:
- Which edges are visible as solid lines
- Which edges are hidden and shown as dashed lines
- How dimensions and proportions relate between views
- The overall shape and structure of the object
Drawing isometric, perspective or orthographic projections
These questions require you to produce accurate technical drawings using specific drawing techniques. Success depends on following systematic approaches and using proper construction methods.
Creating isometric drawings
Isometric drawings show three-dimensional objects in a way that displays three faces simultaneously. This technique is particularly useful for technical illustrations because it provides a clear view of an object's overall form.
Worked Example: Systematic Isometric Drawing Process
Follow this systematic approach when creating isometric drawings:
Step 1: Start with a vertical edge - Begin by drawing this as a perfectly straight vertical line
Step 2: Add construction lines - Draw these at 30-degree angles from your initial vertical line
Step 3: Complete the vertical framework - Fill in additional vertical lines to establish the object's height
Step 4: Add horizontal construction lines - Draw these from your vertical lines to create the framework
Step 5: Draw the final object - Complete the drawing within your construction framework
 Using construction lines effectively
Construction Line Techniques:
Construction lines are essential tools for creating accurate technical drawings. These guidelines help you maintain proper proportions and angles throughout your drawing process. When working on grid paper, use the existing grid structure to help you draw construction lines accurately.
The construction lines should be drawn lightly so they can guide your work without interfering with the final drawing. They help ensure that all parts of your drawing align correctly and maintain the proper perspective.
Working with calculations
Technical drawing questions often include calculation components, particularly involving surface areas and volumes of cut materials or manufactured objects.
Surface area calculations
When calculating surface areas for cut materials, you need to identify all the surfaces that will be exposed after cutting. For example, when cutting triangular sections from a rectangular block, you must calculate the area of the newly exposed triangular faces.
Worked Example: Surface Area Calculation Process
The process typically involves:
Step 1: Identifying the shapes of cut surfaces
Step 2: Calculating individual areas using appropriate formulas
Step 3: Adding areas together for total surface area calculations
Volume calculations
Volume calculations help determine material usage and waste. When objects are cut or modified, you can calculate the volume of removed material by:
Worked Example: Volume Calculation Method
Step 1: Finding the area of the cut cross-section
Step 2: Multiplying by the length or depth of the cut
Step 3: Converting units appropriately (often from mm³ to cm³)
For rectangular cuts, the calculation becomes:
where the area might be the sum of multiple geometric shapes.
Exam technique tips
Essential Exam Strategies:
Successful completion of technical drawing questions requires both technical knowledge and good exam technique. Always use a ruler for straight lines and take time to plan your approach before starting to draw.
When working with dimensions, pay careful attention to the units given and ensure your final answers match the required format. Some questions specify particular units or decimal places for your final answer.
Grid paper can be extremely helpful for maintaining accuracy in your drawings. Use the grid lines as guides for construction lines and to ensure proper proportions in your finished drawings.
Key Points to Remember:
- Master the relationship between plan, front, and side views in orthographic projection
- Follow the systematic 5-step process for creating accurate isometric drawings
- Use construction lines to maintain accuracy and proper proportions in all technical drawings
- Practice surface area and volume calculations with cut materials and geometric shapes
- Always use appropriate tools like rulers and pay attention to required units in calculations