Problems in three dimensions (AQA GCSE Further Maths): Revision Notes
Problems in three dimensions
Introduction to 3D geometry problems
Three-dimensional geometry problems require you to visualise and work with objects that have length, width, and height. These problems often involve finding distances, angles, and areas within 3D structures like buildings, frameworks, or geometric solids.
When solving 3D problems, you'll need to combine your knowledge of trigonometry, Pythagoras' theorem, and geometric principles. The key is breaking down complex 3D situations into manageable 2D calculations.
The most effective approach to 3D problems is to break them down into smaller, more manageable 2D calculations. This allows you to use familiar trigonometric and geometric techniques on simpler components of the overall problem.
Types of 3D problems
Structural problems
Many 3D problems involve real-world structures. For example, you might need to find the lengths of support struts in a roof framework or calculate distances between different points in a building structure.
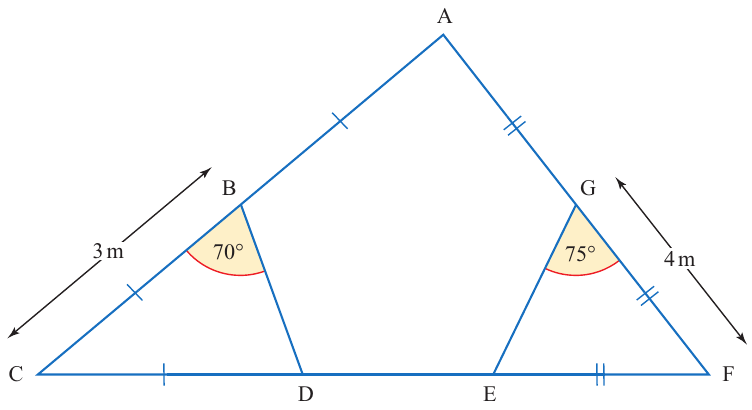
In problems like the timber roof cross-section shown above, you'll typically need to use the given angle measurements and lengths to calculate unknown distances. The diagram shows angles of 70° and 75°, along with measurements of 3m and 4m, which would be used to find the lengths of struts BD and EG, as well as the length DE.
Navigation and bearing problems
Another common type involves navigation problems where people or vehicles travel in different directions using compass bearings. These problems often require you to create triangles and use trigonometry to find final distances between starting and ending points.
Real-world applications
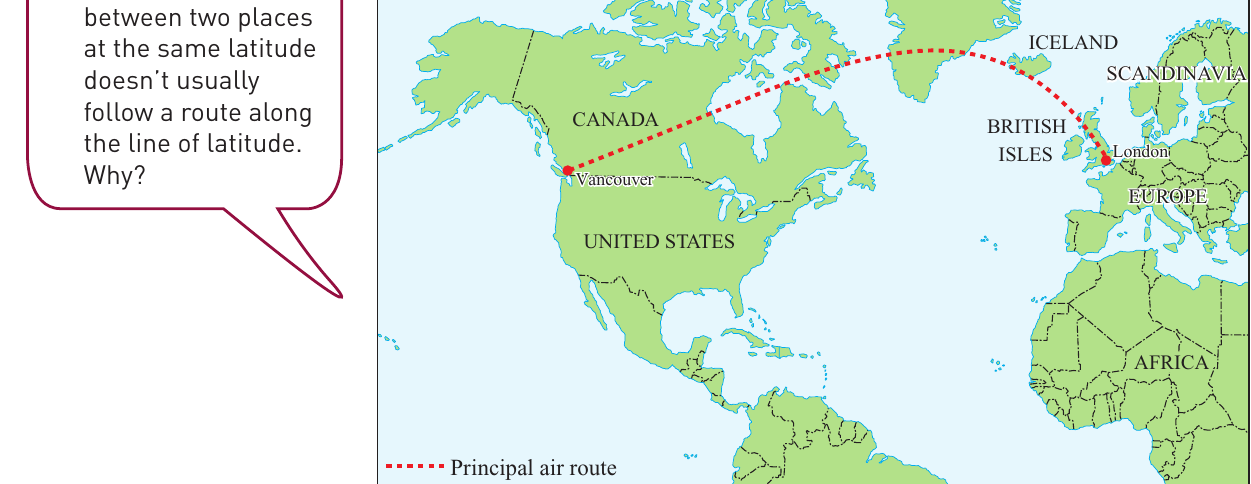
The shortest path between two locations on Earth's surface doesn't always follow what appears to be a straight line on a map. This is because Earth is spherical, so the shortest distance (called a great circle route) appears curved when shown on a flat map projection.
Understanding that Earth is spherical rather than flat is crucial for navigation problems. What looks like a straight line on a map may not actually be the shortest distance between two points in reality.
Drawing three-dimensional objects
Creating clear diagrams is essential for solving 3D problems successfully. There are specific techniques you must follow to represent 3D objects accurately on paper.
Isometric projection rules
When drawing 3D objects using isometric projection, follow these four fundamental rules:
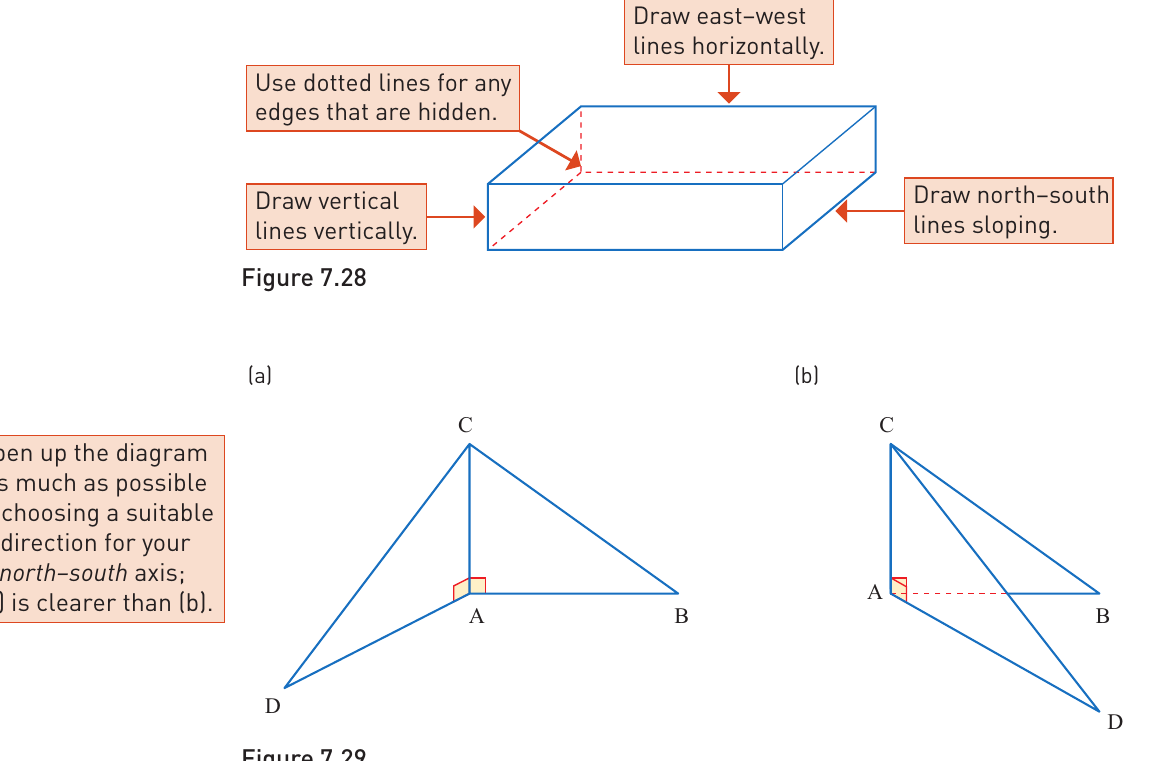
The Four Fundamental Rules of Isometric Projection:
- Horizontal lines: Draw all east-west lines as straight horizontal lines on your paper
- Vertical lines: Draw all vertical lines as straight vertical lines
- Sloping lines: Draw all north-south lines with a slope (typically at about 30° to the horizontal)
- Hidden edges: Use dotted lines for any edges that cannot be seen from your viewing angle
These rules are essential for creating accurate 3D representations that can be used for mathematical calculations.
Choosing the best orientation
When drawing 3D diagrams, consider different orientations to find the clearest representation. Some orientations make the spatial relationships more obvious than others. Always choose the orientation that makes your diagram as clear as possible, especially when you need to identify right angles or measure specific distances.
True shape diagrams
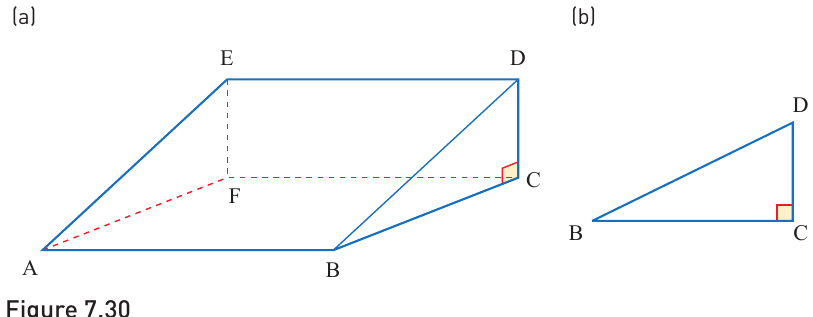
One of the most important concepts when working with 3D problems is understanding that right angles don't always appear as 90° angles when viewed in a 3D representation.
Why true shape diagrams are necessary
When you look at a 3D object from certain angles, right angles can appear distorted. This means that if you need to perform calculations involving right angles, you may need to draw separate 2D diagrams where the right angles appear correctly as 90°.
Critical Concept: Right Angle Distortion
Right angles in 3D objects often appear distorted when viewed from certain perspectives. If you use these distorted angles in trigonometric calculations, your answers will be incorrect. Always create true shape diagrams when working with right angles.
Creating true shape diagrams
To create a true shape diagram:
- Identify the face or cross-section of the 3D object that contains the right angle you need to work with
- Draw this face separately as a 2D shape
- Ensure that right angles appear as genuine 90° angles in your 2D diagram
- Use this accurate 2D representation for your trigonometric calculations
- Transfer your results back to the original 3D context
Step-by-step problem solving approach
Step 1: Understand the problem
Read the problem carefully and identify what information you're given and what you need to find.
Step 2: Draw a clear diagram
Create an accurate 3D representation using isometric projection rules, or draw the situation as described in the problem.
Step 3: Identify the mathematics needed
Determine whether you need to use Pythagoras' theorem, trigonometry, or other geometric principles.
Step 4: Create true shape diagrams if necessary
If your calculations involve right angles that appear distorted in the 3D view, draw separate 2D diagrams where these angles appear correctly.
Step 5: Perform calculations
Use your true shape diagrams to calculate unknown lengths, angles, or areas using appropriate mathematical techniques.
Step 6: Check your answer
Verify that your answer makes sense in the context of the original problem.
Common exam tips and traps
Key exam tips:
- Always draw clear, labelled diagrams
- Use the correct projection method for 3D drawings
- Create true shape diagrams when working with right angles
- Show all your working clearly
- Check units in your final answer
Common Traps to Avoid:
- Using distorted angles from 3D views for trigonometric calculations
- Forgetting to use dotted lines for hidden edges
- Not labelling your diagrams clearly
- Confusing 2D and 3D measurements
- Missing the need for true shape diagrams when right angles are involved
These mistakes can lead to significant point losses in examinations, so always double-check these elements in your work.
Key Points to Remember:
- Three-dimensional problems require you to visualise objects with length, width, and height
- Use isometric projection rules: horizontal east-west lines, vertical lines stay vertical, sloping north-south lines, and dotted lines for hidden edges
- True shape diagrams are essential when right angles appear distorted in 3D views - draw separate 2D diagrams where right angles show as genuine 90°
- Break complex 3D problems into manageable 2D calculations using trigonometry and Pythagoras' theorem
- Always draw clear, labelled diagrams and show your working step-by-step for maximum marks