Using trace tables (Edexcel GCSE Computer Science): Revision Notes
Using trace tables
What are trace tables?
Trace tables are essential tools in computational thinking that help you track how variables change as an algorithm runs. Think of them as a step-by-step record of what happens during programme execution. Each column represents a different variable in your algorithm, plus columns for any input and output values that occur.
When you complete a trace table, you're doing what programmers call a "dry-run" - this means running through the code without actually using a computer, just using paper and pencil to follow the logic.
Trace tables are particularly valuable for debugging algorithms and understanding programme flow before you even run the code. They help you visualise exactly what's happening at each step of execution.
How to complete a trace table step by step
The key to successfully completing trace tables is to work through your algorithm line by line, updating the table whenever a variable changes. Here's the systematic approach:
Worked Example: Step-by-Step Trace Table Process
Step 1: Set up your table with columns for each variable mentioned in the algorithm, plus an output column if needed.
Step 2: Work through each line of code in order, updating the relevant columns when variables change.
Step 3: For loops, repeat the loop body until the condition becomes false, adding a new row for each iteration.
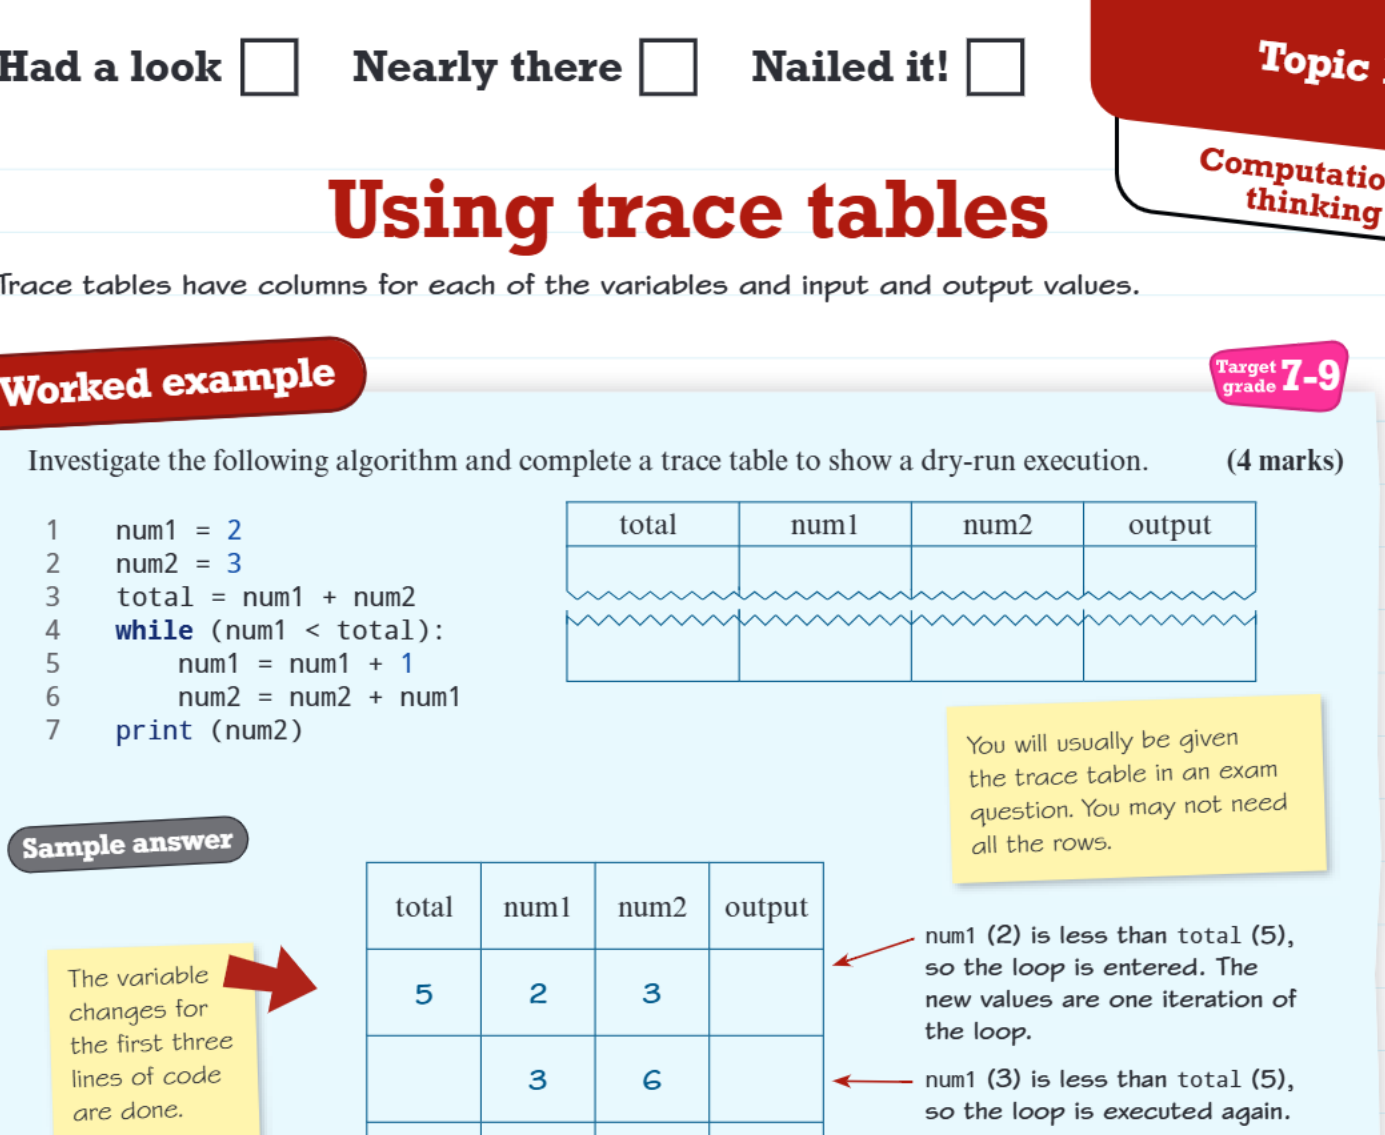
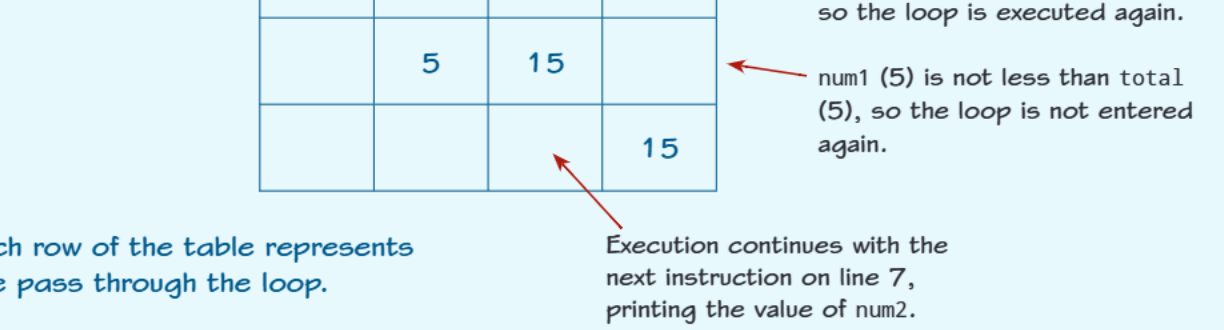
Let's look at a worked example to see this in action. The algorithm shown uses a while loop that continues as long as num1 is less than total.
Understanding loop execution in trace tables
Loops can be tricky in trace tables, but they follow predictable patterns. Understanding the flow is crucial for accurate completion.
Worked Example: While Loop Execution
Starting values: num1 = 2, num2 = 3, total = 5
Iteration 1:
- Check: is
num1 < total(is 2 < 5)? Yes - Execute loop:
num1becomes 3,num2becomes 6
Iteration 2:
- Check: is 3 < 5? Yes
- Execute loop:
num1becomes 4,num2becomes 10
Iteration 3:
- Check: is 4 < 5? Yes
- Execute loop:
num1becomes 5,num2becomes 15
Iteration 4:
- Check: is 5 < 5? No - Loop ends
- Continue to line 7: Print
num2value (15)
Once the loop condition fails, execution continues with the next instruction after the loop. Each row in your trace table represents one complete pass through the loop body, making it easy to track iterations and final values.
Practice with different loop types
Now let's examine a different type of loop - a for loop that uses a range:
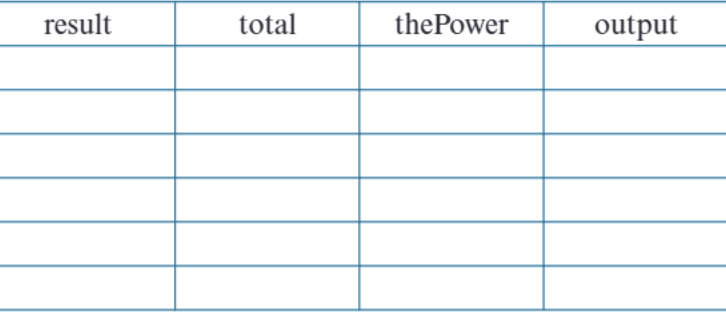
Worked Example: For Loop with Range
This algorithm uses for thePower in range(0, 4), which means:
- The loop runs 4 times with
thePowertaking values 0, 1, 2, and 3 - Each iteration calculates
2 ** thePower(2 to the power of thePower) - Adds the result to a running total
- Prints the current result
The key is understanding that range(0, 4) generates values from 0 up to (but not including) 4.
Exam tips for trace tables
What to expect: In your GCSE exam, you'll usually be given an empty trace table to complete. You might not need to fill in every row - the question will tell you how much to complete.
Common Mistakes to Avoid:
- Forgetting to update all relevant variables in each iteration
- Not checking loop conditions properly
- Missing the final output step after loops end
- Confusing the order of operations within loop bodies
Top Tip: Always check your loop condition before deciding whether to continue. This determines whether you add another row to your trace table or move on to the next instruction.
Remember!
Key Points to Remember:
- Trace tables track variable changes step by step during algorithm execution
- Each column represents a different variable, plus input/output values
- Each row typically represents one pass through a loop or one line of execution
- Always check loop conditions carefully to know when to stop iterating
- Work methodically through the code line by line - don't skip steps
- Practice makes perfect - the more trace tables you complete, the easier they become!