Map symbols and direction (Edexcel GCSE Geography A): Revision Notes
Map symbols and direction
Understanding how to read and interpret maps accurately is a fundamental geographical skill. This involves two key areas: recognising map symbols and understanding directional relationships between features.
Understanding map symbols
Ordnance Survey (OS) maps represent real-world features using standardised symbols rather than trying to draw everything to scale. This system allows maps to display complex landscape information clearly and consistently across different regions.
Each symbol on an OS map has a specific meaning that represents a particular type of feature or landmark. Learning these symbols helps you quickly identify what exists in any given area without needing detailed written descriptions.
The standardised symbol system used by Ordnance Survey ensures that the same feature will be represented identically on all OS maps, regardless of location. This consistency is what makes OS maps so reliable for navigation and geographical analysis.
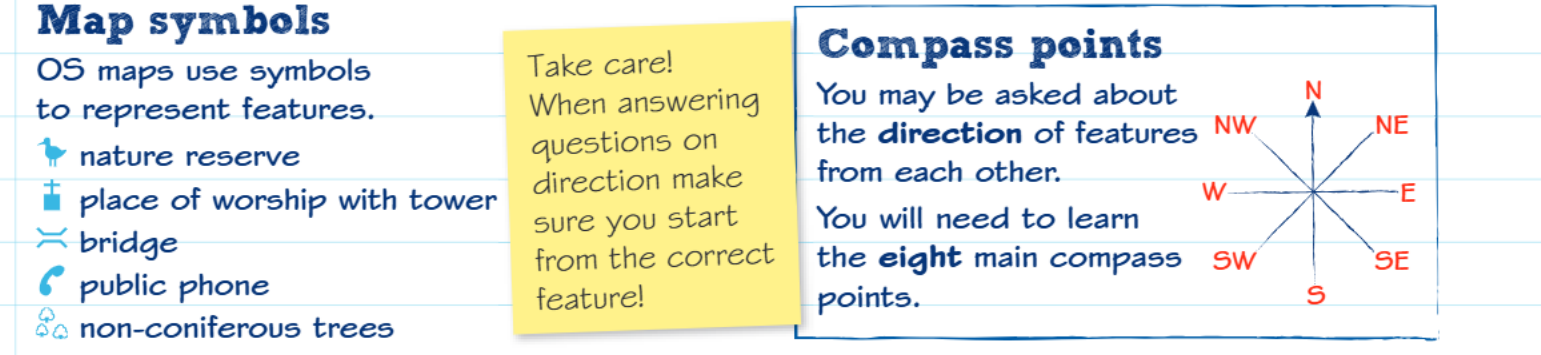
Common OS map symbols
Several frequently encountered symbols include:
- Nature reserve: Shown with a specific symbol to indicate protected wildlife areas
- Place of worship with tower: Represents churches, cathedrals, and similar religious buildings that have towers
- Bridge: Indicates where roads, railways, or paths cross over rivers, railways, or other obstacles
- Public phone: Shows the location of telephone boxes (though these are becoming less common)
- Non-coniferous trees: Represents deciduous woodland areas using tree symbols
When working with map symbols in examinations, you don't need to memorise every symbol. Instead, you should use the map's key or legend to identify unfamiliar symbols. However, becoming familiar with common symbols will help you work more efficiently.
Never guess the meaning of an unfamiliar symbol in an examination. Always refer to the map key or legend provided. Making assumptions about symbol meanings is a common mistake that can cost valuable marks.
Compass points and direction
Understanding direction is essential for describing the relative positions of features on a map. The compass system uses eight main points to indicate direction accurately.
The eight main compass points
The Eight Main Compass Directions
Master these eight compass points as they form the foundation of all directional work:
- N (North)
- NE (Northeast)
- E (East)
- SE (Southeast)
- S (South)
- SW (Southwest)
- W (West)
- NW (Northwest)
These directions help you describe where one feature is located in relation to another. For example, you might say "the village is northeast of the forest" or "the river flows from west to east."
Using directions effectively
When answering questions about direction, always ensure you start from the correct reference point. If asked "which direction is Feature A from Feature B," you must locate Feature B first, then determine where Feature A lies in relation to it.
Common Direction Mistake to Avoid
Direction questions often catch students out because they start from the wrong feature or confuse which feature they should be measuring from. Take time to read the question carefully and identify your starting point before determining the direction.
Worked Example: Finding Direction
Question: "In which direction is the church from the school?"
Step 1: Locate the school on the map (this is your starting point) Step 2: Locate the church on the map Step 3: Draw an imaginary line from the school to the church Step 4: Use your compass knowledge to determine the direction Step 5: State your answer: "The church is southeast of the school"
Understanding map scales
OS maps commonly use a scale of , which means that centimetre measured on the map represents centimetres (or metres) in the real world. This scale allows maps to show considerable detail while covering a reasonable area.
Understanding scale helps you appreciate the actual distances between features and the real size of areas shown on the map. This knowledge is particularly useful when planning routes or estimating travel times.
Scale Conversion Made Simple
Remember the easy conversion for 1:50000 scale maps:
- 1 cm on map = 500 m in real life
- 2 cm on map = 1 km in real life
This makes distance calculations much quicker during examinations.
Practical examination tips
When working with map questions in examinations, accuracy and attention to detail are crucial for success.
Essential Examination Techniques
- Always refer to the map key when unsure about symbol meanings
- Use a sharp pencil when drawing symbols to ensure accuracy
- Don't make symbols too large - they should be proportionate to the map
- Double-check your starting point when answering direction questions
- Take care to distinguish between similar-looking symbols
Map reading skills improve with practice, so spend time familiarising yourself with different types of OS maps and their features. The more you work with maps, the more confident you'll become at quickly identifying symbols and determining directions.
Key Points to Remember:
- OS maps use standardised symbols to represent different landscape features clearly and consistently
- Learn the eight main compass points (N, NE, E, SE, S, SW, W, NW) to describe directional relationships accurately
- Always check the map key when identifying unfamiliar symbols rather than guessing
- In direction questions, carefully identify your starting point before determining which way another feature lies
- The 1:50000 scale means 1cm on the map equals 500m in real life, helping you understand actual distances and sizes