Taps (Junior Cert Engineering): Revision Notes
Taps
What are taps?
Taps are specialised cutting tools designed to create internal threads inside holes in materials like metal, wood, or plastic. This process is called tapping. When you need to make threads inside a hole (like the threaded hole in a nut that a bolt screws into), you use a tap to cut those threads.

Taps are essential tools in manufacturing and engineering because they allow separate parts to be joined together using threaded fasteners like bolts and screws. Without taps, we couldn't create the internal threads needed for nuts, threaded holes in machinery, or any application requiring internal threading.
Types of taps
There are three main types of taps, each designed for a specific stage of the threading process. All three work together to create clean, accurate internal threads.
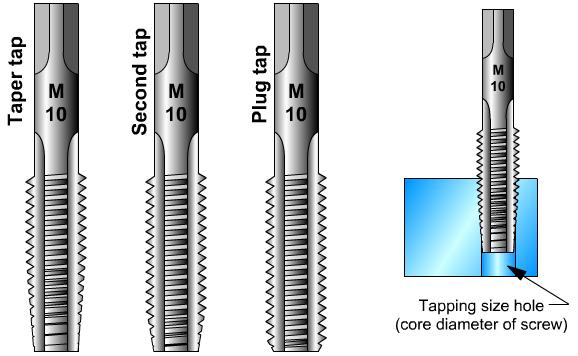
Taper tap
The taper tap is your starting tool. It has threads that are gradually tapered over the first 8 to 10 threads, which means the cutting edges start very small and gradually get bigger. This gentle introduction allows the tap to enter the hole easily and begin cutting threads without jamming or breaking. Think of it as the "gentle starter" that gets the threading process going.
Second tap
The second tap (also called an intermediate tap) is tapered over just the first four threads or so. It's used after the taper tap to continue deepening the threads. This tap does most of the heavy cutting work and is particularly important when tapping blind holes (holes that don't go all the way through the material).
Plug tap
The plug tap has only a very short taper - just one or two threads. It's used for finishing the threads, especially at the bottom of deep or blind holes where you need full-depth threads right to the end.
Tap Sequence for Best Results: Always use taps in the correct order: taper tap first (to start the threads), then second tap (for most of the cutting), and finally plug tap (for finishing). This sequence ensures clean, accurate threads and reduces the risk of tap breakage.
Tap construction and materials
Taps are manufactured from high-speed steel, making them extremely hard and durable. However, this hardness also makes them brittle, so they must be handled with care to avoid snapping, especially the smaller sizes.
Handle Taps with Care! While taps are made from high-speed steel for durability, this same hardness makes them brittle. Small taps especially can snap easily if forced or mishandled. Always apply steady, controlled pressure rather than force.
The key features of tap construction include:
- Flutes: These are the grooves running along the length of the tap. They serve two important purposes - they provide the actual cutting edges that slice through the material, and they create spaces for the metal chips to collect and escape
- Cutting edges: The sharp edges on the flutes that do the actual cutting work
- Rake angle: The angle of the cutting edge that helps with efficient cutting
- Clearance: Space behind the cutting edge to prevent rubbing
The square ends of taps are designed for gripping securely in a tap wrench, ensuring precise control during the tapping operation.
Tap wrenches
A tap wrench is the tool used to rotate taps during the threading process. There are two main types shown in the diagrams:
- Adjustable tap wrench: Features a T-handle design with adjustable jaws that can accommodate different tap sizes
- Chuck-type wrench: Has a more compact design with a chuck mechanism to grip the tap
These wrenches provide the leverage and control needed to turn the tap slowly and steadily while maintaining proper alignment.
Tapping process
The tapping process requires careful preparation and technique to achieve good results. Proper technique is essential for preventing tap breakage and ensuring quality threads.
Preparation
Before you begin tapping, you must drill a "tapping size" hole. This hole is slightly smaller than the tap size - you can find the correct drill size in reference tables. For example, if you're using an M10 tap, you wouldn't drill a 10mm hole, but rather a smaller hole that allows the tap to cut threads.
Tapping technique
Worked Example: Proper Tapping Technique
Step 1: Secure the workpiece firmly in a vice or clamp
Step 2: Start with the taper tap in the tap wrench
Step 3: Position at 90 degrees - Place the tap at exactly 90 degrees to the work surface
Step 4: Begin cutting - Apply light downward pressure while turning clockwise
Step 5: Check alignment frequently to ensure the tap remains perpendicular
Step 6: Apply cutting fluid (unless working with cast iron or brass)
Step 7: Use forward-reverse technique - Turn clockwise for about half a turn, then reverse about a quarter turn to break chips
Step 8: Continue pattern - Repeat the forward-and-reverse pattern, gradually screwing deeper
Critical Safety and Technique Points:
- Always maintain the tap at exactly 90 degrees to the work surface - this is crucial for straight, properly formed threads
- Never force a tap - if it becomes difficult to turn, back it out and clear any chips
- The forward-and-reverse turning pattern is essential for breaking metal chips and preventing tap breakage
- Clean taps thoroughly after use to prevent chip buildup
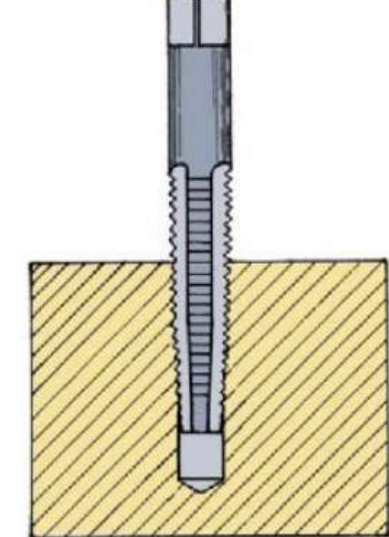
Tapping blind holes
A blind hole is one that doesn't go completely through the material - it has a bottom. Tapping blind holes requires special attention because you can't let the taper tap go all the way through.
Special Considerations for Blind Holes:
When tapping blind holes, follow this modified approach:
- Start with the taper tap, but use it carefully
- Follow with the second tap to deepen the threads
- Finish with the plug tap to get full-depth threads at the bottom
- Remove chips frequently by backing the tap out periodically
- Be extra careful not to force the tap against the bottom of the hole, as this can cause breakage
- If the hole is shallow, you might need to start with the second tap instead of the taper tap
Common tapping faults and solutions
Understanding what can go wrong during tapping helps you avoid problems and achieve better results. Here are the most common issues and their causes:
Broken Tap Causes:
- Drilling the tapping hole too small
- Not reversing the tap regularly to break chips
- Misalignment between tap and hole
- Not starting with the taper tap
- Attaching the wrench while the tap is still in the hole
Shallow Thread Cause: Drilling the tapping hole too large, which doesn't leave enough material for the tap to cut proper threads.
Stripped Thread Causes:
- Not reversing the tap to break off chips
- Allowing tap flutes to become clogged with metal chips
- Insufficient cutting fluid causing excessive friction
Rough Thread Causes:
- Lack of proper cutting fluid causing poor cutting conditions
- Clogged tap flutes that can't cut cleanly
Bolt Not Square with Work Face Cause: The original hole wasn't drilled square (perpendicular) to the work surface, so the threads follow the same angle.
Key Points to Remember:
-
Taps create internal threads - use the right sequence: taper tap first, then second tap, then plug tap for best results
-
Always start at 90 degrees - keeping the tap perpendicular to the work surface is essential for straight, usable threads
-
Use the turn-and-reverse technique - turn clockwise half a turn, then reverse a quarter turn to break chips and prevent tap breakage
-
Drill the correct tapping size hole - too small and the tap will break, too large and the threads will be weak
-
Clean taps after use and use cutting fluid - this prevents chip buildup and extends tool life while improving thread quality