Illustrations and Animations (Grade 10 NSC Matric Computer Application Technology): Revision Notes
Illustrations and Animations
Adding visual elements to your presentations makes them more engaging and interesting for your audience. Illustrations and animations help you communicate your message more effectively by combining text with visual elements and movement. This guide will show you how to enhance your presentations using pictures, graphics, shapes, and various animation effects.
Inserting pictures
Pictures are one of the most common types of illustrations you can add to your presentations. They help make your content more visually appealing and can support the message you're trying to convey.
Choose high-quality images that are relevant to your content and maintain a consistent style throughout your presentation for the best visual impact.
Using the Pictures command
The most straightforward way to add images to your presentation is through the Pictures command. Here's how this process works:
Step-by-Step: Inserting Pictures
- Position your cursor where you want the picture to appear on your slide
- Navigate to the Insert tab in the ribbon menu
- Look for the Pictures command in the Images group
- Click on Pictures to open the file browser
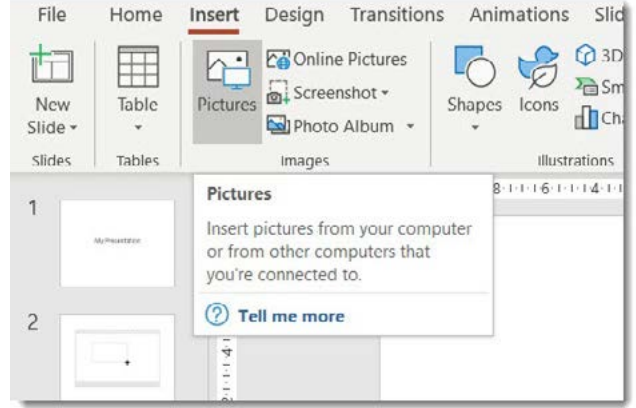
When you click the Pictures command, a dialogue box will appear that allows you to browse your computer or connected devices to find the image you want to insert. Once you select an image file and click Insert, the picture will appear on your selected slide.
Using placeholders
An alternative method for inserting pictures is through slide placeholders. Many slide layouts include content placeholders that make it easy to add different types of media.
When you see a placeholder on your slide, you can click on the picture icon within that placeholder to insert an image. This method is particularly useful when working with pre-designed slide layouts that already have designated spaces for images.
Using placeholders ensures your images are properly sized and positioned according to the slide layout design, maintaining visual consistency across your presentation.
SmartArt graphics
SmartArt is a powerful feature that allows you to create professional-looking graphics to display information visually. Rather than presenting information only through text, SmartArt helps you convey ideas through diagrams, charts, and other graphic elements.
Understanding SmartArt
SmartArt graphics are pre-designed layouts that you can use to present information in various visual formats. These graphics can show relationships, processes, hierarchies, and other types of information structure. You can customise the colours, styles, and content to match your presentation's theme.
SmartArt is particularly effective for presenting complex information that would be difficult to understand in text format alone, such as organisational charts, process flows, and comparison data.
Inserting SmartArt graphics
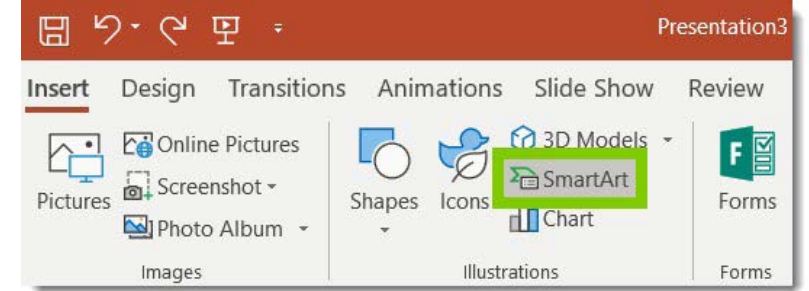
Step-by-Step: Adding SmartArt Graphics
- Place your cursor on the slide where you want the graphic to appear
- Go to the Insert tab in the ribbon
- Find the Illustrations group and click on SmartArt
- A dialogue box will open showing different categories of SmartArt graphics
- Choose the category that best fits your content type
- Select the specific graphic design you prefer
- Click OK to insert the SmartArt into your slide
Once inserted, you can add your own text content to the SmartArt graphic, just like you would in a word-processing application. The graphic will automatically adjust its layout based on the amount of content you add.
Inserting shapes
Shapes add visual interest to your presentations and can help emphasise important points or create visual separation between different sections of content.
Purpose of shapes
Shapes serve multiple purposes in presentations. They can be used to create backgrounds, highlight text, create custom graphics, or simply add visual appeal. You can customise shapes by changing their colours, adding text, adjusting their size, and applying various formatting effects.
Adding shapes to your slides
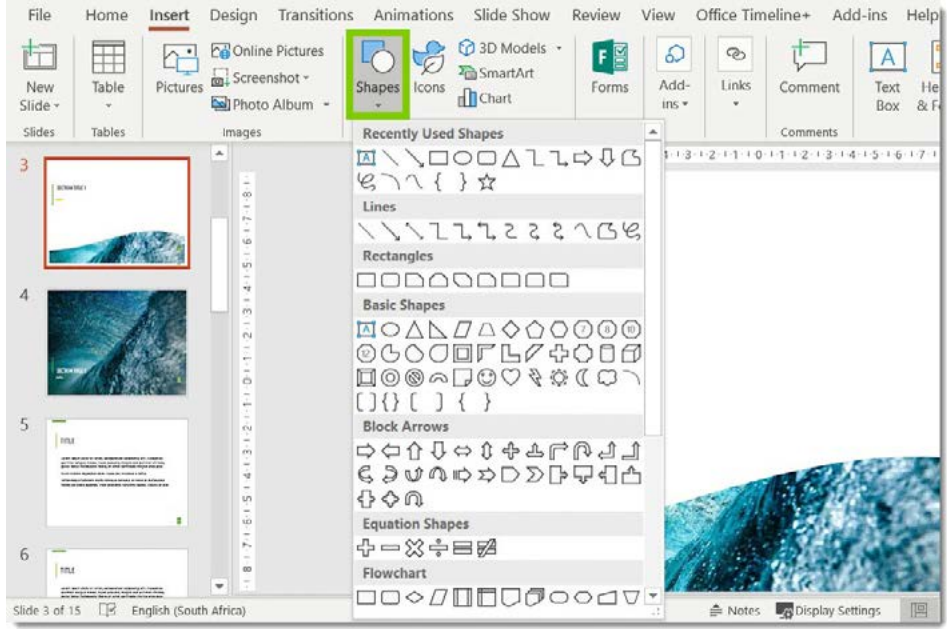
Step-by-Step: Inserting Shapes
- Position your cursor on the slide where you want the shape
- Navigate to the Insert tab
- In the Illustrations group, click on Shapes
- A menu will appear showing different categories of shapes including basic shapes, arrows, flowchart elements, and more
- Select the shape you want to use
- Click and drag on your slide to create the shape in your desired size
Customising shapes
After inserting a shape, you can modify it in several ways:
- Resizing: Drag the corner handles to make the shape larger or smaller
- Moving: Click and drag the shape to reposition it on your slide
- Formatting: Change colours, add borders, apply effects, and modify other visual properties
- Adding text: You can type directly into most shapes to add text content
Hold the Shift key while resizing shapes to maintain their proportions and prevent distortion.
Transition animations
Transitions control how your presentation moves from one slide to the next. They create smooth visual effects that help maintain audience engagement as you progress through your content.
Understanding transitions
A transition is the visual effect that occurs when one slide changes to the next slide during your presentation. Instead of slides simply appearing and disappearing, transitions provide smooth, professional-looking changes between slides.
Types of transitions
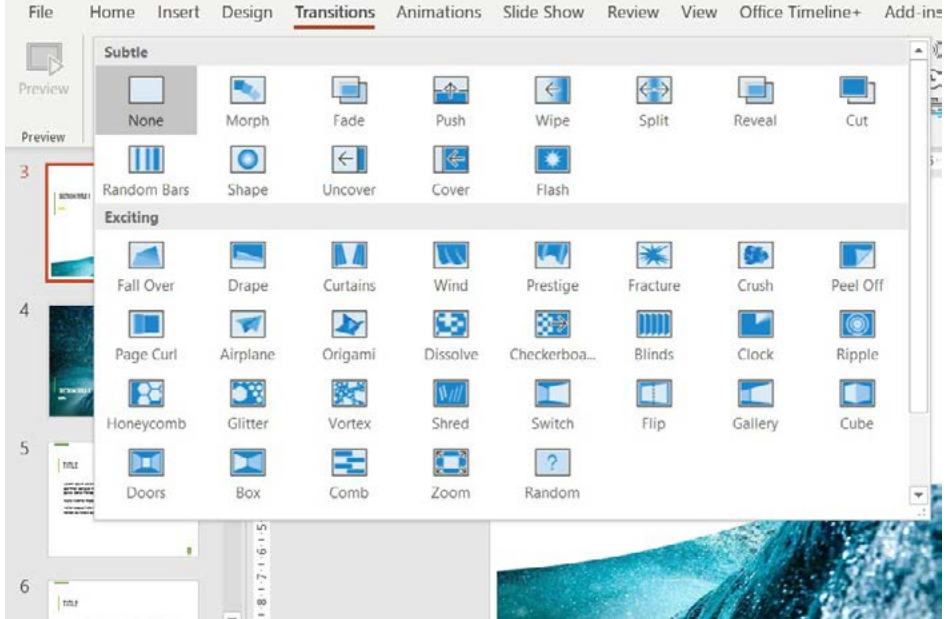
PowerPoint offers many different transition effects, organised into categories:
- Subtle transitions: Simple effects like Fade, Push, Wipe, and Split
- Exciting transitions: More dramatic effects like Drape, Curtains, Fracture, and Crush
- Dynamic content transitions: Advanced effects like Morph, which can create smooth animations between similar objects on consecutive slides
Use transitions consistently throughout your presentation. Avoid mixing too many different transition types as this can be distracting for your audience.
Applying transitions
Step-by-Step: Adding Transition Effects
- Open your presentation and select the slide where you want to apply a transition
- Go to the Transitions tab in the ribbon
- Browse through the available transition effects
- Click on any transition to apply it to the selected slide
- You can apply the same transition to all slides or use different transitions for different slides
Custom animations
While transitions affect how slides change, custom animations control how individual objects move and appear within a single slide. These animations can bring attention to specific content and create engaging visual effects.
Understanding custom animations
Custom animations allow you to control when and how objects appear, move, or disappear within a slide. This includes text blocks, images, shapes, and other slide elements. Animation helps direct your audience's attention to specific content at the right moment during your presentation.
Use custom animations purposefully to enhance your message. Excessive or unnecessary animations can distract from your content rather than enhance it.
Creating custom animations
Step-by-Step: Adding Custom Animations
- Select the object you want to animate (text, shape, picture, etc.)
- Go to the Animations tab in the ribbon
- Choose from the available animation effects
- Use the Animation Pane to control timing and sequencing
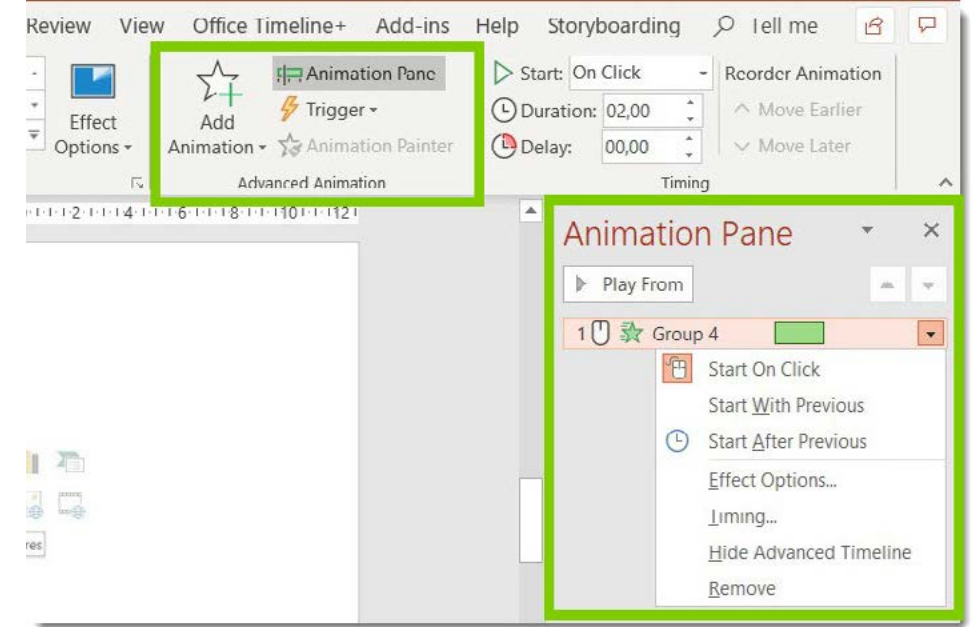
Animation timing and control
The Animation Pane provides detailed control over your animations:
- Start options: Choose when the animation begins (On Click, With Previous, After Previous)
- Duration: Control how long the animation takes to complete
- Delay: Set a pause before the animation begins
- Effect options: Modify specific aspects of the animation effect
Advanced animation features
You can create sophisticated animation sequences by:
- Combining multiple animations on the same object
- Setting different start times for various objects
- Using entrance, emphasis, and exit animations together
- Adjusting animation direction and other effect properties
The Effect Options dialogue allows you to fine-tune animations by controlling sound effects, timing delays, and the direction from which animations originate.
Key Points to Remember:
- Pictures enhance presentations - Use the Pictures command or placeholders to insert images from your computer or online sources
- SmartArt creates professional graphics - These pre-designed layouts help you present information visually rather than just using text
- Shapes add visual interest - Insert and customise shapes to emphasise content, create backgrounds, or add decorative elements
- Transitions smooth slide changes - Apply transition effects to control how one slide changes to the next during your presentation
- Custom animations control object movement - Use the Animation Pane to precisely control when and how objects appear and move within slides