Basic Concepts of File Management (Grade 10 NSC Matric Computer Application Technology): Revision Notes
Basic Concepts of File Management
What is file management?
File management on a computer works just like organising documents in a physical filing cabinet. When you have important papers at home, you might put them in folders inside a filing cabinet to keep them organised and easy to find. Similarly, on a computer, we store our digital files in folders to keep everything neat and accessible.
Filing Cabinet Analogy
Think of your computer's file system like a physical filing cabinet:
- Filing cabinet = Your computer's storage drive
- Drawers = Main folders (like Documents, Music, Pictures)
- Folders within drawers = Sub-folders for specific categories
- Individual papers = Your actual files (documents, photos, videos)

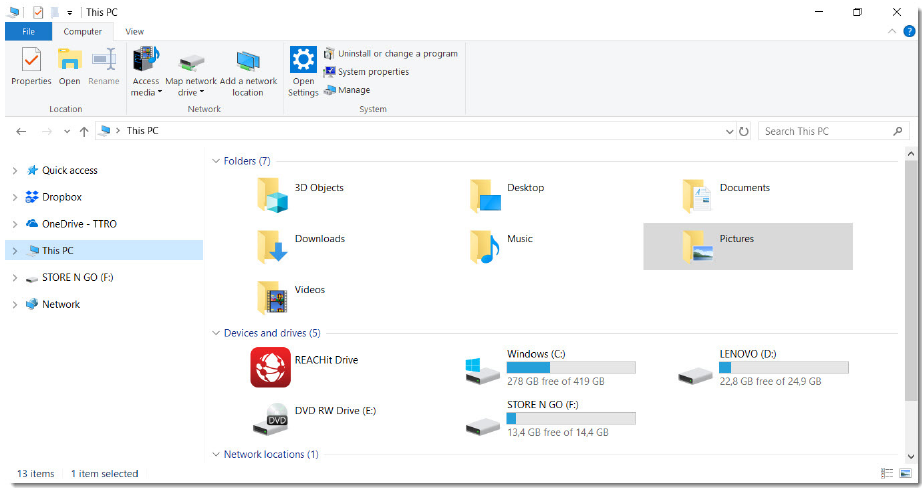
The image above shows how Windows File Explorer displays folders. Just as you might have different folders for different subjects or purposes, this Music folder contains sub-folders organised by artist names like "Beethoven", "Jenny", and "The Long Johns". This organisation makes it much easier to find specific songs when you need them.
Understanding disc drives and storage
Before we can organise files, we need to understand where they are stored. Files live on disc drives, which are the storage devices in your computer. Think of drives as different filing cabinets - each one has its own space and purpose.
Your computer can have several types of drives:
- C: drive - This is usually your main hard disc drive (HDD) where Windows and most programmes are installed
- D: drive - Often a second hard drive or DVD drive
- F: drive - Might be a USB flash drive (removable storage)
- Other drives can include network drives, external hard drives, or cloud storage
Each drive has a letter (like C:, D:, F:) that helps identify what type of storage it is.
Remember: Removable Storage
Removable drives like USB sticks don't save data permanently on your computer - when you unplug them, the files go with them. Always safely eject USB drives before unplugging to prevent data loss!
The hierarchical folder structure
Windows organises drives, folders, and files in what we call a hierarchical structure. This means everything is arranged in levels, like branches on a tree. The easiest way to understand this is to picture an upside-down tree, where the computer is at the top and files are at the bottom.
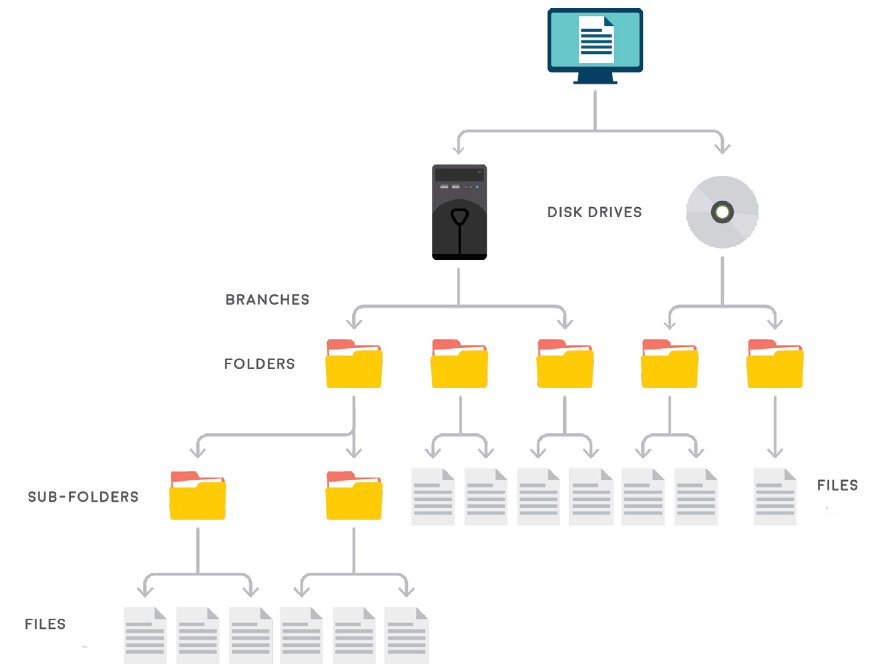
This diagram shows how the file system works:
- At the top level, you have your computer
- Below that are the disc drives (like C:, D:, F:)
- Then come folders and sub-folders
- Finally, at the bottom level, you have individual files
The highest level of this tree structure is called the root directory. For your main hard drive, this is written as C:\. Everything else branches out from here, just like branches growing from a tree trunk.
Understanding file paths
A file path is like a postal address for your files - it tells the computer exactly where to find a specific file or folder. Just as your home has a unique address, every file on your computer has a unique path.

File Path Breakdown: Understanding the Components
Let's break down this file path example: C:\Music\Beethoven\Moonlight.mp3
Step 1: Identify the drive
- C: - This is the drive letter (which filing cabinet)
Step 2: Navigate through folders
- Music - This is the main folder (like the drawer in the cabinet)
- Beethoven - This is a sub-folder inside Music (like a section within the drawer)
Step 3: Find the file
- Moonlight - This is the filename
- .mp3 - This is the file extension (tells us it's an audio file)
The backslash () characters separate each level of the path. In Windows, you must always use backslashes, not forwards slashes.
Finding a file path
Sometimes you need to know the exact path of a file or folder. Here's how to find it:
Finding File Paths: Two Methods
Method 1: Using the address bar
- Open File Explorer from the Start menu
- Navigate to the folder you want to find the path for
- Click on the address bar at the top - it will show the full path
Method 2: Using file properties
- Right-click on any file
- Select "Properties" from the menu
- The file path will be shown at the top of the Properties window under "Object name"
Organising files and folders
Good file organisation is essential for finding your work quickly and keeping your computer tidy. Think about how you organise your school subjects - you probably have different folders or binders for each subject. The same principle applies to computer files.
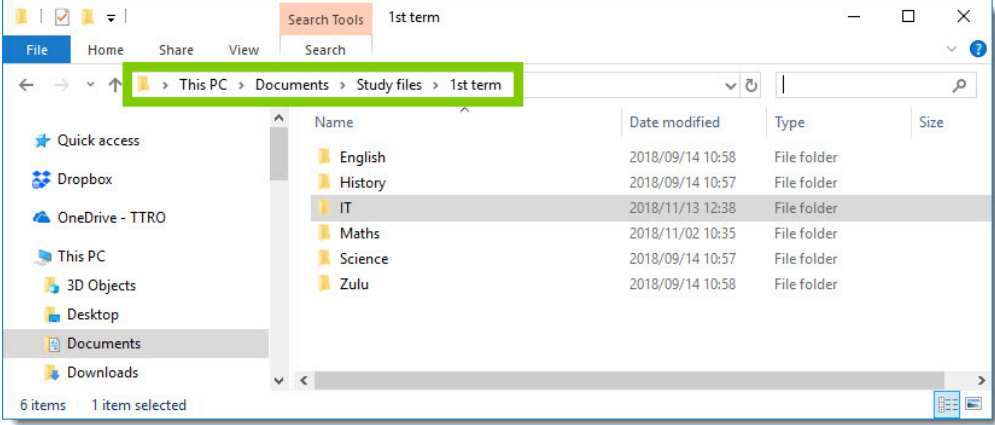
This example shows excellent organisation for a student's work. The path This PC > Documents > Study files > 1st term shows a logical hierarchy:
- Documents - The main location for schoolwork
- Study files - A sub-folder specifically for academic work
- 1st term - Organised by time period
- Subject folders - Individual folders for English, History, IT, Maths, Science, and Zulu
Organization Best Practices
This structure makes it easy to find any assignment or project because everything has its proper place. Consider creating a similar system for your own work:
- Start with a main folder for all schoolwork
- Create sub-folders by term or semester
- Within each term, create folders for each subject
- Use consistent naming throughout your system
Using the file manager (This PC)
The file manager is your main tool for working with files and folders. In Windows, this is called "File Explorer" and you can access it by clicking on "This PC".
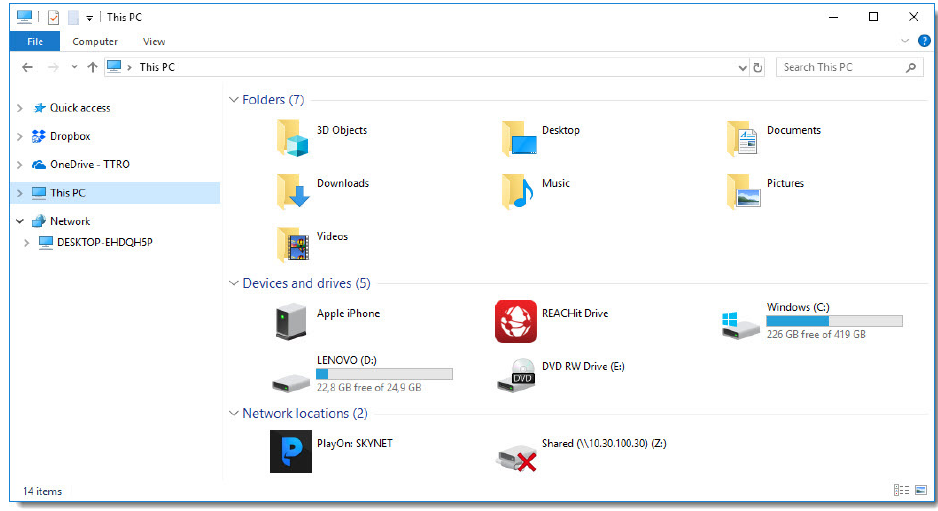
When you open This PC, you'll see:
- Default folders like Documents, Downloads, Music, Pictures, and Videos
- Connected devices including your main hard drives, USB drives, and any other storage devices
- Network locations if you're connected to shared drives
Getting Started with File Explorer
To start organising your files:
- Click on the Start menu
- Type "File Explorer" or click on the folder icon
- Click on "This PC" in the left panel
- Double-click on any storage device to explore its contents
Creating new folders and files
An important part of staying organised is creating your own folder structure. Think of this as setting up your own filing system.
Creating a new folder
Creating a New Folder
To create a new folder:
- Navigate to where you want the new folder using File Explorer
- Right-click in an empty space
- Select "New" from the menu, then choose "Folder"
- Type a name for your folder and press Enter
Creating a new file
You can also create new files directly:
Creating a New File
- Navigate to the folder where you want the file
- Right-click in an empty space
- Select "New" from the menu
- Choose the type of file you want (like Word Document, Text Document, etc.)
- Give your file a meaningful name and press Enter
File naming conventions and properties
Best practices for naming files
Good file names help you find files quickly and understand what they contain. Here are some important guidelines:
Do use:
- Short but meaningful names that describe the content
- Version numbers (like v1, v2) and dates in format yyyy/mm/dd
- Project or document names that identify the subject
- Descriptive words that help you remember the content
File Naming Rules: What to Avoid
Never use these special characters in file names:
- Backslash (), forwards slash (/), less than (<), greater than (>)
- Quotation marks ("), colon (:), pipe (|), question mark (?), asterisk (*)
- Dollar sign ($), ampersand (&)
Also avoid:
- Very simple words like "draught", "current", or "document"
- Confusing abbreviations that you might not remember later
Example of good naming:
History_Essay_WW2_v2_2024-03-15.docxinstead of justEssay.docxMaths_Homework_Ch5_Problems.xlsxinstead ofhomework.xlsx
File properties
Every file has properties that give you important information about it, such as:
- File type and size
- When it was created and last modified
- Where it's located on your computer
- Who created it
To view file properties, right-click on any file and select "Properties". This information can be very helpful when you're trying to find or organise files.
Essential file operations
Renaming files
There are three ways to rename a file:
| Method | Steps |
|---|---|
| Right-click menu | 1. Right-click the file 2. Select "Rename" 3. Type new name 4. Press Enter |
| Keyboard shortcut | 1. Select the file 2. Press F2 3. Type new name 4. Press Enter |
| Click method | 1. Click once on the filename 2. Wait a moment, then click again 3. Type new name 4. Press Enter |
Using keyboard shortcuts like F2 will make you much faster at file management tasks.
Copying files
When you copy a file, you create a duplicate that can be placed somewhere else. This is useful for backing up important files or sharing them.
| Method | Steps |
|---|---|
| Right-click menu | 1. Right-click the file 2. Select "Copy" 3. Navigate to destination 4. Right-click and select "Paste" |
| Keyboard shortcuts | 1. Select the file 2. Press Ctrl+C to copy 3. Navigate to destination 4. Press Ctrl+V to paste |
| Drag and drop | 1. Select files to copy 2. Hold Ctrl key while dragging 3. Drop in destination folder |
Files are copied when you want to share them or create backups for safety.
Moving files
Moving files is different from copying - when you move a file, it goes to a new location but is deleted from the original location. Use this when you want to reorganise files.
| Method | Steps |
|---|---|
| Right-click menu | 1. Right-click the file 2. Select "Cut" 3. Navigate to destination 4. Right-click and select "Paste" |
| Keyboard shortcuts | 1. Select the file 2. Press Ctrl+X to cut 3. Navigate to destination 4. Press Ctrl+V to paste |
| Drag and drop | 1. Select files to move 2. Hold Shift key while dragging 3. Drop in destination folder |
Deleting files safely
The Delete function removes files from your storage device. However, Windows provides a safety net called the Recycle Bin.
Regular deletion (to Recycle Bin):
- Select the file and press the Delete key
- Or right-click and choose "Delete"
- Files go to the Recycle Bin and can be restored if needed
Permanent deletion (bypassing Recycle Bin):
- Hold Shift + Delete keys together
- This permanently removes files - be very careful!
Warning About Removable Storage
Files deleted from USB drives and other removable storage cannot be restored from the Recycle Bin, so be extra careful with these devices!
Restoring deleted files
If you accidentally delete a file, you can often get it back:
Restoring Files from Recycle Bin
- Open the Recycle Bin by double-clicking its icon on the desktop
- Find the file(s) you want to restore
- Right-click on the file and select "Restore"
- The file will return to its original location
Searching for files
When you have many files, searching becomes essential. Windows provides several ways to find files quickly:
Using the Start menu search:
- Click the Start button
- Type the name of the file you're looking for
- Windows will show matching results
Search Tips for Better Results
- Use different search terms if you can't remember the exact filename
- Check "File > Open > Recent" in applications to find recently used files
- Move and rename files after finding them to make them easier to locate next time
Key Points to Remember:
- File management is like organising a filing cabinet - use folders to group related files together
- Understand the hierarchy - files are stored in drives, which contain folders, which contain sub-folders and files
- File paths are like postal addresses - they tell you exactly where a file is located using the format Drive:\Folder\Subfolder\Filename.extension
- Master the keyboard shortcuts - F2 (rename), Ctrl+C (copy), Ctrl+V (paste), Ctrl+X (cut), Delete key for faster file management
- Use good naming conventions - choose descriptive names and avoid special characters to make files easier to find and identify