Assembly Diagrams, Floor Plans, and Packaging (Grade 10 NSC Matric Mathematical Literacy): Revision Notes
Floor Plans
What is a floor plan?
A floor plan is a special type of plan that shows what a building or room looks like when viewed from above. Think of it as taking the roof off a building and looking down inside to see the layout of rooms, walls, doors, and furniture.
A floor plan provides a bird's eye view of any space, making it easier to understand the relationship between different areas and how they connect together.
Key characteristics of floor plans:
- They are 2-dimensional drawings that show the layout of a space
- They display the dimensions of rooms and objects
- They use a scale to represent real-life measurements in a smaller format
- They show the arrangement of walls, doors, windows, and furniture
Types of plans:
- Floor plans (or layout plans) - show the layout from above
- Elevation plans - show what objects look like from the side
- Design plans - used in fashion and design industries
In Grade 10 Mathematical Literacy, you will focus specifically on understanding and working with floor plans.
Understanding floor plan symbols
Floor plans use standard symbols to represent different elements. Learning these symbols is essential for reading any floor plan accurately.
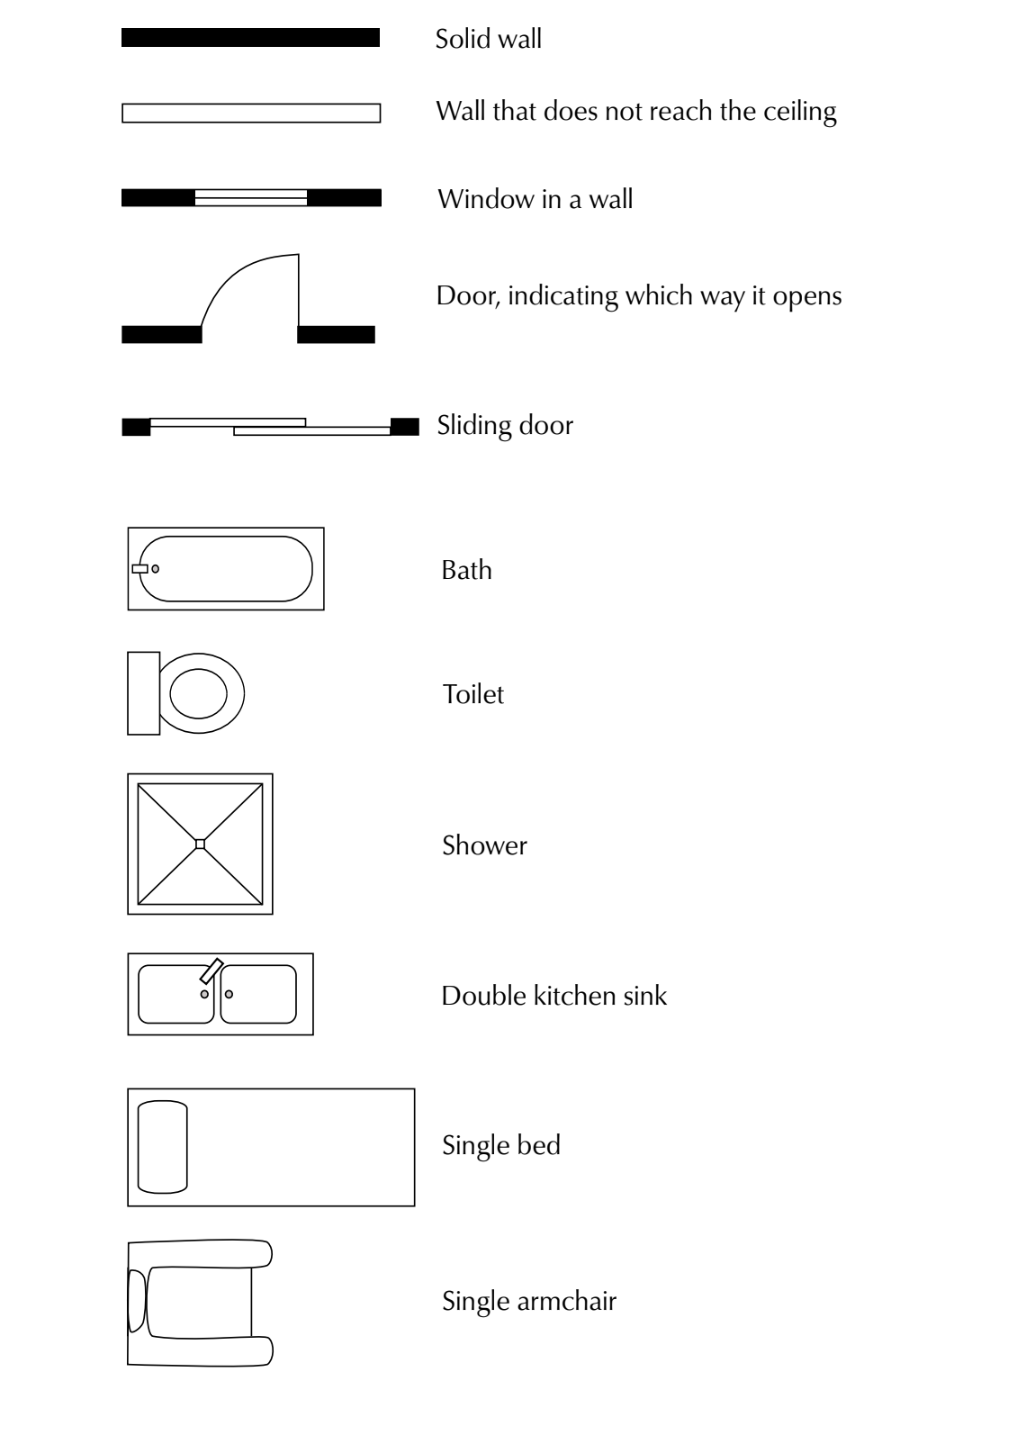
Wall symbols:
- Solid walls: Thick black lines representing permanent walls that reach the ceiling
- Partial walls: Hollow rectangles showing walls that don't reach the ceiling (like room dividers)
Door and window symbols:
- Windows: Black rectangles with white centers, shown within walls
- Doors: Curved lines showing the direction the door swings open
- Sliding doors: Overlapping rectangles indicating doors that slide rather than swing
Fixture symbols:
- Bathtub: Oval shape within a rectangle
- Toilet: Circular symbol
- Shower: Square with diagonal cross lines
- Kitchen sink: Rectangle with circular elements (single or double)
Furniture symbols:
- Single bed: Rectangle with smaller rectangle inside
- Armchair: Curved shape representing seating furniture
The quarter circle symbol for doors is crucial - it shows which direction the door opens. This helps you avoid placing furniture where it would block the door's swing path.
Reading floor plans - worked example
Let's examine how to interpret a floor plan using a practical example.
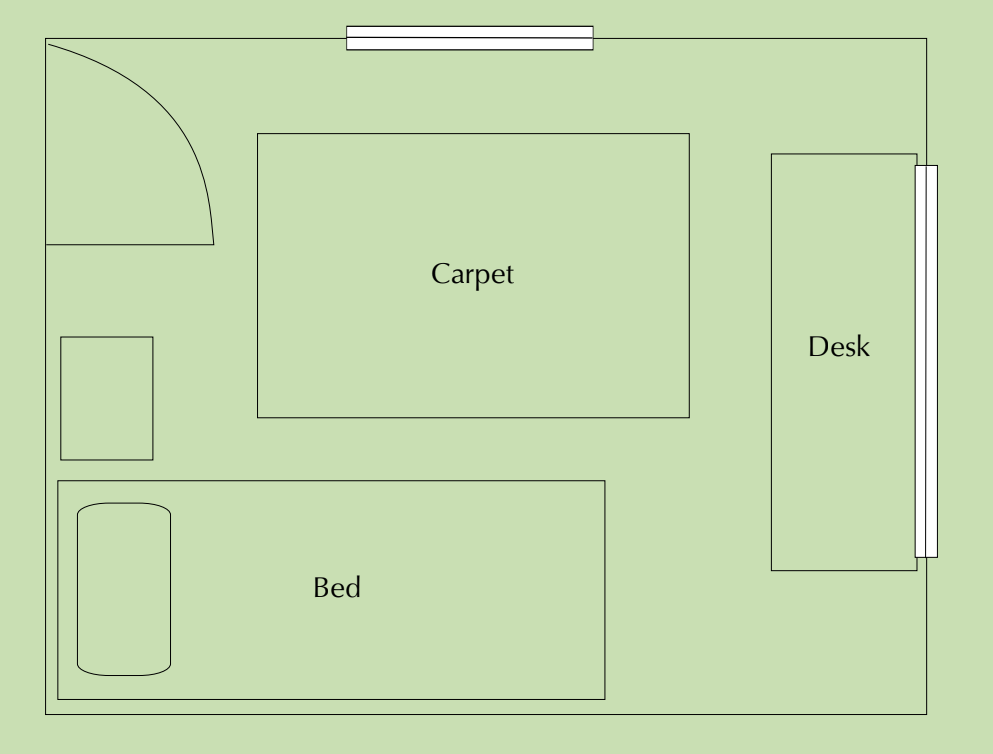
This bedroom floor plan demonstrates key elements you should identify when reading any floor plan. The layout shows one door (indicated by the quarter-circle symbol), two windows (rectangular symbols in the walls), and furniture placement including bed, desk, and carpet area clearly marked.
Worked Example: Analyzing a Bedroom Floor Plan
Step 1: Identify the entrance
- Locate the door symbol (quarter circle)
- Note which way the door opens
Step 2: Find the windows
- Count the window symbols (black rectangles in walls)
- Consider how they affect natural light and furniture placement
Step 3: Analyze furniture layout
- Check if furniture blocks the door's opening path
- Ensure there's adequate space for movement around furniture
- Verify that the layout is practical for daily use
Important considerations when reading floor plans:
- The door symbol (quarter circle) shows which way the door opens and helps ensure furniture won't block the door's path
- Window placement affects natural light and furniture positioning
- Room layout should allow for practical movement around furniture
Analyzing floor plan layouts
Good floor plan design considers workflow, accessibility, and practical use of space. Let's examine kitchen layouts as an example.
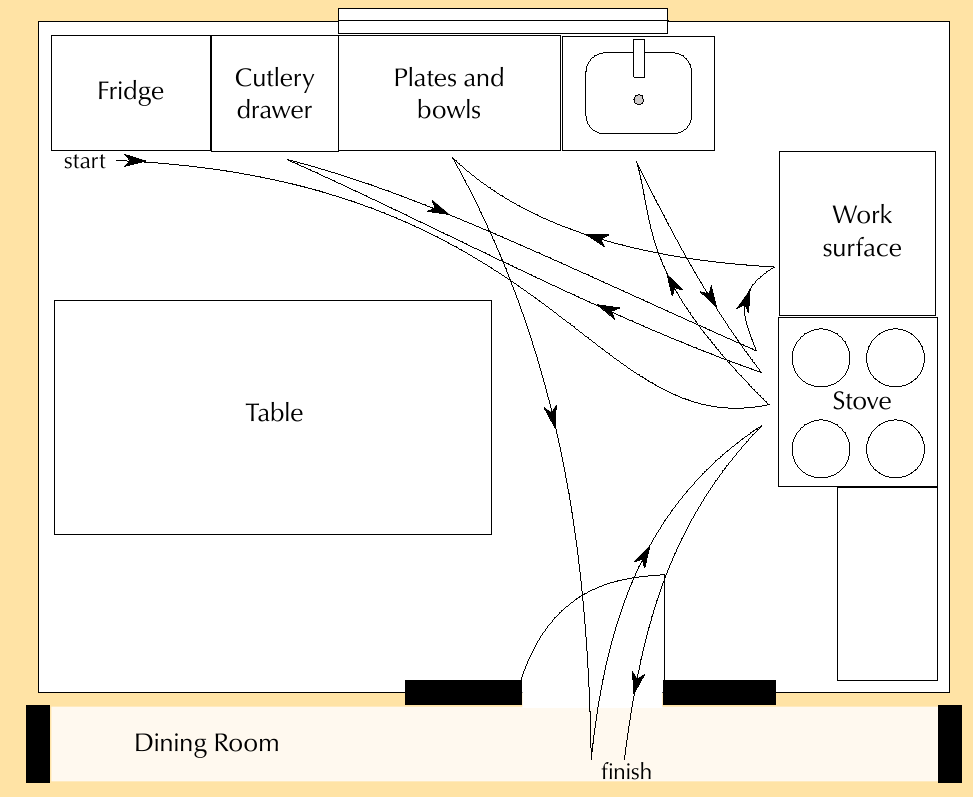

These kitchen diagrams show workflow patterns with arrows indicating movement between the fridge (food storage), work surface (preparation area), stove (cooking area), and sink (cleaning area).
Design principles for good layouts:
- Minimize walking distance between frequently used areas
- Avoid blocking pathways with furniture or fixtures
- Consider natural light when positioning work areas
- Ensure doors can open freely without hitting furniture
The concept of workflow is particularly important in kitchen design, where the relationship between the refrigerator, sink, and stove forms what designers call the work triangle. An efficient work triangle reduces unnecessary movement and makes cooking more convenient.
Working with scale on floor plans
Scale allows us to represent large real-life measurements on smaller drawings. The most common scales for floor plans are 1:50 and 1:100.
Understanding scale ratios is fundamental to working with floor plans effectively. When you see a scale of 1:50, this means that every 1 unit of measurement on the plan represents 50 units in the actual building.
Understanding scale ratios:
- 1:50 scale means 1 unit on the plan represents 50 units in real life
- 1:100 scale means 1 unit on the plan represents 100 units in real life
Scale calculation is essential for any practical work with floor plans. The basic formula you must remember is:
Scale calculation method:
To convert real measurements to plan measurements: Plan measurement = Real measurement ÷ Scale ratio
Worked Example: Converting measurements using 1:50 scale
Given measurements:
- Length of walls: 5 metres
- Width of door: 810 mm
- Width of window: 1000 mm
Step-by-step calculations:
Step 1: Wall length
- Real measurement: 5 metres = 500 cm
- Calculation:
- Plan measurement: 10 cm
Step 2: Door width
- Real measurement: 810 mm
- Calculation:
- Plan measurement: 1.62 cm
Step 3: Window width
- Real measurement: 1000 mm
- Calculation:
- Plan measurement: 2 cm
Practical applications of scaled floor plans:
Area calculations:
- Calculate floor area for tiling:
- Determine material quantities needed
- Estimate costs for renovations or construction
Worked Example: Area and Cost Calculation
Given:
- Classroom dimensions: 5m × 5m
- Tiles cost R150 per box covering 4m²
Step 1: Calculate area
Step 2: Calculate boxes needed
Step 3: Round up and calculate cost
- Round up to 7 boxes (you can't buy partial boxes)
- Total cost =
Common exam tips for floor plans
Understanding how to approach floor plan questions in exams requires both technical knowledge and practical thinking skills.
When interpreting floor plans:
- Always check the scale given on the plan
- Identify all symbols using the legend provided
- Consider practical usage - can doors open? Is furniture positioned sensibly?
- Look for design problems like blocked pathways or poor workflow
When analyzing floor plans in exams, think like someone who would actually use the space. Ask yourself: "Would this layout work in real life?" This practical approach often helps you spot design flaws or inefficiencies.
For scale calculations:
- Convert units carefully (metres to centimetres to millimetres)
- Show your working clearly
- Round appropriately for practical purposes (you can't buy partial boxes of tiles)
- Check your answer makes sense in context
Design analysis skills:
- Consider natural light from windows
- Think about traffic flow through spaces
- Identify wasted space or inefficient layouts
- Suggest practical improvements based on how the space will be used
Common Mistakes to Avoid:
- Forgetting to convert between different units (metres, centimetres, millimetres)
- Misreading the scale ratio (confusing 1:50 with 1:100)
- Not showing calculation steps clearly
- Suggesting impractical design changes that ignore structural limitations
Key Points to Remember:
-
Floor plans show the layout of buildings as viewed from above, like removing the roof and looking down
-
Scale ratios like 1:50 mean 1 unit on the plan equals 50 units in real life - use division to convert real measurements to plan measurements
-
Door symbols (quarter circles) show swing direction to help avoid furniture placement that would block doors
-
Good floor plan design considers workflow, natural light, and practical movement between areas
-
Always show your calculations step-by-step in exam questions, including unit conversions and final answers with appropriate units
-
Think practically when analyzing layouts - would this design work for someone actually using the space?