Advanced Word Processing Techniques (Grade 12 NSC Matric Computer Application Technology): Revision Notes
Advanced Word Processing Techniques
When working with longer, more complex documents, basic word processing skills aren't always enough. This section covers sophisticated techniques that will help you create professional documents more efficiently and maintain better control over formatting and structure.
These advanced techniques become essential skills when you're working on professional reports, academic papers, or any document that requires precise formatting and easy navigation. Mastering them early will save you significant time and frustration later.
Non-breaking spaces
Sometimes you need to keep certain words together on the same line, even when Word tries to split them automatically. For example, you might want "Mr Smith" to stay together, or keep a date like "25 December" from being split across two lines.
A non-breaking space is a special type of space that tells Word not to break the line at that point. Think of it as a "sticky space" that glues words together. This is particularly useful for:
- Titles with surnames (Dr Johnson, Ms Williams)
- Dates and times (3 January 2024, 2:30 PM)
- Technical terms or measurements (50 km, 100%)
- Any words that should logically stay together
Key Shortcuts to Remember:
- Non-breaking space: Ctrl + Shift + Space between words you want to keep together
- Non-breaking hyphen: Ctrl + Shift + - for hyphens that won't allow line breaks
These shortcuts are essential for professional document formatting and prevent awkward line breaks that can make your document look unprofessional.
Non-breaking hyphens: Similar to non-breaking spaces, you can create hyphens that won't allow line breaks. Use Ctrl + Shift + - to insert a non-breaking hyphen. This is useful for compound words or phone numbers that shouldn't be split.
Practical Example: Formatting Contact Information
Instead of typing: Dr Smith called at 2:30 PM about the X-ray results Use non-breaking spaces: Dr[Ctrl+Shift+Space]Smith called at 2:30[Ctrl+Shift+Space]PM about the X-ray results
This ensures "Dr Smith" and "2:30 PM" never get split across lines, maintaining professional appearance.
Advanced copying techniques
When you copy text from one document to another, Word doesn't just copy the words - it also copies all the formatting, including fonts, colours, sizes, and styles. While this can sometimes be helpful, it often creates problems when you're trying to maintain consistent formatting in your destination document.
This happens because Word documents store formatting information along with the text content. When you paste, you're essentially importing both the text and its original appearance, which might clash with your current document's style.
Why This Matters: Uncontrolled formatting can create inconsistent documents where different sections have different fonts, sizes, or styles. This not only looks unprofessional but can also take considerable time to fix manually.
Copying text only: To avoid formatting conflicts and save time on reformatting, you can choose to paste just the text without any formatting. Here's how:
- Copy your text as normal using Ctrl + C
- When you paste, right-click at your destination
- Look for the paste options that appear
- Select "Keep Text Only" from the options
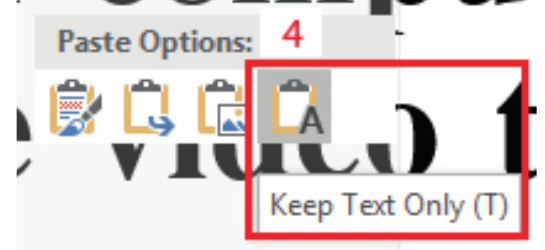
This technique ensures that your pasted text adopts the formatting of your current document, maintaining consistency throughout your work.
Professional Tip: Always use "Keep Text Only" when copying from websites, emails, or other documents to maintain your document's formatting consistency. This single habit will save you hours of reformatting work.
Line spacing control
Line spacing refers to the vertical space between lines of text in a paragraph. While Word's default spacing works well for most documents, you might need to adjust it based on specific requirements, such as academic formatting guidelines or publication standards.
The standard line spacing in Word documents is 1.15, which provides good readability while being economical with space. However, you can customise this to suit your needs:
Basic line spacing options:
- Single spacing (1.0): Minimal space between lines
- 1.15 spacing: Word's default, slightly more readable than single
- 1.5 spacing: Moderate spacing, often required for drafts
- Double spacing (2.0): Maximum spacing, commonly required for academic submissions
Step-by-Step: Changing Line Spacing
- Select the text you want to modify
- Go to the Home tab on the ribbon
- Find the Paragraph section
- Click on the Line Spacing button
- Choose from the preset options, or select "Line Spacing Options" for more control
Advanced spacing options: The Paragraph dialogue box gives you precise control over spacing. You can:
- Set exact spacing measurements
- Control spacing before and after paragraphs
- Choose different spacing methods (single, multiple, exact points)
- Apply spacing consistently across similar paragraph styles
This level of control is particularly valuable when preparing documents for specific formatting requirements or when working with complex layouts. Many academic institutions and publishers have strict spacing requirements that require these advanced controls.
Document structure and navigation
Large documents can become difficult to navigate, especially when they contain multiple sections, chapters, or topics. Word provides powerful navigation tools that make moving around your document much easier and help you maintain an organised structure.
The Navigation Pane: The Navigation Pane is a sidebar tool that appears on the left side of your document and provides three key functions:
-
Heading navigation: Shows a hierarchical list of all headings in your document, allowing you to jump quickly between sections. You can also reorganise content by moving headings up or down in the list.
-
Page thumbnails: Displays small previews of each page, giving you a visual overview of your document's layout and helping you locate specific content quickly.
-
Search functionality: Provides advanced search capabilities, highlighting all instances of your search term and allowing you to navigate between them easily.
Enabling the Navigation Pane:

- Go to the View tab in the ribbon
- Look for the Show section
- Tick the checkbox next to "Navigation Pane"
Once enabled, the Navigation Pane appears on the left side of your document. You can switch between the three views (Headings, Pages, Results) by clicking the respective tabs at the top of the pane.
Benefits of using document structure:
- Faster navigation: Jump directly to any section without scrolling
- Better organisation: See the overall structure of your document at a glance
- Easy editing: Reorganise sections by dragging and dropping headings
- Professional appearance: Well-structured documents look more polished and are easier to read
The Navigation Pane is particularly valuable for academic papers, reports, manuals, and any document longer than a few pages. It transforms document editing from a linear process into a more flexible, efficient workflow.
Key Points to Remember:
-
Use non-breaking spaces (Ctrl + Shift + Space) to keep important words together - prevent awkward line breaks in dates, names, and measurements
-
Copy text without formatting using "Keep Text Only" - maintain consistent document styling and save reformatting time
-
Adjust line spacing through Home → Paragraph → Line Spacing - meet specific formatting requirements for academic or professional documents
-
Enable the Navigation Pane (View tab) for better document management - quickly navigate, search, and reorganise content in longer documents
-
Master these advanced techniques to work more efficiently - they become essential skills when creating professional, well-structured documents