Magnetic Field Lines (HSC SSCE Physics): Revision Notes
Magnetic Field Lines
What are magnetic field lines?
Magnetic field lines are a visual way to represent magnetic fields. They help us understand both the strength and direction of magnetic forces at different points in space. Just like electric field lines show us electric fields, magnetic field lines show us magnetic fields.
These field lines indicate the direction of force that would act on a magnetic north pole if placed at any point. Where the lines are closely packed together, the magnetic field is strong. Where they spread apart, the field is weaker.
Field Strength and Line Density
The relationship between line density and field strength is proportional - twice as many lines means twice the field strength. This is a fundamental property that allows us to visually assess magnetic field strength just by looking at field line diagrams.
Direction of Magnetic Field Lines
Magnetic field lines always point away from north poles and towards south poles. Think about pushing two magnets together with their north poles facing - they repel because the field lines from one north pole push against the field lines from the other. When you turn one magnet around, the north pole attracts the south pole because field lines flow from north to south.
Visualising magnetic field lines
Using compass needles
One of the simplest ways to detect magnetic fields is with a compass. Compass needles are made from magnetised iron or steel, with their own north and south poles.
How Compass Needles Work
When placed in a magnetic field, the north pole of the compass is attracted to magnetic south poles and repelled by magnetic north poles. This makes compasses excellent tools for mapping out magnetic fields. By placing a compass at different points around a magnet, you can trace the direction of the field lines - the compass needle will align itself with the field at each location.
Using iron filings
Iron filings provide a dramatic way to visualise magnetic fields. These tiny pieces of iron are ferromagnetic, meaning they become magnetised when placed in a magnetic field. Once magnetised, they behave like tiny compass needles and align themselves with the field lines.
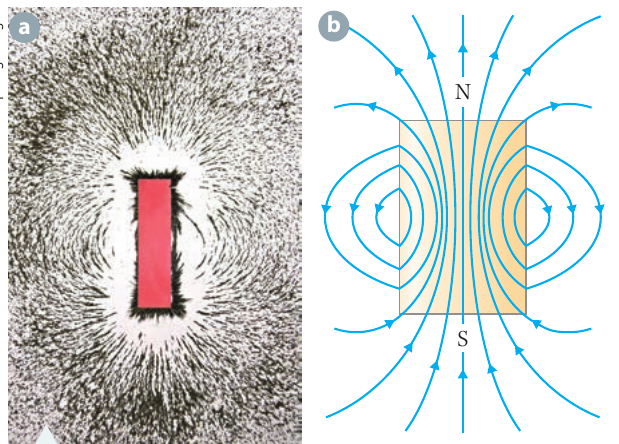
The image above shows iron filings scattered around a bar magnet alongside a diagram of the theoretical field lines. Notice how the iron filings create patterns that match the field line diagram perfectly. The filings cluster more densely near the poles where the field is strongest, and the field is strongest of all inside the magnet itself.
Three-dimensional visualization
Magnetic Fields in Three Dimensions
The diagrams we usually draw show magnetic fields in a flat plane, but real magnetic fields exist in three dimensions. To observe the complete 3D structure of a field, you can suspend iron filings in oil and place a magnet nearby. This allows you to see how the field lines extend in all directions around the magnet, not just in one plane.
Magnetic fields from electric currents
Øersted's Revolutionary Discovery
In 1819, Danish physicist Hans Christian Øersted made a groundbreaking discovery during a lecture demonstration. He noticed that an electric current flowing through a wire deflected a nearby compass needle. This was the first evidence that electric currents create magnetic fields - a discovery that revolutionised our understanding of electromagnetism.
Current-carrying wires
When iron filings are placed around a wire carrying electric current, they form circular loops. This shows that the magnetic field lines around a straight current-carrying wire are circular, centred on the wire. The field gets weaker as you move further from the wire - the field lines spread out and become less dense.
Michael Faraday was the first to observe and publish details about these circular field patterns. Later, Jean-Baptiste Biot and Félix Savart made precise measurements showing exactly how the field strength decreases with distance from the wire.
Current loops
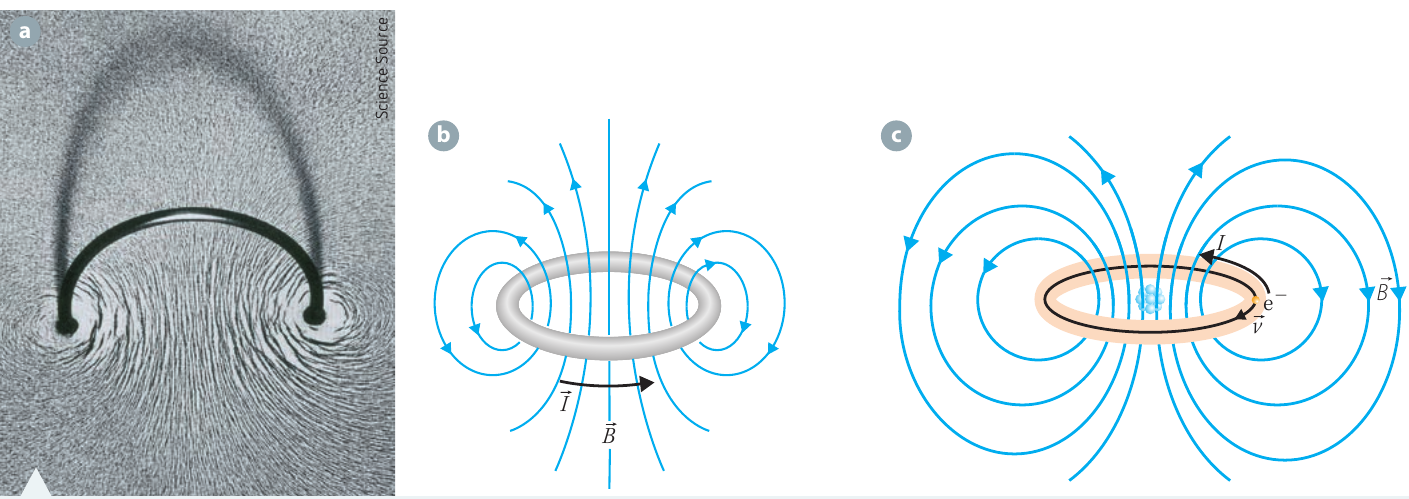
When you bend a current-carrying wire into a loop, something interesting happens to the magnetic field. Inside the loop, the field lines bunch together and run parallel to each other, creating a strong, relatively uniform field. Outside the loop, the field lines spread out and the field becomes much weaker.
The image above demonstrates this effect. Notice how the field pattern of a current loop resembles that of a bar magnet, with distinct north and south poles. This similarity is not a coincidence - the magnetic fields from electrons orbiting atomic nuclei follow the same pattern, and these atomic current loops are responsible for the magnetic properties of materials.
Solenoids
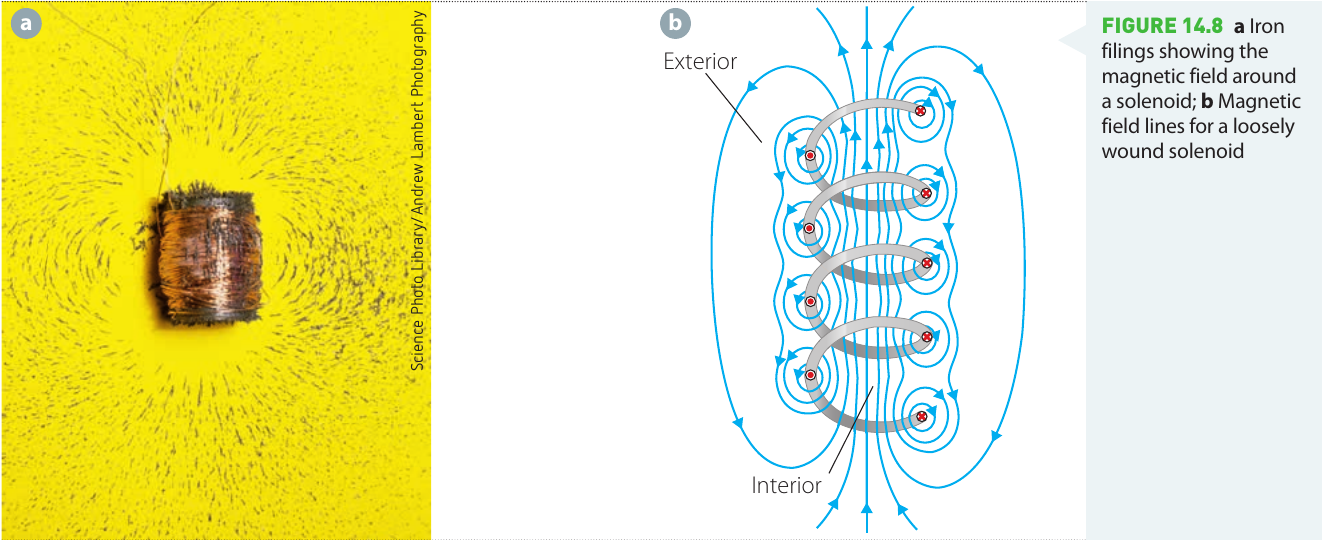
A solenoid is a coil made by winding wire into many loops. Each loop contributes to the total magnetic field, so solenoids produce much stronger fields than single loops. Inside a tightly wound solenoid, the field lines are straight and parallel, creating a large, uniform field. Outside the solenoid, field lines from adjacent loops tend to cancel each other out, resulting in a very weak external field.
Applications of Solenoids
The more turns of wire in the solenoid, the stronger the internal magnetic field. This makes solenoids extremely useful devices. They store energy in their magnetic fields and are used in inductors, transformers, electromagnets, magnetic switches, and many other applications.
Key properties of magnetic field lines
Direction and poles
Magnetic field lines always emerge from north poles and enter south poles. This is fundamentally different from electric charges, which can exist independently as positive or negative charges.
Magnetic Poles Always Come in Pairs
Magnetic poles always come in pairs - you cannot isolate a north pole without having a south pole somewhere. This is a fundamental property that distinguishes magnetism from electricity.
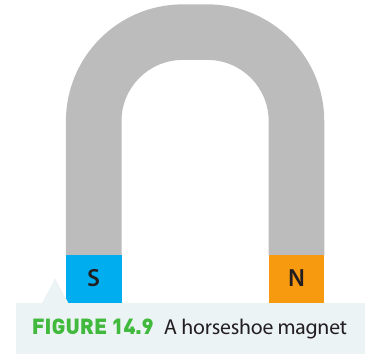
Consider the horseshoe magnet shown above. The field lines leave the north pole (marked N), travel through the air gap, and enter the south pole (marked S). Inside the magnet, the field lines continue through the material back to the north pole, forming a complete loop.
Closed loops
Magnetic Field Lines Form Closed Loops
Unlike electric field lines, which can start on a positive charge and end on a negative charge, magnetic field lines always form complete, closed loops. For permanent magnets, the loops emerge from the north pole, travel around the outside of the magnet to the south pole, then continue through the magnet material back to the north pole.
For magnetic fields created by electric currents, the field lines form closed loops that circle around the current. This is true whether the current flows through a straight wire, a loop, or a solenoid.
Field strength and density
Density Indicates Strength
The density of field lines indicates the strength of the magnetic field. Where lines are packed closely together, the field is strong. Where they spread apart, the field is weak. This relationship is proportional - if the lines are three times as dense, the field is three times as strong.
For a bar magnet, the field is strongest near the poles and weakest far away. Inside the magnet itself, the field is actually stronger than at the poles. For a current-carrying wire, the field is strongest close to the wire and gets progressively weaker with distance.
Investigation 14.3: Visualising magnetic field lines in three dimensions
Aim
To observe the magnetic field lines of magnets in three dimensions using iron filings suspended in oil.
Materials
- Bottle of baby oil
- Iron filings (approximately 15 mL)
- Test tube that fits snugly into the bottle neck
- Small magnets (spherical magnets, bar magnets, or fridge magnet strips)
- Paper towel
Risk assessment
Safety Considerations
| Risk | Management strategy |
|---|---|
| Oil containing metal filings may cause skin irritation and abrasions if not properly disposed of | Dispose of contaminated oil correctly, or label clearly and store in the laboratory |
| Glassware may break and cause cuts | Handle glassware carefully and clean up any breakages according to teacher instructions |
Method
- Remove the label from the bottle and pour out a small amount of oil so the test tube will fit inside. Do not pour oil down the sink - ask your teacher where to dispose of it.
- Add the iron filings to the oil in the bottle.
- Insert the test tube into the bottle neck. It should fit snugly to prevent oil leaking around it. Clean up any spills immediately with paper towel.
- Carefully slide the first magnet into the test tube. Do not drop it as this may break the tube.
- Draw diagrams or take photographs showing how the iron filings have arranged themselves. You may need multiple views from different angles to capture the three-dimensional field pattern.
- Carefully remove the first magnet.
- Repeat steps 4-6 with each different magnet.
Results
You should obtain a collection of diagrams or photographs showing the three-dimensional field patterns for different magnets.
Analysis
- Compare the field patterns produced by different magnets. What similarities and differences do you observe?
- Can you identify where the north and south poles are located on each magnet?
- How does the field pattern indicate how field strength varies with distance from each magnet?
Conclusion
Write a conclusion that refers to your observations and addresses the investigation aim.
Investigation 14.4: Visualising magnetic field lines using computer simulations
Aim
To model magnetic field lines for various current configurations using computer simulations.
Materials
- Computer
- Magnetic field line simulator software (available online)
Method
- Open the magnetic field line simulator and follow its instructions.
- When the simulator displays magnetic field lines, capture the image (for example, by taking a screenshot) and save it.
- Vary the magnitude and direction of the current. Record how the field pattern changes.
- Test different current arrangements, such as:
- A long straight wire
- Two parallel wires with currents in the same direction
- Two parallel wires with currents in opposite directions
- A current loop
- A solenoid
- Keep detailed records of each configuration and the resulting field patterns.
Results
You should have a collection of diagrams showing field line patterns for different current arrangements.
Analysis
- What do your field line diagrams reveal about the force that would act on a magnet placed at different positions?
- How do the diagrams indicate how field strength varies with distance from each current?
Conclusion
Write a conclusion based on the investigation aim, referring to your observations and analysis.
Understanding Simulation Limitations
Computer simulations are valuable tools for visualising complex magnetic fields, especially those created by complicated current arrangements. However, remember that simulations are models - they represent reality but are not the real thing. Like all models, simulations have limitations and simplifications built into them.
Remember!
Key Points to Remember:
-
Magnetic field lines are visual models that show both the direction and strength of magnetic fields at different points in space.
-
Field line direction indicates the force on a north pole - lines emerge from north poles and enter south poles.
-
Field line density shows field strength - closely spaced lines mean a strong field, while widely spaced lines indicate a weak field.
-
Magnetic field lines always form closed loops - they either circle around currents or pass through permanent magnets from south to north pole internally.
-
Electric currents create magnetic fields - discovered by Øersted in 1819, this principle underlies electromagnets, motors, generators, and countless other technologies.