Convert algorithms 4 (Edexcel GCSE Computer Science): Revision Notes
Convert algorithms 4: Count-controlled loops
What are count-controlled loops?
Count-controlled loops are a type of repetition structure that runs for a fixed number of times. This means you know exactly how many iterations the loop will complete before it starts running. These loops are perfect for situations where you need to repeat an action a specific number of times, like counting from 1 to 10 or displaying a message five times.
In programming, count-controlled loops are translated into Python using the for...in range() statement. This is different from condition-controlled loops that continue until a certain condition becomes true or false.
The key difference between count-controlled and condition-controlled loops is predictability - with count-controlled loops, you always know in advance exactly how many times the loop will execute.
Understanding flowchart symbols for loops
When you see a flowchart with a count-controlled loop, look for these key features:
- A rectangular box for setting the initial counter value
- A diamond shape for the decision/condition check
- A backwards arrow that points back to the condition - this indicates the loop structure
- Process boxes for the actions performed inside the loop
- An increment or decrement step to change the counter value
The backwards arrow is your main clue that you're looking at a loop structure rather than a simple sequence of steps. Always look for this visual indicator when analysing flowcharts.
Converting counting up loops
Let's examine how to convert a simple counting loop from a flowchart to Python code.
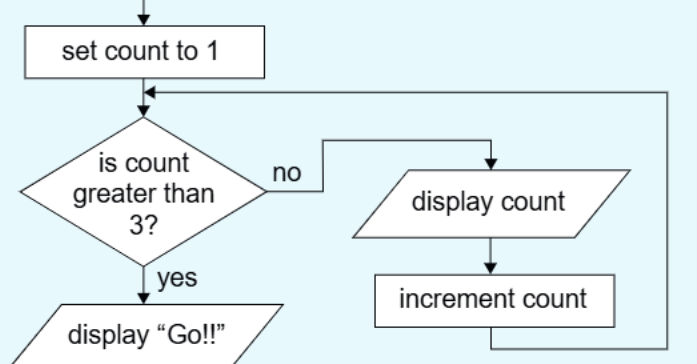
This flowchart shows a "1-2-3-go" algorithm that follows these steps:
- Sets a counter to 1
- Checks if the count is greater than 3
- If not, displays the count and increments it
- Loops back to check the condition again
- When the count exceeds 3, displays "Go!!"
Worked Example: Converting a Count-Up Loop
From the flowchart above, we can convert this to Python code:
for count in range(1, 4):
    print(count)
print("Go!!")
Step-by-step breakdown:
- range(1, 4) generates numbers 1, 2, 3 (includes the start but excludes the end)
- The loop automatically handles incrementing the counter
- Any code indented under the for statement runs inside the loop
Remember that the range() function includes the start value but excludes the end value. So range(1, 4) produces 1, 2, 3 - not 1, 2, 3, 4.
Converting counting down loops
Now let's look at a countdown example to see how loops can work in reverse.
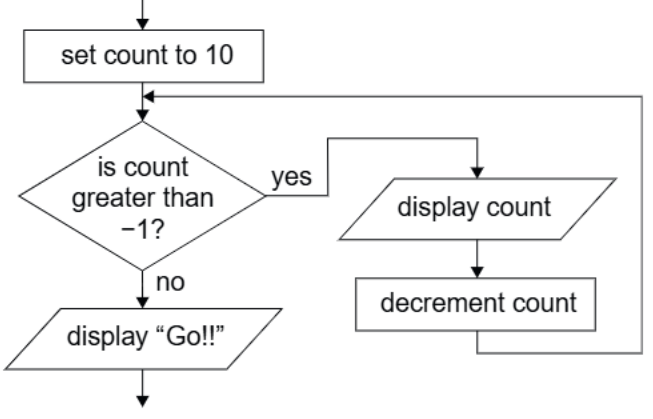
This flowchart implements a countdown from 10 that follows these steps:
- Sets the counter to 10
- Checks if the count is greater than -1 (meaning 0 or above)
- If true, displays the count and decrements it by 1
- Loops back until the count reaches -1
- Then displays "Go!!"
Worked Example: Converting a Count-Down Loop
From the countdown flowchart above:
for count in range(10, -1, -1):
    print(count)
print("Go!!")
Understanding the range() parameters:
- range(10, -1, -1) means: start at 10, stop before -1, step by -1
- This generates the sequence: 10, 9, 8, 7, 6, 5, 4, 3, 2, 1, 0
- The third parameter (-1) is the step value that tells Python to count backwards
When counting down, you need three parameters in range(): the start value, the end value (exclusive), and the negative step value. Don't forget that third parameter!
Exam tips for converting algorithms
When faced with a flowchart conversion question, follow this systematic approach:
Essential Steps for Flowchart Conversion:
- Identify the loop type - look for the backwards arrow pointing to a condition
- Find the starting value - usually in the first rectangular box
- Determine the condition - check what the diamond is testing
- Spot the increment/decrement - see how the counter changes each time
- Work out the range() - figure out start, stop, and step values
Common mistakes to avoid:
- Forgetting that range() excludes the end number
- Missing the step value for countdown loops
- Not indenting the code inside the loop properly
- Adding extra functionality when the question asks for basic implementation only
Practice makes perfect
The best way to master these conversions is to practice identifying the pattern. Here are the key patterns to remember:
- Count up = range(start, end+1)
- Count down = range(start, end-1, -1)
- Custom steps = range(start, end, step)
Remember that recognising these patterns in flowcharts and translating them to the correct for...in range() syntax is a key skill for GCSE programming questions.
Practice with different starting values, ending values, and step sizes. The more patterns you recognise, the faster you'll be able to convert flowcharts during exams.
Key Points to Remember:
- Count-controlled loops run for a fixed number of times that you know in advance
- Look for the backwards arrow in flowcharts to identify loop structures
- Python uses for...in range() to implement count-controlled loops
- The range() function includes the start value but excludes the end value
- Use a negative step value (like -1) to create countdown loops