Pictorial Projection 2 (Leaving Cert DCG): Revision Notes
Method of Constructing a two-point perspective
Two-point perspective is a powerful drawing technique that creates realistic three-dimensional representations of objects. This method uses two vanishing points to show how parallel lines appear to converge in the distance, giving drawings depth and realism.
Understanding the basic setup
The construction process begins with two essential views: a plan view (looking down from above) and an elevation view (looking from the side). These orthographic projections provide all the measurements and proportions needed to create an accurate perspective drawing.
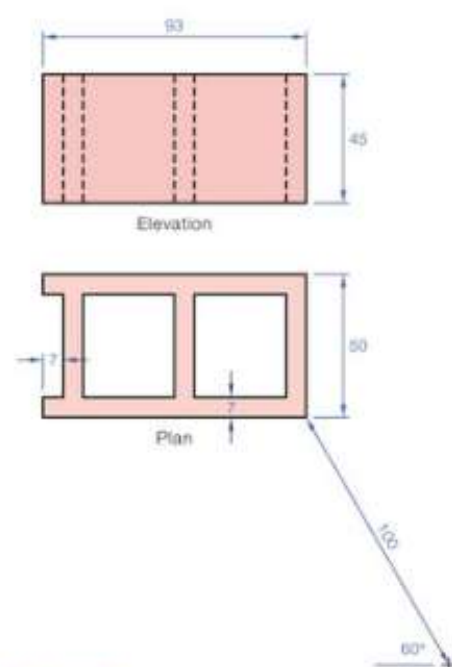
The spectator position is crucial in perspective construction. The viewer is typically positioned at a specific distance from the object and at a certain height above ground level. The central line of vision extends from the spectator's eye towards the object, creating the foundation for the entire construction.
Understanding the relationship between the spectator position and the object is fundamental to creating convincing perspective drawings. This relationship determines the viewing angle and the apparent size of objects in the final drawing.
Key elements and terminology
Several important elements work together in two-point perspective construction:
- Picture plane: An imaginary vertical surface that acts like a window through which we view the scene. It must always be perpendicular to the central line of vision
- Vanishing points (VP1 and VP2): Two points where parallel lines appear to meet on the horizon line
- Ground line: The intersection between the ground plane and the picture plane
- Horizon line: A horizontal line representing the viewer's eye level
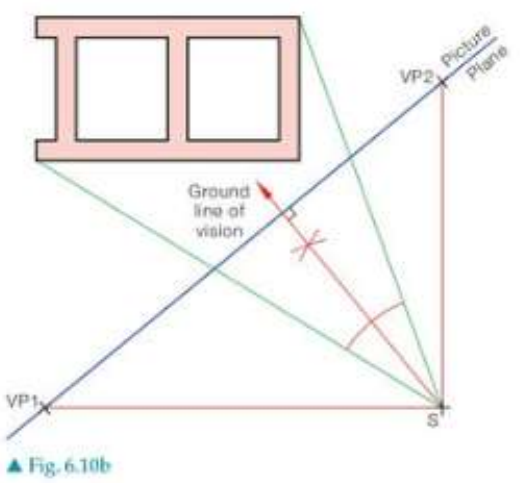
The relationship between these elements determines how the final perspective will appear. The picture plane serves as the drawing surface where the perspective image is projected.
The picture plane must always be perpendicular to the central line of vision. This is a fundamental rule that ensures accurate perspective construction. Violating this principle will result in distorted or incorrect perspective drawings.
Step-by-step construction process
Initial projection setup
The construction begins by connecting the corner points of the plan view back to the spectator position. These connection lines help establish the angle and position of the object relative to the viewer. The intersection points where these lines cross the picture plane become reference points for the perspective construction.
Establishing vanishing points
The two vanishing points are determined by extending lines parallel to the principal axes of the object until they meet the picture plane. These points control how the object's edges will appear to converge in the perspective view.
Step-by-Step Construction Process:
Step 1: Locate vanishing points on the picture plane
Step 2: Draw the horizon line through both vanishing points
Step 3: Project height measurements from the elevation view
Step 4: Use light rays to transfer information from plan to perspective
Building the perspective view
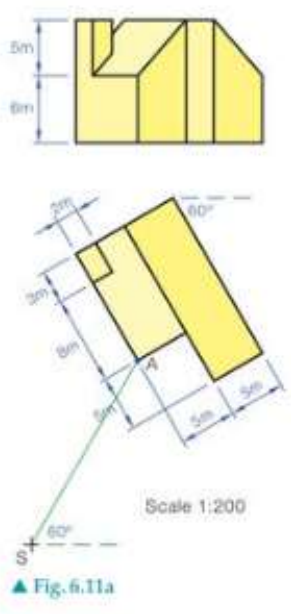
The construction process involves projecting points from both the plan and elevation views onto the picture plane. Light rays drawn from key points help establish where features should appear in the final perspective drawing.
Each corner and edge of the object must be carefully projected to ensure accurate proportions in the final result. The process requires systematic attention to how lines converge towards the appropriate vanishing point.
Patience and precision are essential during this stage. Taking time to accurately project each point will result in a much more convincing final drawing.
Advanced construction techniques
Completing complex forms
For more complex objects, the construction process involves building up the form systematically. Each face of the object is constructed by extending lines to the appropriate vanishing point and using height measurements projected from the elevation view.
Managing height and depth
Vertical measurements are transferred directly from the elevation view, while horizontal distances are determined by the convergence towards vanishing points. This combination ensures that the perspective maintains accurate proportions while showing proper depth recession.
The final perspective drawing should show a convincing three-dimensional representation that appears natural to the viewer's eye.
Practical applications
Two-point perspective construction is essential for:
- Architectural drawings and visualisations
- Product design presentations
- Technical illustration
- Artistic representation of buildings and objects
Understanding this construction method enables you to create accurate, professional-looking perspective drawings that communicate spatial relationships effectively.
These skills are particularly valuable in professional design fields where clear communication of three-dimensional concepts is essential for client presentations and technical documentation.
Exam tips
Essential Guidelines for Success:
- Always establish your picture plane perpendicular to the central line of vision
- Take time to accurately locate your vanishing points - they control the entire drawing
- Use light construction lines that can be erased later
- Work systematically through each step rather than jumping ahead
- Check that parallel lines in your object converge to the correct vanishing point
Key Points to Remember:
- Two-point perspective uses two vanishing points on the horizon line to create realistic depth
- The picture plane must always be perpendicular to the central line of vision
- Light rays help project information from plan and elevation views to create the perspective
- Systematic construction ensures accurate proportions and realistic appearance
- This technique is essential for architectural and technical drawings requiring three-dimensional representation