Finding Auxiliary Vanishing Points (Leaving Cert DCG): Revision Notes
Finding Auxiliary Vanishing Points
What are auxiliary vanishing points?
Auxiliary vanishing points are special reference points used in perspective drawing to help construct sloped lines accurately. When drawing objects that have slanted surfaces, such as roofs or ramps, these sloped lines don't converge to the main vanishing points. Instead, they need their own vanishing points called auxiliary vanishing points (AVP).
Think of auxiliary vanishing points as specialised tools for handling any line that isn't perfectly horizontal or vertical in your perspective drawing. They work alongside your main vanishing points to create accurate three-dimensional representations.
When do we need auxiliary vanishing points?
You'll need auxiliary vanishing points whenever you're drawing objects with angled surfaces that don't align with your main perspective grid.
Common Applications: You'll encounter auxiliary vanishing points when drawing:
- Sloped roofs or surfaces
- Ramps or inclined planes
- Any object with lines that aren't horizontal or vertical
- Complex architectural features with angled elements
Method 1: Traditional distance method
This method uses measurements from your elevation and plan views to locate the auxiliary vanishing point. It's a systematic approach that relies on geometric construction to find the correct position.
Key rule for horizon placement
The position of your auxiliary vanishing point depends on the direction of the sloped lines:
- If sloped lines go upwards as they move away from the spectator, the auxiliary vanishing point will be above the horizon
- If sloped lines go downwards as they move away from the spectator, the auxiliary vanishing point will be below the horizon
Step-by-step process
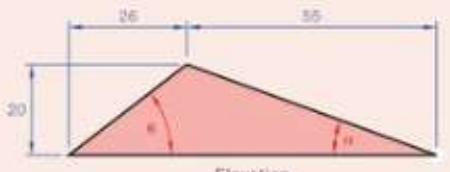
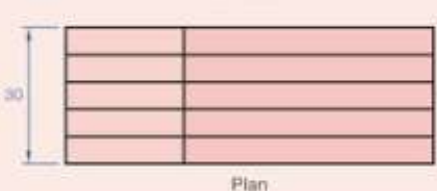
Worked Example: Constructing an Auxiliary Vanishing Point
Step 1: Identify the sloped lines First, you need to identify which set of sloped lines requires the auxiliary vanishing point. Look at your elevation view to see the angle and direction of these lines.
Step 2: Draw a line to the spectator Create a line that runs parallel to your set of sloped lines, extending it back towards the spectator position in your plan view.
Step 3: Measure and transfer heights Take the length measurement of one of the sloped lines as it appears in your plan view. Use this measurement to determine the height difference, then mark this as a perpendicular distance from your horizon line.
Step 4: Complete the triangle The auxiliary vanishing point is located where these construction lines meet. This triangular construction ensures your sloped lines will appear correctly in perspective.
Method 2: Alternative method using true angles
This second method is often more accurate as it uses the actual angles rather than scaled distances. Instead of relying on measurements, this approach focuses on the angular relationships between lines.
How the angle method works:
Instead of measuring distances, this method focuses on the true angular relationships between lines. You create the auxiliary vanishing point by:
- Taking the true angle of your sloped lines from your elevation drawing
- Projecting this angle directly to find where the auxiliary vanishing point should be positioned
- Using parallel lines to the sloped set to establish the exact location
Advantages of the angle method
The angle method offers several benefits over the traditional distance method:
- More precise than distance measurements
- Reduces errors from scaling issues
- Gives cleaner, more accurate perspective results
- Works well for complex angular relationships
Practical application tips
Understanding the theory is important, but successful application requires attention to technique and awareness of common pitfalls.
Essential Drawing Technique:
- Always start with your basic two-point perspective setup
- Add auxiliary vanishing points only after establishing your main vanishing points
- Use light construction lines that can be erased later
- Check that your sloped lines all converge properly to the auxiliary point
Common mistakes to avoid:
- Forgetting to check whether slopes go up or down from the spectator
- Placing auxiliary vanishing points on the wrong side of the horizon
- Making construction lines too heavy or permanent
- Not maintaining consistent angles throughout the drawing
Key Points to Remember:
- Auxiliary vanishing points handle sloped lines that don't fit the main horizontal and vertical perspective system
- Up slopes = AVP above horizon, down slopes = AVP below horizon - this rule is crucial for correct placement
- Two methods available: distance method using measurements, or angle method using true angles
- Always construct lightly first - these are construction tools, not final drawing elements
- Check your work by ensuring all parallel sloped lines converge to the same auxiliary vanishing point