Types of Perspective (Leaving Cert DCG): Revision Notes
Types of Perspective
Understanding perspective terminology
Before diving into the different types of perspective, it's essential to understand the key terms that form the foundation of perspective drawing. These terms will help you communicate clearly about perspective techniques and understand how they work.
Mastering perspective terminology is crucial for technical drawing success. These terms form the language that designers and engineers use to communicate about spatial relationships and drawing techniques.
Key perspective terms
Picture plane is the imaginary vertical surface onto which your drawing is projected. Think of it like a window that you're looking through. You can move this plane closer to or further from the object you're drawing. When the picture plane is positioned behind the object, your drawing will appear larger than the actual object. When it's placed in front of the object, your drawing will be smaller than reality.
Ground line represents where the picture plane meets the horizontal surface or ground. This line helps establish the base reference point for your perspective drawing.
Horizon line is a horizontal line drawn on the picture plane that matches the height of your eyes as the viewer. This line is crucial because it determines your viewpoint and affects how objects appear in your drawing.
Spectator refers to you, the person viewing and drawing the object. Your position relative to the object affects the entire perspective.
Station point describes your exact position as the spectator in relation to both the object and the picture plane. Moving your station point changes your perspective view.
Vanishing points are special points where parallel lines appear to meet in the distance. All sets of parallel lines that aren't parallel to the picture plane will converge to their own vanishing point. Horizontal vanishing points always sit on the horizon line.
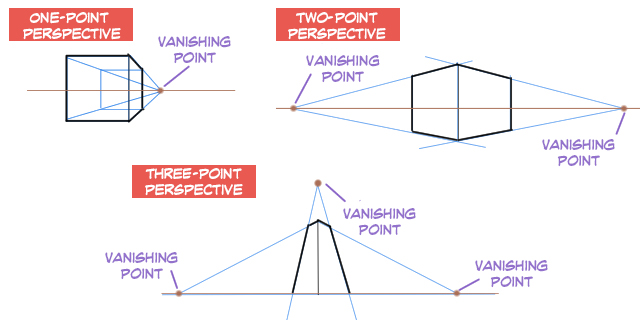
Understanding the three types of perspective
Perspective drawing systems are categorised based on how the object is positioned relative to the picture plane. Each type creates different visual effects and serves different purposes in technical drawing.
One-point perspective (parallel perspective)
One-point perspective occurs when two of the object's main axes are parallel to the picture plane, leaving only the third axis to converge to a single vanishing point. This is the most commonly used perspective system because it's quick to construct and produces clear, easily understood drawings.
Practical Application: Cabinet Drawing
The cabinet shown above demonstrates perfect one-point perspective. Notice how:
- The front face remains perfectly rectangular (parallel to picture plane)
- All depth lines converge to a single vanishing point
- Vertical and horizontal edges of the front face stay parallel to the picture plane edges
This perspective type is particularly useful for:
- Presentation work where clarity is important
- Interior room layouts where you're looking straight into a space
- Objects with circular features because circles remain as true circles when their surfaces are parallel to the picture plane
When drawing objects with curved surfaces in one-point perspective, position the object so that surfaces containing circles face directly towards you. This way, you can draw the circles with a compass rather than constructing complex ellipses.
Two-point perspective (angular perspective)
Two-point perspective is created when the object is rotated so that only its vertical edges remain parallel to the picture plane. The horizontal edges converge to two separate vanishing points on the horizon line. This creates a more dynamic view that shows two faces of the object simultaneously.
Three-point perspective
Three-point perspective occurs when none of the object's edges are parallel to the picture plane. This creates the most dramatic viewpoint, often used for very tall buildings viewed from ground level or objects seen from unusual angles.
Choosing the Right Perspective Type
Your choice of perspective depends on what you want to emphasise:
- Use one-point for clarity and circular features
- Use two-point for dynamic views showing multiple faces
- Use three-point for dramatic architectural or unusual viewpoints
Practical drawing tips
Step-by-Step Perspective Setup
- Establish your horizon line first - this represents your eye level
- Position your station point carefully - too close creates distortion, too far creates a flat appearance
- Choose your perspective type based on which faces of the object you want to show clearly
- Remember that vertical lines stay vertical in one-point and two-point perspective
Start with one-point perspective as it's the easiest to master. Use one-point perspective for objects with important circular details, as this allows you to draw true circles rather than complex ellipses.
Key Points to Remember
- Picture plane is your drawing surface - moving it changes the size of your perspective
- Horizon line equals your eye level and contains all horizontal vanishing points
- One-point perspective needs two axes parallel to the picture plane - it's the most common and practical type
- Vanishing points are where parallel lines meet - horizontal ones always sit on the horizon line
- Choose perspective type based on what faces of the object you want to show clearly