Molecular Make-Up of Cells (Grade 10 NSC Matric Life Sciences): Revision Notes
Molecular Make-Up of Cells
Introduction to cells
Cells are the fundamental structural and functional units of all living organisms. These microscopic structures are composed of the organic molecules you've studied previously - carbohydrates, fats, proteins, nucleic acids, and water. The term "cell" was first coined in the 17th century by scientist Robert Hooke when he observed small compartments in cork tissue under a microscope.
The human body contains approximately cells, each too small to see with the naked eye. This incredible number demonstrates why the development of microscopic techniques has been essential for understanding life at the cellular level.
As Antonie van Leeuwenhoek, known as the Father of Microbiology, famously stated in 1657: "I discovered very small living creatures in rain water." His groundbreaking observations, along with Robert Hooke's discoveries, established the foundation of microbiology and our understanding of cellular life.
Understanding microscopy
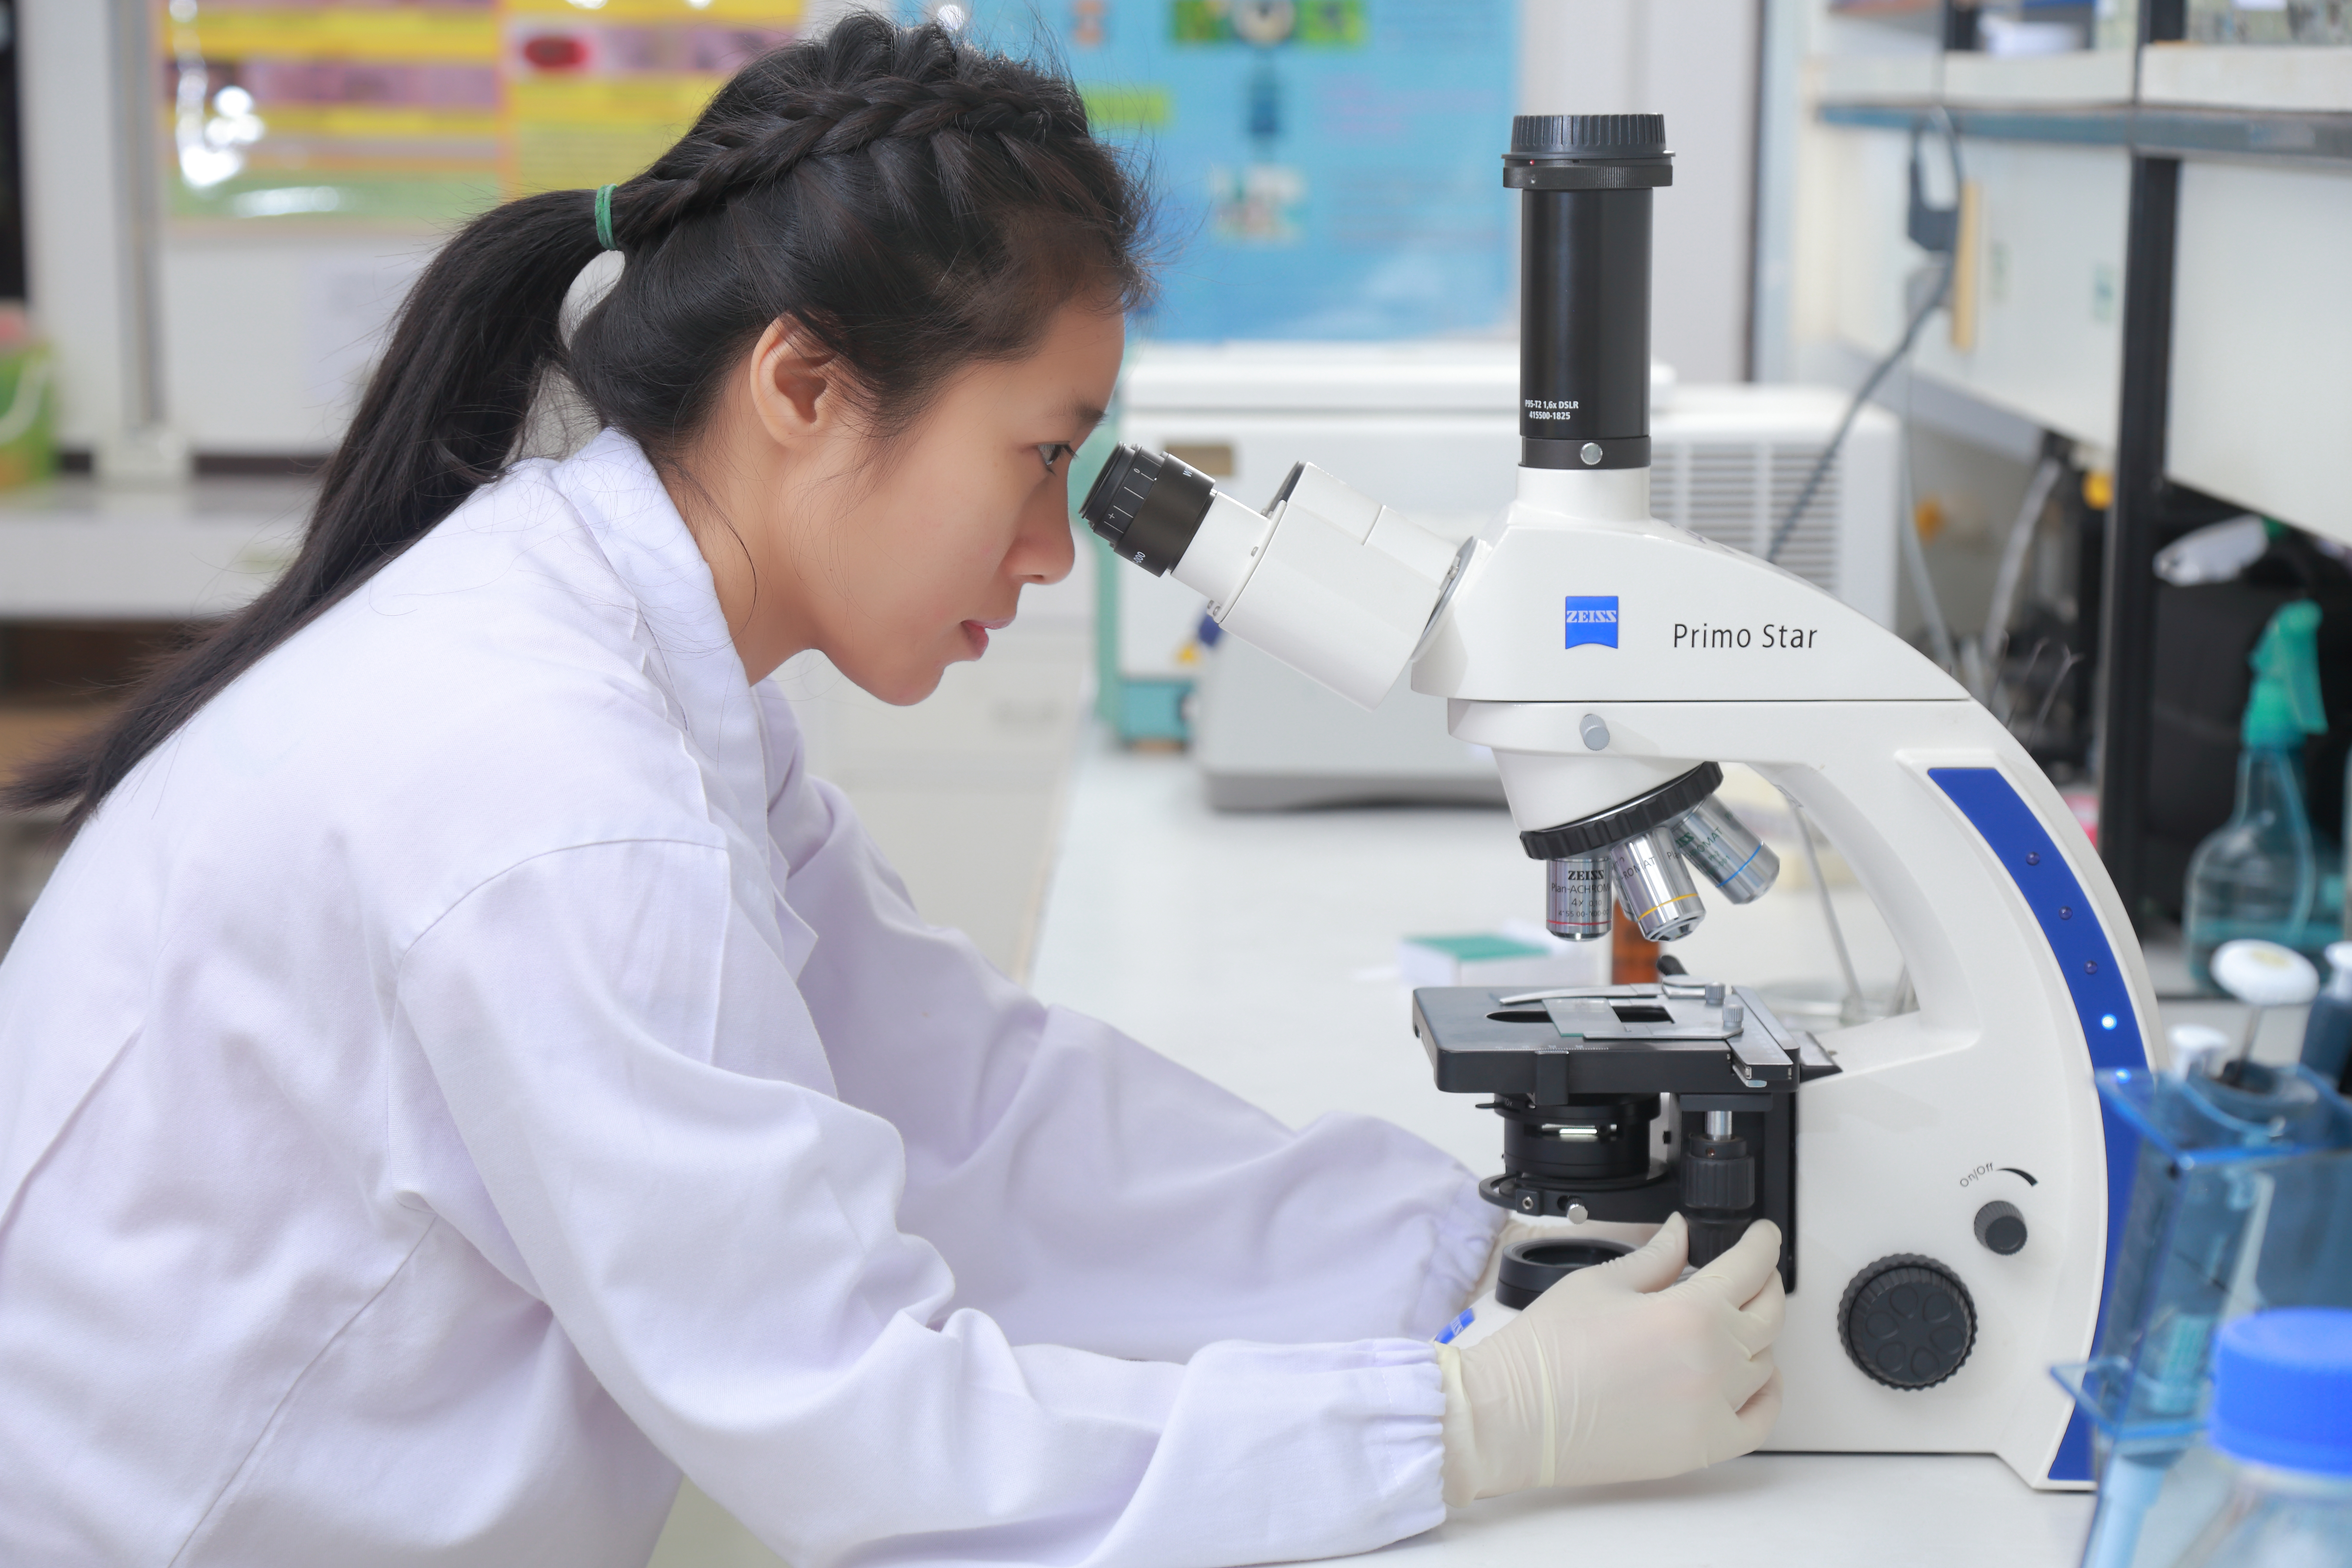
The invention of microscopes revolutionised our ability to study life at the microscopic level. Without these instruments, we would never have discovered the intricate world of cells and their internal structures.
Types of microscopes
Dissecting microscope This optical microscope allows you to view three-dimensional images at low resolution. It's particularly useful for examining live tissues and specimens that need low-level magnification.
Light microscope The light microscope uses visible light to magnify images and can achieve up to 1000X magnification. This instrument enabled scientists to observe individual cells and internal structures like cell walls, membranes, mitochondria, and chloroplasts. However, to see even smaller structures such as the internal details of organelles, more powerful microscopes were needed.
Electron microscopes The development of electron microscopes allowed scientists to observe organelles like mitochondria and chloroplasts in much greater detail. There are two main types:
Transmission Electron Microscope (TEM): Uses a beam of electrons passing through extremely thin sections of material. The electrons are focused by electromagnetic lenses to create detailed images of internal structures.
Scanning Electron Microscope (SEM): Electrons bounce off the surface of the material, producing detailed 3D images of external surfaces. An electron collector captures these secondary electrons, and the image is amplified and viewed on a screen.
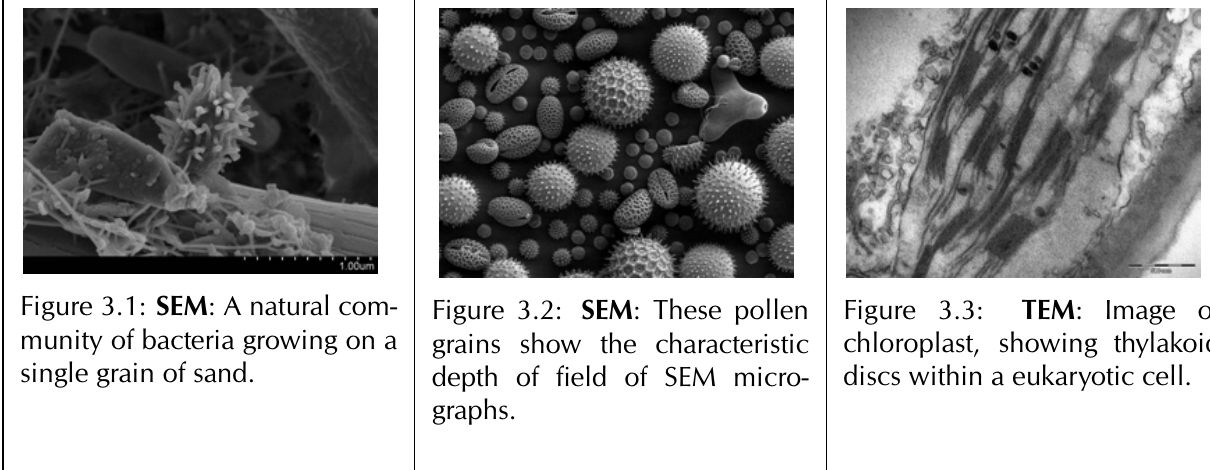
The images above demonstrate the different capabilities of these microscopes - from SEM images showing bacterial communities and pollen grain surfaces, to TEM images revealing the internal structure of chloroplasts.
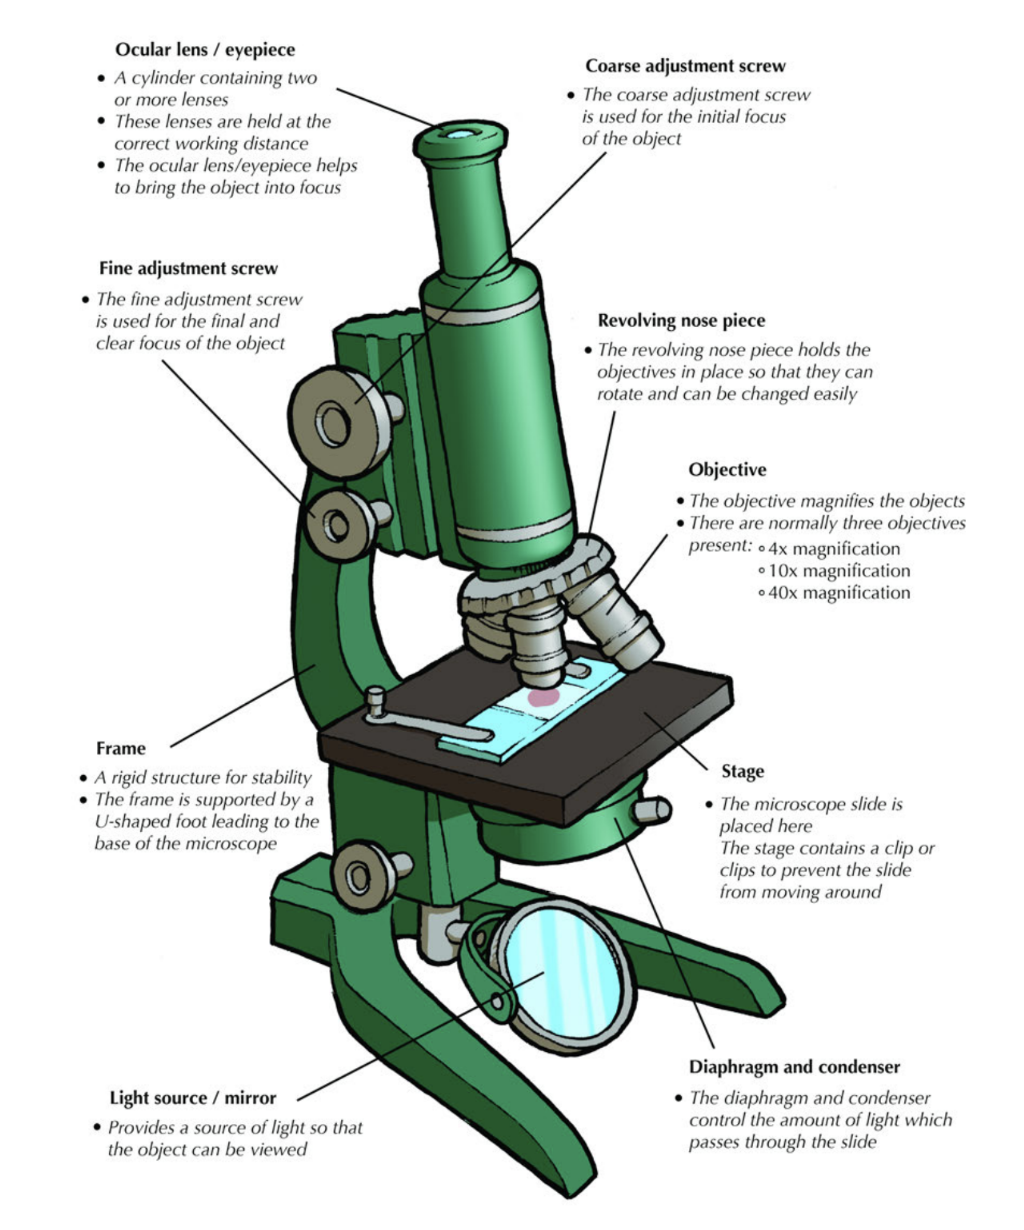
Parts of a light microscope
Understanding each component of a light microscope helps you use it effectively and safely.
| Part of the microscope | Description |
|---|---|
| Ocular lens/eyepiece | Contains two or more lenses held at the correct working distance. Helps bring the object into focus. |
| Revolving nosepiece | Holds the objectives in place so they can rotate and be changed easily. |
| Objective | Magnifies the objects. Usually three objectives are present: 4X, 10X, and 40X magnification. |
| Coarse adjustment screw | Used for initial focus by moving the stage up and down, bringing the object closer to or further from the objective lens. |
| Fine adjustment screw | Used for final and clear focus of the object. |
| Frame | Provides rigid structure for stability. Supported by a U-shaped foot leading to the microscope base. |
| Light source/mirror | Provides light so the object can be viewed. |
| Diaphragm and condenser | Controls the amount of light passing through the slide. |
| Stage | Where the microscope slide is placed. Contains clips to prevent slide movement and has a hole allowing light through. |
The ocular lens, rotating nosepiece, and objectives are held above the stage by the arm.
How to use a microscope correctly
Follow these steps to ensure proper microscope use and avoid damage:
- Handle with care: Always carry the microscope with both hands - grasp the arm with one hand and support the base with the other.
- Start with low power: Turn the revolving nosepiece so the lowest power objective is in position.
- Prepare your slide: Place the microscope slide on the stage and secure it with the stage clips.
- Adjust lighting: Look through the eyepiece and adjust the diaphragm for maximum light.
- Initial focusing: While viewing the slide from the side, turn the coarse adjustment screw to bring the stage as close to the objective lens as possible.
- Coarse focus: Slowly turn the coarse adjustment screw until the image comes into focus.
- Fine focus: Use the fine adjustment screw to move the stage downwards until the image is clearly visible.
- Optimise image: Readjust the light source and diaphragm for the clearest image.
- Change objectives: When switching to higher magnification, use only the fine adjustment screw.
- Handle lenses carefully: Never touch the glass parts of lenses with your fingers.
- Proper storage: When finished, move the stage and objective as far apart as possible, remove the slide, disconnect power, and cover the microscope.
- Safe transport: Carry the microscope by holding both the "arm" and "base", keeping it close to your chest.
Critical Safety Rules:
- Never touch or damage the slide
- Never move the lens towards the slide
- Never use the coarse adjustment screw for higher power objectives
- Never touch the glass parts of lenses with your fingers
Microscopes are expensive scientific equipment requiring careful handling. Use proper lens paper for cleaning and avoid moisture on objective lenses, as dust and moisture are microscopes' biggest enemies.
Comparing light and electron microscopes
| Property | Light Microscope | Transmission Electron Microscope |
|---|---|---|
| Source | Light | Beam of electrons |
| Resolution | Under optimal conditions (clean lenses, oil immersion): 0.2 micrometres or 2 thousandths of a millimetre | About 0.05 nanometers (nm) - approximately 0.5 millionths of a millimetre. This gives about 10,000 times the resolving power of a light microscope |
| Material (alive/dead) | Can observe living or dead specimens. Bright field or phase contrast microscopes enable viewing of living cells. Some specimens need staining | Dead specimens only. Images produced by passing electron beam through tissues stained with heavy metals |
| Example image | Bacterial spores under light microscope | Chlamydomonas reinhardtii (single-celled green algae) under transmission electron microscope |
Microscopy calculations
Understanding how to calculate magnification and measurements is crucial for interpreting microscopic observations accurately.
Calculating overall magnification
Microscopes achieve magnification through two lens systems working together. The ocular lens (eyepiece) provides initial magnification, which is then further increased by the objective lens.
Formula:
Worked Example: Basic Magnification Calculation
If the eyepiece magnification is 5X and the objective lens magnification is 10X, what is the total magnification?
Solution: Overall magnification = 5X × 10X = 50X
This means the image appears 50 times larger than the actual object.
Understanding field of view
When viewing objects through a microscope, you see them within a circular area called the field of view. This represents the diameter of the circle through which you observe the specimen.
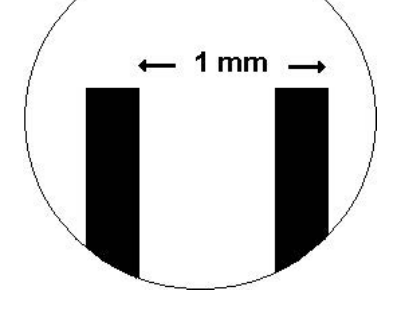
Key relationship: As magnification increases, the field of view decreases.
You can measure field of view using a microscope slide with a tiny ruler. For example, at low power magnification, the field of view might be approximately 1 millimetre.
Calculating new field of view: When changing magnification, use this formula:
Worked Example: Field of View Calculation
- At 10X magnification, field of view = 1.0 mm
- What is the field of view at 100X magnification?
Solution: New field of view =
This means at higher magnification, you see smaller areas in greater detail.
Using scale bars and calculating actual sizes
When drawing cellular structures, your diagrams are usually much larger than the actual structures.
Basic magnification formula:
With scale bars:
Worked examples
Worked Example 1: Overall Magnification
Calculate the overall magnification of a compound light microscope with 10X eyepiece magnification and 100X objective magnification.
Solution: Overall magnification = power of eyepiece × power of objective = 10 × 100 = 1000X the original size
Worked Example 2: Calculating Actual Size
A beetle larva image measures 2 centimetres (20 mm) when viewed with 5X ocular magnification and 10X objective magnification. What is the actual length?
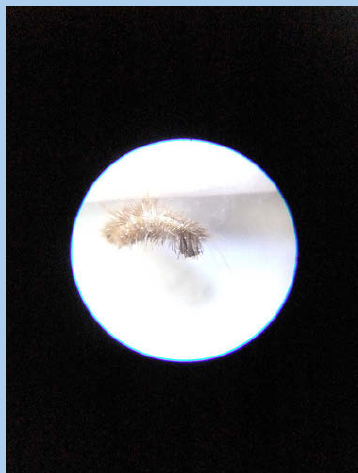
Solution: Step 1: Calculate total magnification Overall magnification = 5 × 10 = 50X the original size
Step 2: Calculate actual size
The actual larva length is 0.4 millimetres.
Worked Example 3: Field of View Calculations
If the field of view is 0.05 mm at 500X magnification, what will it be at 100X magnification?
Solution:
At lower magnification, you see a larger area (0.25 mm vs 0.05 mm).
Key Points to Remember:
-
Cells are the basic units of life - composed of carbohydrates, proteins, fats, nucleic acids, and water, discovered through microscopy developments
-
Different microscopes serve different purposes - light microscopes for living specimens up to 1000X magnification, electron microscopes for detailed internal structures with much higher resolution
-
Proper microscope technique is essential - always start with low magnification, use coarse adjustment for initial focus, fine adjustment for clarity, and handle equipment carefully
-
Magnification calculations follow simple formulas - overall magnification = eyepiece × objective, and higher magnification means smaller field of view
-
Scale and measurement skills are crucial - understanding how to calculate actual sizes from magnified images and using scale bars properly for accurate scientific observations