Diffraction (Grade 11 NSC Matric Physical Sciences): Revision Notes
Diffraction
What is diffraction?
Diffraction is one of the most fascinating properties of waves. When waves encounter obstacles or pass through small openings, they don't simply stop or continue in straight lines - they bend and spread out in a remarkable way.
Definition: Diffraction is the ability of a wave to spread out in wavefronts as the wave passes through a small aperture or around a sharp edge.
Everyday Example: Sound Through Doorways
Think about this everyday example: when two rooms are connected by an open doorway and a sound is produced in a remote corner of one room, a person in the other room will hear the sound as if it originated at the doorway. This happens because the sound waves diffract as they pass through the doorway opening.
The vibrating air in the doorway becomes the source of the sound for the second room. When waves move through small holes, they appear to bend around the sides because there are not enough points on the wavefront to form another straight wavefront. This bending around the sides is what we call diffraction.
Factors affecting diffraction
Diffraction effects become more noticeable under certain conditions. Understanding these factors helps predict when diffraction will be most significant:
- Longer wavelengths show more diffraction than shorter wavelengths
- Smaller obstacles or apertures cause more diffraction
- When the wavelength is similar to or larger than the size of the obstacle, significant diffraction occurs
- When wavelengths are much smaller than obstacles, very little diffraction occurs
The key principle to remember: Diffraction is most pronounced when the wavelength is comparable to or larger than the size of the opening or obstacle.
Experimental demonstration of diffraction
Water wave experiment
You can observe diffraction clearly using water waves in a ripple tank. This hands-on approach provides excellent visual evidence of wave behavior:
Demonstration: Water Wave Diffraction
High frequency waves (short wavelength):
- Place obstacles (like a brick or ruler) in the ripple tank
- Observe how wavefronts propagate near and past the obstacles
- Note the amount of bending around the obstacle
Low frequency waves (longer wavelength):
- Use the same obstacles with longer wavelength waves
- Compare the diffraction with the shorter wavelength case
- You'll notice more pronounced bending with longer wavelengths
The experiment shows that diffraction increases with increasing wavelength and decreases with decreasing wavelength.
Diffraction through a single slit
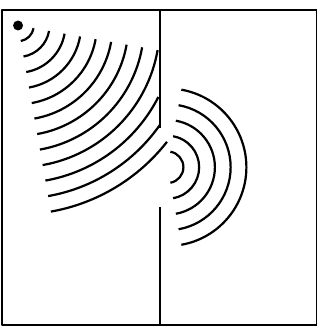
When waves encounter a barrier with a single slit, fascinating patterns emerge. Let's understand this using Huygens' principle, which explains how waves propagate by treating each point on a wavefront as a source of secondary wavelets.
Understanding single slit diffraction
Before the wavefront strikes the barrier, it generates another forward-moving wavefront according to Huygens' principle. Once the barrier blocks most of the wavefront, you can see that the forward-moving wavefront bends around the slit because the secondary waves that would need to interfere to create a straight wavefront have been blocked by the barrier.
The effect is that the wavefronts are no longer straight lines - they spread out in a curved pattern. This curvature is the direct result of diffraction.
Diffraction patterns and interference
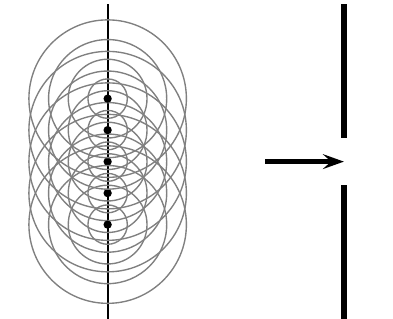
Each point on the wavefront moving through the slit acts like a point source. We can think of this as two point sources close together (representing the edges of the slit) that emit wavefronts with the same wavelength and frequency.

Each point source emits wavefronts from the edge of the slit. In diagrams, we show:
- Black lines represent peaks in the waves (crests)
- Grey lines represent troughs
When these wavefronts meet:
- Constructive interference (peak meets peak or trough meets trough) creates bright regions
- Destructive interference (peak meets trough) creates dark regions
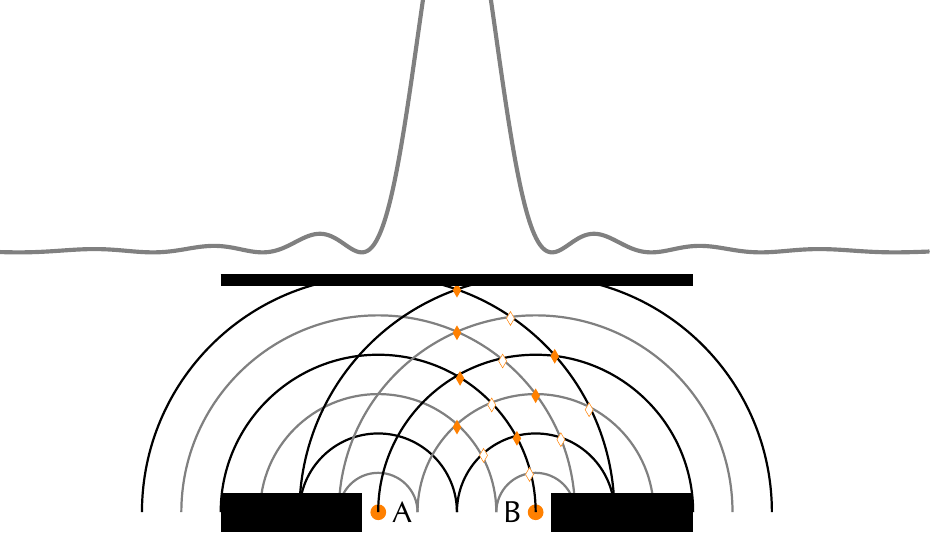
The measurable effect depends on the type of waves. For sound waves, you would hear loud areas where constructive interference occurs and quiet areas where destructive interference occurs.
Critical Concept: The pattern of constructive and destructive interference measured some distance away from a single slit results from two wave properties: diffraction and interference. This pattern is called a diffraction pattern.
Effect of slit width and wavelength
The extent to which diffracted waves spread out depends on two key factors. Understanding this relationship is crucial for predicting diffraction behavior in various situations.
The relationship
The degree of diffraction follows this fundamental relationship:
Where:
- (lambda) = wavelength of the wave
- = width of the slit
What this means in practice
- Narrower slits → more diffraction (waves spread out more)
- Wider slits → less diffraction (waves spread out less)
- Longer wavelengths → more diffraction
- Shorter wavelengths → less diffraction
Checking the Relationship: Extreme Cases
Let's verify this makes sense with extreme cases:
Case 1 - Very large slit, wavelength = 1: Result = = very small number → little diffraction ✓
Case 2 - Very small slit, wavelength = 1: Result = = very big number → large diffraction ✓
Case 3 - Very large wavelength, slit = 1: Result = = very big number → large diffraction ✓
Case 4 - Very small wavelength, slit = 1: Result = = very small number → little diffraction ✓
Diffraction of light
Light is electromagnetic radiation, so it should also show diffraction when it strikes barriers or passes through slits. However, you don't notice light diffracting around everyday objects or through doorways because the wavelength of light is very small compared to typical openings like doors and windows.
Calculating light diffraction
Let's put some real numbers into our diffraction relationship to understand why we don't see light bending around corners in daily life:
Worked Example: Light Diffraction Through a Doorway
For green light with wavelength m striking a wall with a doorway 1 m wide:
Result: This is an extremely small number, so we expect very little diffraction. The effect is so small that we cannot see it with the naked eye.
Observing light diffraction
To observe light diffraction, we need the wavelength and slit width to be similar in size. We use special objects called diffraction gratings that have very narrow slits. When wavefronts of green light strike a diffraction grating, we can observe the diffraction pattern on a screen.

Different colours produce different patterns because they have different wavelengths. Blue light (shorter wavelength) produces a narrower diffraction pattern than red light (longer wavelength).
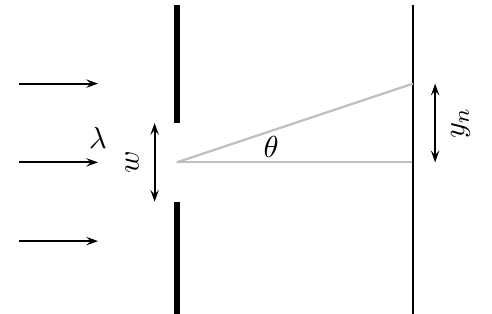
Calculating interference minima
For single slit diffraction, we can calculate where the dark regions (minima) appear using mathematical analysis. This quantitative approach allows us to predict the exact locations of constructive and destructive interference.
Formula for interference minima:
Where:
- = angle to the minimum from the centre
- = order of the minimum ()
- = wavelength of the impinging wavefronts
- = width of the slit
Worked Example: Finding the First Minimum
Question: A slit with width 2511 nm has red light of wavelength 650 nm impinging on it. At what angle will the first minimum be?
Step 1: Identify what we know
- Slit width:
- Wavelength:
- First minimum:
Step 2: Apply the formula
Step 3: Substitute values
Answer: The first minimum occurs at 15° from the centre maximum.
Checking wavelength effects
From the formula , we can see that a smaller wavelength for the same slit results in a smaller angle to the interference minimum. This confirms our earlier observation that shorter wavelengths produce narrower diffraction patterns.
Key applications and examples
Comparing different wavelengths
Understanding how different wavelengths behave helps us analyze real diffraction patterns:
Worked Example: Wavelength Comparison
Question: Two diffraction patterns are shown - one for green light and one for red light using the same diffraction grating. Which has the longer wavelength?
Analysis: The red pattern is wider than the green pattern. Since and the grating is the same in both cases:
- More diffraction → larger
- Red light shows more diffraction than green light
- Therefore:
Answer: Red light has a longer wavelength than green light.
Key Points to Remember:
- Diffraction is the spreading out of waves when they pass through small apertures or around sharp edges
- Longer wavelengths diffract more than shorter wavelengths
- Narrower slits cause more diffraction than wider slits
- The relationship is:
- Light diffracts but the effect is usually too small to notice in everyday life because light wavelengths are very small
- Diffraction patterns result from the combination of diffraction and interference effects