The Battle of Hastings (Edexcel GCSE History): Revision Notes
The Battle of Hastings
The Battle of Hastings was the decisive confrontation that determined the future of England in 1066. To understand this pivotal moment, you need to grasp the key features of the battle, including how the different armies were organised and the various types of troops that fought on each side.
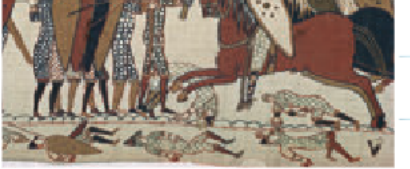
The Norman Conquest was so significant that it was recorded in the famous Bayeux Tapestry, which provides us with visual evidence of these historic events and remains one of our most important historical sources for understanding mediaeval warfare.
Timeline of events leading to the battle
The path to Hastings involved a series of rapid movements by both armies, with just over two weeks separating William's departure from the decisive battle:
- 27 September 1066: William's fleet departed from Normandy
- 28 September: Norman forces landed at Pevensey on the English coast
- 2 October: Harold departed York after defeating the Vikings at Stamford Bridge
- 6 October: Harold's army reached London
- 12 October: Harold left London to march south towards the Norman army
- 14 October: The Battle of Hastings took place
Notice how quickly events unfolded - Harold had to march his army over 250 miles from Yorkshire to Sussex in just 12 days, while also fighting a major battle against the Vikings. This exhausting pace would prove crucial to the battle's outcome.
How the battle unfolded
The Battle of Hastings developed through ten crucial phases that determined England's fate:
Phase 1: Norman scouts discovered Harold's approaching forces, preventing the English king from achieving the element of surprise he had hoped for.
Phase 2: Harold's army managed to secure a strong defensive position along a ridge at the top of a hill, forcing William's forces to attack uphill.
Phase 3: The fighting continued for eight hours, which was exceptionally long for a mediaeval battle. This extended duration occurred because both armies were fairly evenly matched in strength and determination.
Tactical Example: The Shield Wall Defense
The English shield wall was a highly effective defensive formation:
- Soldiers stood shoulder-to-shoulder with overlapping shields
- Long spears protruded between the shields to repel cavalry
- Two-handed axes could strike over the shield wall
- This formation was nearly impenetrable when maintained properly
Phase 4: William began the assault with his archers, but the English defenders had to remain outside of javelin range. The English shield wall proved highly effective at catching and deflecting the Norman arrows.
Phase 5: Norman foot soldiers and knights initially struggled against the English shield wall. The English housecarls caused severe casualties among both horses and riders using their deadly two-handed axes.
Phase 6: At one critical moment, rumours spread through the Norman army that William had been killed. To prove he remained alive and in command, William removed his helmet to show his face to his troops.
Phase 7: A feigned retreat (or possibly a genuine retreat) caused English fyrdsmen to abandon their disciplined shield wall formation and chase after the seemingly fleeing Normans. The English forces were then surrounded and cut down.
This was the crucial turning point of the battle. The English fyrdsmen broke their own successful defensive strategy by abandoning the shield wall formation. This tactical mistake allowed the Normans to exploit their superior mobility and surround isolated groups of English soldiers.
Phase 8: The shield wall began to weaken and thin out. Norman knights broke through the English lines and inflicted significant casualties. Norman archers also became more effective as the defensive formation collapsed.
Phase 9: Harold and his brothers, Gyrth and Leofwine, along with their loyal housecarls, made their final stand at the hilltop, fighting courageously until death. Harold and both his brothers were killed in this last phase.
Phase 10: The remaining English forces fled the battlefield. The Bayeux Tapestry records this moment with the Latin inscription "and the English turned and fled."
Military forces and tactics
Norman knights versus English housecarls
Norman knights possessed several key advantages in mediaeval warfare. These heavily-armoured mounted warriors could launch devastating charges using their height advantage to overwhelm enemy foot soldiers. However, their horses created vulnerabilities - if forced to fight uphill, the advantages of cavalry charges were significantly reduced.
Mediaeval warfare heavily favoured cavalry because mounted warriors could strike down at foot soldiers, had greater mobility to pursue fleeing enemies, and could break through infantry formations with coordinated charges. However, cavalry needed flat ground to be most effective.
English housecarls represented the elite of Anglo-Saxon military forces. These professional soldiers served as bodyguards to their lords and formed an extremely disciplined shield wall that proved very difficult to penetrate. Their two-handed axes were particularly effective weapons. However, once the shield wall formation began to break apart, the housecarls became vulnerable to both cavalry charges and archer attacks.
Norman foot soldiers versus English fyrds
William's infantry consisted of a mixture of Norman soldiers and mercenaries recruited from across Europe. This force included lightly armoured archers and crossbowmen alongside heavily armoured foot soldiers. Although the foot soldiers may not have received the same level of training as knights, they could still coordinate their attacks effectively.
The English fyrds represented the general militia - ordinary men called to military service. While thegns (local nobles) came properly equipped for battle, many fyrdsmen possessed only basic farming tools and long knives as weapons. Few archers served in the English ranks, and the general fyrdsmen lacked professional military training.
The contrast in military organisation was significant: William brought a professional army with specialised troops (archers, cavalry, infantry), while Harold relied heavily on part-time soldiers who were farmers and craftsmen in peacetime.
Key terms
Housecarls: Elite trained soldiers who served as personal bodyguards to their lord and formed the backbone of Anglo-Saxon armies.
Key Points to Remember:
- The Battle of Hastings lasted eight hours on 14 October 1066, making it exceptionally long for a mediaeval battle
- Harold secured the high ground but couldn't achieve the surprise attack he wanted
- The English shield wall initially proved very effective against Norman attacks
- A feigned retreat broke the English formation when fyrdsmen chased the seemingly fleeing Normans
- Harold and his brothers died fighting to the end, leading to English defeat and Norman conquest
- The battle's outcome changed English history forever, establishing Norman rule under William the Conqueror