William's victory (Edexcel GCSE History): Revision Notes
William's victory at the Battle of Hastings, 1066
William of Normandy's triumph over Harold II at the Battle of Hastings on 14 October 1066 was the result of multiple interconnected factors. Understanding why William won requires examining both his strengths and Harold's weaknesses, as well as the role that luck and timing played in this pivotal moment in English history.
Reasons for William's victory
The Norman conquest succeeded due to a combination of William's tactical innovations, superior leadership, and fortunate timing, alongside significant English disadvantages.
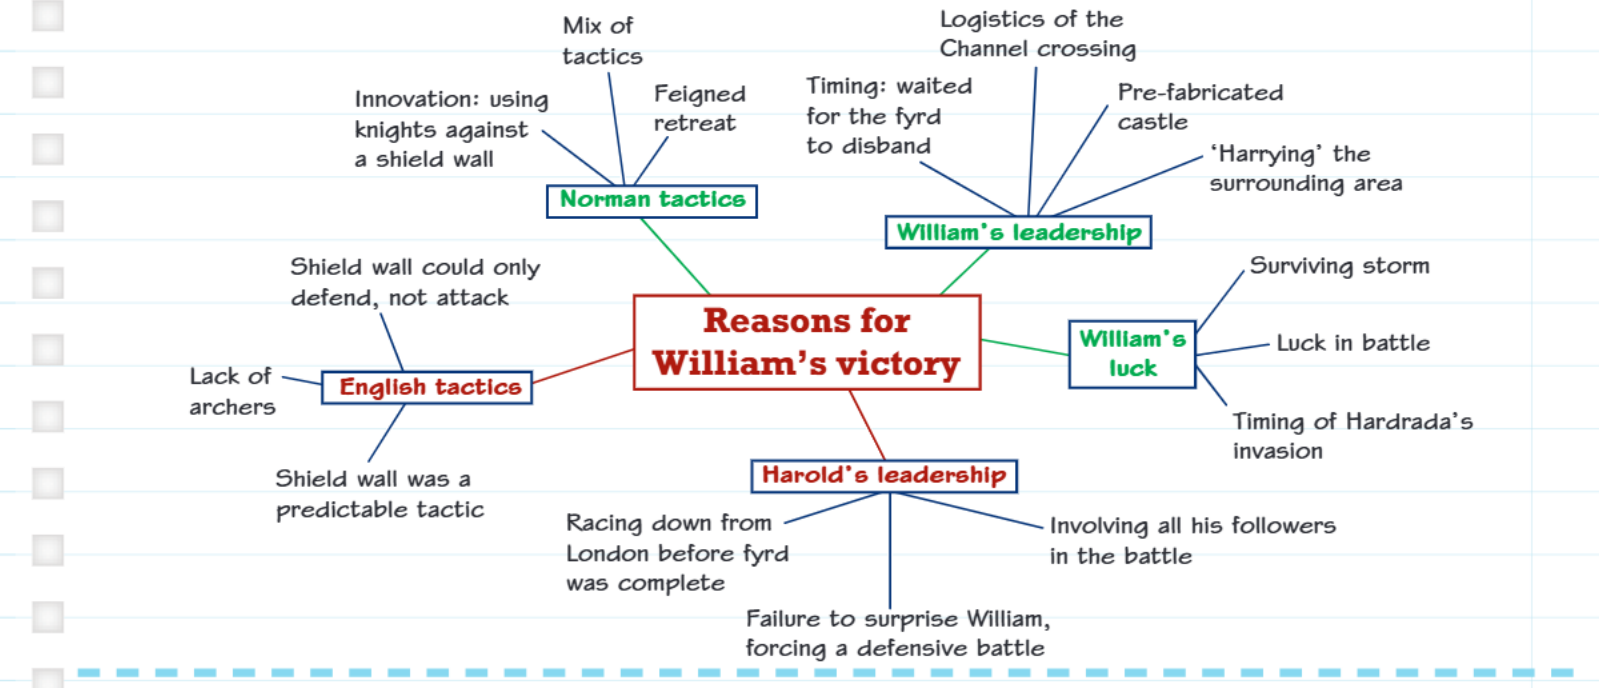
Norman tactical advantages
William's forces employed revolutionary military tactics that the English had never encountered before. The Normans developed innovative methods for using mounted knights against traditional English shield wall formations. This included coordinating different types of troops - knights, archers, and foot soldiers - to work together effectively in battle.
Tactical Innovation: The Feigned Retreat
The most famous of these tactical innovations was the feigned retreat. This sophisticated manoeuvre worked in several stages:
Step 1: Norman knights would charge the English shield wall but then appear to flee in panic
Step 2: English soldiers, believing they had won, would break formation to pursue the "retreating" Normans
Step 3: Once the English were scattered and vulnerable, Norman cavalry would wheel around and attack the disorganised troops
This tactic exploited the main weakness of the shield wall - its inability to maintain formation while advancing.
William's exceptional leadership
William demonstrated outstanding organisational and strategic skills throughout the invasion. He successfully managed the complex logistics of transporting an entire army across the English Channel, including horses, weapons, and supplies. His timing was carefully calculated - he waited for favourable winds and chose his moment to strike when Harold was distracted by other threats.
William showed remarkable foresight by bringing pre-fabricated wooden castle sections with him. This allowed his forces to quickly establish defensive positions once they landed in England, giving them immediate strategic advantages in unfamiliar territory.
The Norman leader employed harrying tactics after landing, systematically destroying the surrounding countryside to force Harold into battle on Norman terms.
The role of luck in William's success
Several fortunate circumstances aided William's victory. His fleet survived dangerous Channel storms that could have destroyed the invasion force entirely. The timing of Harald Hardrada's invasion in the north was particularly beneficial, as it forced Harold to fight two major battles in quick succession.
During the actual Battle of Hastings, luck continued to favour William. Key moments in the fighting went his way, and he survived the intense combat that claimed many other nobles on both sides.
English tactical limitations
The English army relied heavily on traditional defensive tactics centred around the shield wall formation. While this had been effective against previous enemies, it proved inadequate against Norman combined-arms tactics. The shield wall could only defend - it provided no means for launching effective attacks against mobile cavalry.
The English forces suffered from a critical shortage of archers. This left them unable to counter Norman archery effectively and gave William's forces a significant ranged advantage. English tactics had become predictable, making it easier for experienced Norman commanders to develop counter-strategies.
Harold's leadership mistakes
Harold made several crucial errors that contributed to his defeat. He rushed his army south from London before the fyrd (local militia) had fully assembled, meaning he faced William with an incomplete force. Many of his troops were exhausted from the recent victory at Stamford Bridge and the subsequent forced march south.
Harold's Critical Error
Perhaps most critically, Harold committed his entire available force to a single decisive battle. He failed to surprise William or force the Normans into an unfavourable position, instead allowing them to choose the terms of engagement.
Battle advantages and disadvantages
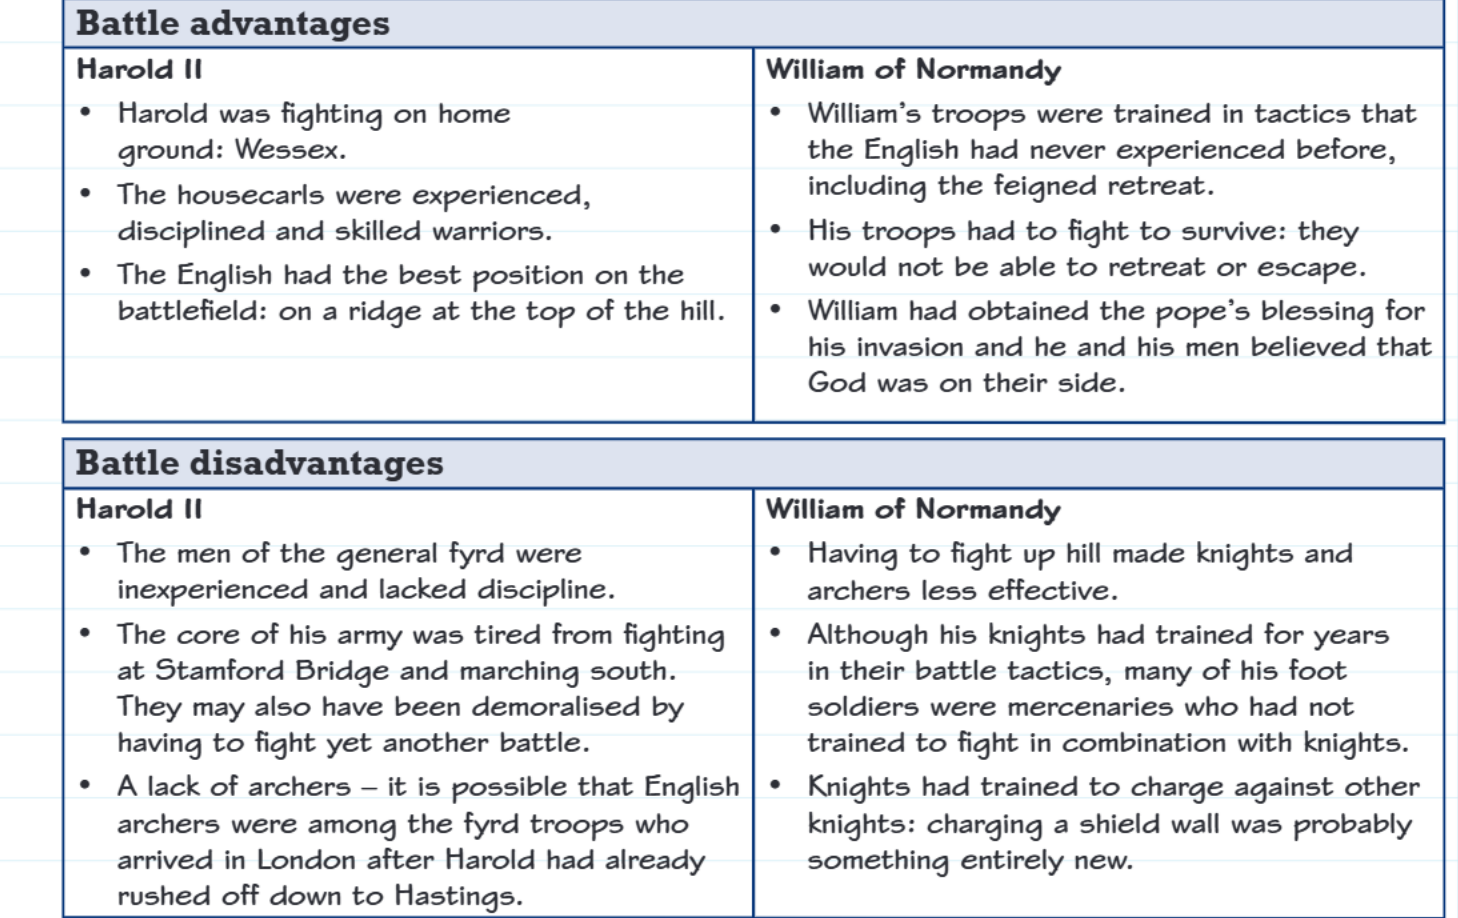
Harold's position
Harold did possess some significant advantages at the start of the battle. He was fighting on familiar home territory in Wessex, which gave his forces knowledge of the local terrain. His housecarls were highly experienced, disciplined, and skilled professional warriors who formed the core of his army. The English also secured the best position on the battlefield - a ridge at the top of a hill that forced the Normans to attack uphill.
However, these advantages were offset by serious weaknesses:
- The general fyrd troops were inexperienced and lacked proper military discipline
- Harold's army was demoralised and exhausted from their recent victory at Stamford Bridge and the long march south
- The English may have lacked sufficient archers, possibly because many had already departed for London after Harold's earlier victory
William's strategic position
William's troops possessed tactical training that the English had never experienced, particularly the coordinated use of feigned retreats. His forces were desperately motivated - they had to fight to survive since retreat or escape was not an option after crossing the Channel.
William had obtained the Pope's blessing for his invasion, which provided both moral authority and boosted his troops' confidence that God supported their cause. This religious endorsement was significant in mediaeval warfare.
The Norman disadvantages were primarily tactical. Fighting uphill made cavalry charges less effective and put his forces at a physical disadvantage. Many of William's foot soldiers were mercenaries rather than trained knights, and coordinating these mixed forces with the cavalry required exceptional leadership.
The feigned retreat: a key tactical innovation
The feigned retreat was perhaps the most important tactical innovation that secured William's victory. This manoeuvre involved Norman cavalry pretending to flee in panic, which encouraged English soldiers to break their disciplined shield wall formation and pursue what they believed were defeated enemies. Once the English were scattered and vulnerable, the Norman knights would wheel around and attack the disorganised troops.
This tactic was particularly effective because it exploited the main weakness of the shield wall - its inability to maintain formation while advancing. The English had never encountered this sophisticated manoeuvre before, making them particularly vulnerable to its effects.
Timeline of key events
- September 1066: Harald Hardrada invades northern England
- 25 September 1066: Harold defeats Hardrada at Stamford Bridge
- 28 September 1066: William lands at Pevensey
- October 1066: Harold marches his exhausted army south
- 14 October 1066: Battle of Hastings - William achieves decisive victory
Key Points to Remember:
- William's victory resulted from a combination of Norman tactical superiority, superior leadership, and English mistakes
- The feigned retreat was a revolutionary tactic that broke the traditional English shield wall formation
- Harold's exhausted army was forced to fight two major battles in quick succession, severely weakening their effectiveness
- William's careful planning, from logistics to pre-fabricated castles, demonstrated exceptional organisational skills
- The battle marked the end of Anglo-Saxon England and the beginning of Norman rule