Cold Forming Processes (Junior Cert Engineering): Revision Notes
Cold Forming Processes
Cold forming processes are manufacturing techniques that shape metals at room temperature without heating. These methods are essential in sheet metalwork and beaten metalwork, allowing engineers to create functional and decorative metal products efficiently.
Cold forming processes are preferred in many applications because they maintain the metal's structural integrity while avoiding the energy costs and potential distortion associated with heat treatment.
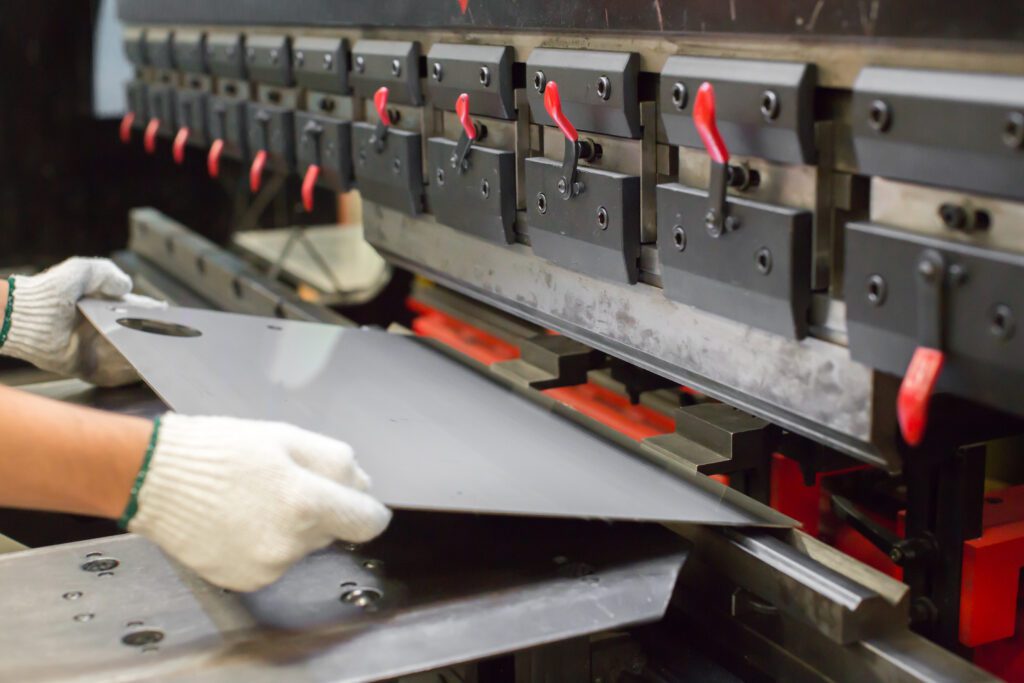
Sheet metalwork
Sheet metalwork involves manipulating thin metal sheets made from materials like tinplate, copper, brass, mild steel, aluminium, and galvanised iron. This process includes drawing developments, cutting, bending, and joining various metal pieces together.
Key principles of sheet metalwork
When working with sheet metal, proper planning is crucial. Simple shapes can be drawn directly onto the material, but complex developments should first be drawn on paper and used as templates. Always use a soft pencil (2H) for marking, except when drawing lines to be cut, which should be scribed for accuracy.
Sheet metal thickness is measured using a wire gauge, and protective clamps must be used when holding materials in a vice to prevent damage. This is essential for maintaining both material quality and workshop safety.
Cutting tools
Snips are the primary hand tools for cutting thin sheet metal. Three main types serve different purposes:
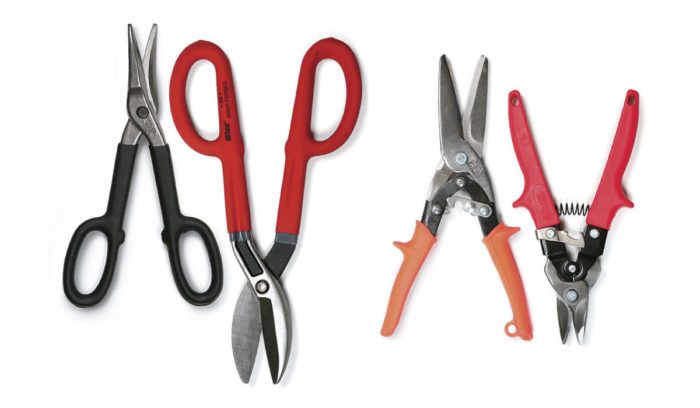
- Straight snips are used for straight cuts and outside curves
- Curved snips excel at cutting inside curves and tight corners
- Universal snips can handle both straight cuts and various curved cuts
When using snips, cut accurately along marked lines without leaving waste material that requires filing. For large amounts of waste removal, cut away the main portions first, then trim along the final line.
Never use snips to cut wire, as this damages the blades. This is one of the most common mistakes that can permanently ruin your cutting tools.
Bench shears provide more cutting power for thicker materials. These tools can cut mild steel plates up to 3mm thick and round bars up to 12mm in diameter. The high carbon steel blades must have no gap between them, and the bottom blade can be adjusted using screws to compensate for wear.
An important safety feature is the hole in the upper blade for cutting round or square bars. When not in use, insert a bolt through this hole or remove the lever to prevent accidental closure and potential injuries.
Shaping and forming tools
Mallets are essential for bending and shaping without damaging the metal surface. Boxwood-headed mallets are commonly used in school workshops, though plastic-headed versions are also available. The handles are typically made from cane or ash for comfort and control.

Folding bars work in pairs to create precise bends in sheet metal. When secured in a vice, they grip the material along the bend line. The metal can then be shaped by striking with a mallet or using a wooden block and hammer.
Work along the full length gradually, increasing the bend in stages rather than attempting to complete one section at a time. This prevents material stress and ensures even bending.
Stakes provide shaped surfaces for forming curved and complex shapes in sheet metal. A wide variety of stakes are available, each designed for specific forming operations. They can be held in special sockets or gripped in a vice with protective clamps to prevent damage to the shanks.
Specialised tools and techniques
Sheet metal punches create clean holes in metal up to 1.5mm thick. An Allen key operates the screw mechanism that drives the punch through the material.
Paning hammers have narrow striking edges perfect for folding metal edges in confined spaces, particularly useful when creating wired edges.
Groove punches (or groovers) are designed for closing wired edges and creating interlocking grooved seams in sheet metal assemblies.
Forming edges for strength and safety
Edge forming techniques strengthen sheet metal articles and make them safer to handle by eliminating sharp edges.
Beaded edges follow a five-step process:
Worked Example: Creating Beaded Edges
Step 1: Allow 3-6mm material for the bead Step 2: Hold material in folding bars and create initial bend Step 3: Continue bending using a hatchet stake Step 4: Fold the edge around a thin metal strip Step 5: Close the bead with a mallet, avoiding flattening
Wired edges require more material and follow a seven-step process:
Worked Example: Creating Wired Edges
Step 1: Allow 2½ times the wire diameter for the edge Step 2: Hold material in folding bars and form initial round bend Step 3: Continue bending on a hatchet stake Step 4: Fold down on a flat strip with rounded edges Step 5: Insert wire and bend down the material to hold it Step 6: Close the material with a groove punch Step 7: Complete by tucking in with a paning hammer
Beaten metalwork
Beaten metalwork involves shaping sheet metals using hammering techniques. This process requires malleable and ductile metals, with copper, aluminium, and brass being most commonly used in school workshops.
Preparation and safety
Before beginning beaten metalwork, metals must be cleaned and annealed. Copper and brass require pickling after heating to remove oxides. The pickling solution consists of one part acid to approximately ten parts water - always add acid to water, never the reverse.
This solution should only be prepared by your teacher due to safety concerns. The chemical reaction can be dangerous and requires proper safety equipment and ventilation.
After pickling, thoroughly wash the material under running water. Handle the pickle solution with care, dipping materials gently to avoid splashing.
Forming techniques
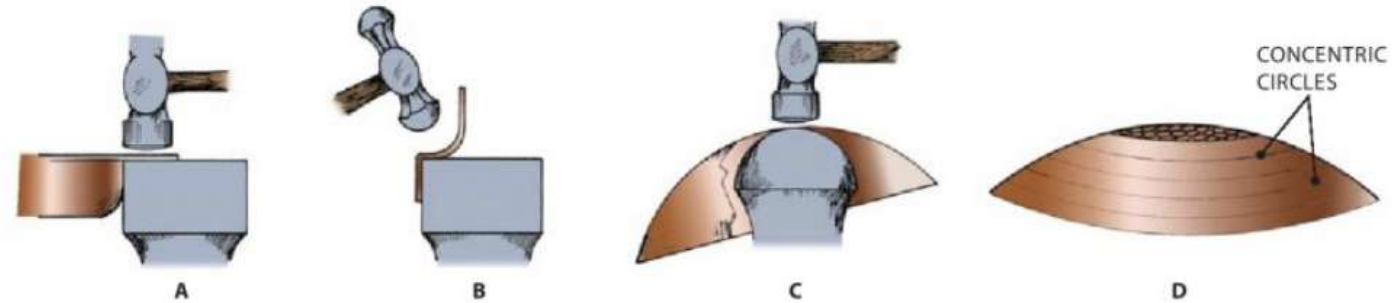
Hollowing creates bowl-shaped articles by beating the material with a blocking hammer or bossing mallet over a depression in wood or leather. The blank disc should be only slightly larger than the finished article diameter, as the material doesn't change size significantly during forming.
Draw concentric circles about 12mm apart on the disc as guides for beating. Start with the outer circle and work inward in decreasing circles. Avoid creating waves and wrinkles by maintaining consistent hammer blows.
The material becomes work-hardened during beating and requires periodic annealing.
Sinking forms hollow flat-rimmed articles like small trays. A shaped wooden block with guide pins maintains constant rim width. The disc is held against the pins and rotated while being beaten. After each rotation, turn the material over on a bench block to flatten the rim.
Planishing provides the finishing touch by removing marks and irregularities while work-hardening the material. This involves light hammering over a stake while the article is supported. Both the stake and hammer striking face must be smooth and highly polished. The workpiece should be cleaned and annealed before planishing, and concentric circles drawn as guides.
Additional cold forming processes
Bending
For sheet metal bending, folding bars should be used exclusively. Vice clamps and formers can assist with other cold bending operations. When using round formers, grip the workpiece at the starting point of the bend for best results.
Twisting
Twisting serves primarily decorative purposes and works well with square bars up to about 10mm. One end is held in the vice while the other is turned using a lever with a hole. Mark the length to be twisted, or use a tube of the required length placed over the bar.
The finished twist will be slightly shorter than the original marked dimension. For consistent results, mark one side of the bar with chalk and note its position at the beginning.
Heat bars evenly throughout the twisted portion to prevent irregular twisting at hot spots.
For flat light section bars, use an adjustable spanner with two lines drawn to indicate twist position. Hold the bar in the vice with one line level with the clamp edge, then twist using the spanner on the other line.
Key Points to Remember:
- Cold forming processes shape metal at room temperature using tools like snips, mallets, and stakes
- Safety first - always use protective clamps in vices and handle pickling solutions with extreme care
- Edge forming strengthens sheet metal - beaded edges need allowance, wired edges need times wire diameter
- Beaten metalwork requires annealed, malleable metals and involves hollowing, sinking, and planishing techniques
- Tool selection is crucial - use the right snips for the job and maintain sharp, properly adjusted cutting edges