Non Destructive Testing (NDT) (Leaving Cert Engineering): Revision Notes
Ultrasonic Test
What is ultrasonic testing?
Ultrasonic testing is a non-destructive testing (NDT) method that uses high-frequency sound waves to detect internal flaws and defects in materials. This technique works on the fundamental principle of sound reflexion and echo, allowing engineers to examine the internal structure of components without causing any damage.
The method is particularly valuable because it can identify problems that are completely invisible from the outside, making it an essential tool for quality control and safety inspections in engineering applications.
Unlike destructive testing methods that require sample destruction, ultrasonic testing allows the same component to remain in service after inspection, making it ideal for critical safety applications where components cannot be replaced unnecessarily.
How ultrasonic testing works
Basic principle
Ultrasonic testing operates by sending inaudible high-frequency sound waves through a material in the form of a pulse. These sound waves behave predictably when they encounter different materials and boundaries:
- Sound waves travel through solid materials at consistent speeds
- When waves meet a surface or boundary, they reflect back as echoes
- The time taken for echoes to return reveals information about the material's internal structure
- Any interruption in the sound path indicates the presence of a flaw or defect
Key Principle: If there is a flaw inside the material, the sound will be unable to travel through the entire thickness of the material and will reflect back early, creating a detectable echo pattern that reveals the defect's presence and location.
The testing process
The testing process involves several key steps that work together to reveal internal defects:
- Wave transmission: A transducer emits high-frequency sound waves into the test material
- Wave propagation: Sound travels through the material thickness
- Echo generation: Waves reflect from internal flaws and the back surface
- Signal detection: The transducer receives the reflected echoes
- Display analysis: Results appear on an oscilloscope or display unit
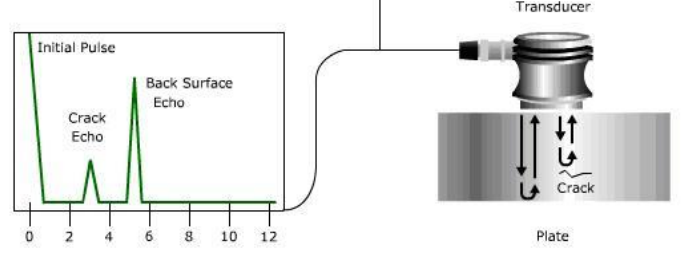
The diagram above shows how ultrasonic waves interact with a specimen containing internal defects. The A-scan display reveals different echo patterns that help identify flaws.
Understanding the results
Echo patterns
The A-scan waveform displays three main types of echoes that provide crucial information:
- Initial pulse: Shows when the sound wave was first transmitted
- Crack echo: Indicates reflexion from an internal flaw or defect
- Back surface echo: Confirms the wave reached the material's far surface
Detecting flaws
When a sound wave encounters an internal flaw, it cannot continue its full journey through the material. Instead, it reflects back early, creating a crack echo that appears on the display before the expected back surface echo. This early reflexion reveals both the presence and approximate location of the defect.
The display unit measures the time taken for sound to travel, allowing operators to calculate distances and pinpoint flaw locations with considerable accuracy.
Worked Example: Interpreting Echo Patterns
Consider a 20mm thick steel plate being tested:
Step 1: Initial pulse appears at time = 0 Step 2: If no defects exist, back surface echo appears at time = 6.7μs Step 3: If a crack echo appears at time = 3.3μs, this indicates a flaw at approximately 10mm depth (halfway through the material) Step 4: The absence or reduction of the back surface echo confirms the flaw blocks sound transmission
Practical applications
Ultrasonic testing finds widespread use across many engineering sectors where material integrity is critical:
- Railway maintenance: Inspecting rail joints and track components for fatigue cracks
- Aerospace industry: Checking aircraft components for internal stress fractures
- Manufacturing: Quality control of welded joints and cast components
- Power generation: Monitoring turbine blades and pressure vessels

The image shows ultrasonic testing being applied to railway infrastructure, demonstrating its practical use in maintaining transport safety.
The versatility of ultrasonic testing makes it suitable for a wide range of materials including metals, plastics, ceramics, and composites, though the testing parameters may need adjustment for different material properties.
Advantages and considerations
Benefits of ultrasonic testing
- Non-destructive: Components remain fully usable after testing
- Highly sensitive: Can detect very small internal flaws
- Versatile: Works with many different materials and component shapes
- Precise: Provides accurate location and sizing of defects
Important limitations
- Skilled operators required: Results can be difficult to interpret correctly
- Surface preparation: Clean, smooth surfaces needed for good coupling
- Material dependent: Some materials may cause signal interference or fluctuation
- Equipment complexity: Requires specialised electronic equipment and training
Critical Requirement: The need for skilled operators cannot be overstated, as incorrect interpretation of results could lead to missing critical flaws or unnecessary component replacement. Proper training and certification are essential for reliable results.
Key Points to Remember:
- Ultrasonic testing uses high-frequency sound waves to detect internal flaws without damaging components
- The method relies on sound reflexion and echo principles to reveal defects through early echo returns
- A-scan displays show initial pulses, crack echoes, and back surface echoes to help identify problems
- Skilled operators are essential because results require careful interpretation and analysis
- This NDT method is widely used in railways, aerospace, manufacturing, and power generation for safety-critical inspections