Oblique and Vertical Aerial Photographs (Grade 11 NSC Matric Geography): Revision Notes
Oblique and Vertical Aerial Photographs
What is remote sensing?
Remote sensing is the process of gathering information about objects or places on Earth's surface without being in direct physical contact with them. Think of it like taking photos from a distance to learn about something without having to touch it.
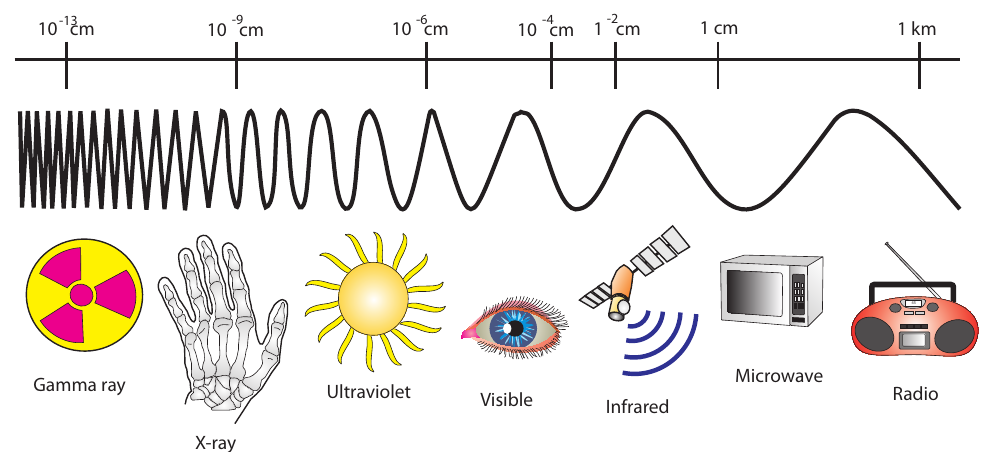
Aerial photographs are a key type of remote sensing that uses cameras mounted on aircraft or helicopters to capture images of Earth's surface from above. These photographs use the electromagnetic spectrum - the full range of electromagnetic radiation including visible light that our eyes can see.
The electromagnetic spectrum includes everything from gamma rays to radio waves, but aerial photography typically uses the visible light portion that creates the images we can easily interpret. This makes aerial photographs familiar and easy to understand since they show the world as our eyes would see it from above.
Types of aerial photographs
Aerial photography can be classified into different categories based on the angle at which the camera is positioned when taking the photograph. Understanding this classification system is essential for interpreting different types of aerial images.
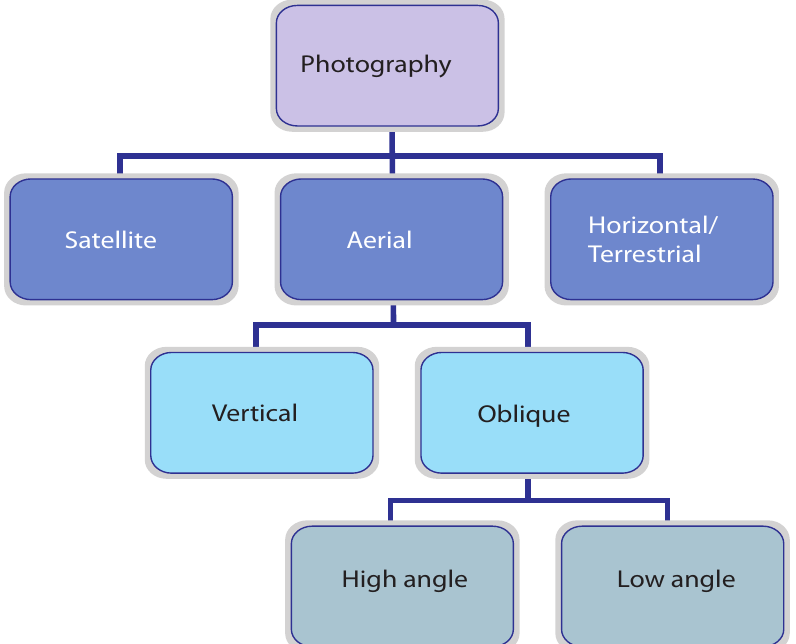
The camera angle is the most critical factor that determines the type of aerial photograph and its potential uses. Each angle provides different advantages and limitations for geographic analysis.
There are two main types of aerial photographs:
1. Vertical aerial photographs
Vertical aerial photographs provide a bird's-eye view of the landscape, taken with the camera pointing straight down at a 90-degree angle to the ground. These photographs are the most commonly used type in geographical studies and mapping.
Key characteristics:
- Camera angle: 90° to the ground (straight down)
- Provides a direct overhead view
- Scale can be accurately calculated
- Used for creating and updating maps
- Shows true relationships between features
- Minimal distortion of ground features
Main uses:
- Map compilation and updating
- Urban planning projects
- Agricultural monitoring
- Land use surveys
- Creating topographic maps
2. Oblique aerial photographs
Oblique aerial photographs are taken with the camera angled away from the vertical position, providing a side-view perspective of the landscape. These photographs are further divided into two subcategories based on the camera angle.
Low-angle oblique photographs
Low-angle oblique photographs are taken with the camera tilted at a 30-degree angle from the vertical.
Key characteristics:
- Camera angle: 30° to the vertical
- Shows a smaller, more detailed area
- Foreground features appear distorted
- Features become more recognisable as distance increases
- Horizon line is not visible in the photograph
- Scale calculations cannot be performed accurately
High-angle oblique photographs
High-angle oblique photographs are taken with the camera angled at 60 degrees from the vertical.
Key characteristics:
- Camera angle: 60° to the vertical
- Covers a larger geographical area
- Scale is distorted throughout the image
- Horizon line is visible in the photograph
- Cannot be used for accurate scale calculations
- Useful for showing landscape context and relationships
Comparison of aerial photograph types
| Type | Camera Angle | Advantages | Limitations |
|---|---|---|---|
| Vertical | 90° to ground | - Accurate scale calculations - Minimal distortion - Good for mapping | - May be difficult to interpret terrain |
| Low-angle oblique | 30° from vertical | - Good detail of foreground - Easier feature recognition | - Scale distortion - No horizon visible |
| High-angle oblique | 60° from vertical | - Large area coverage - Shows landscape context | - Significant scale distortion - Cannot measure accurately |
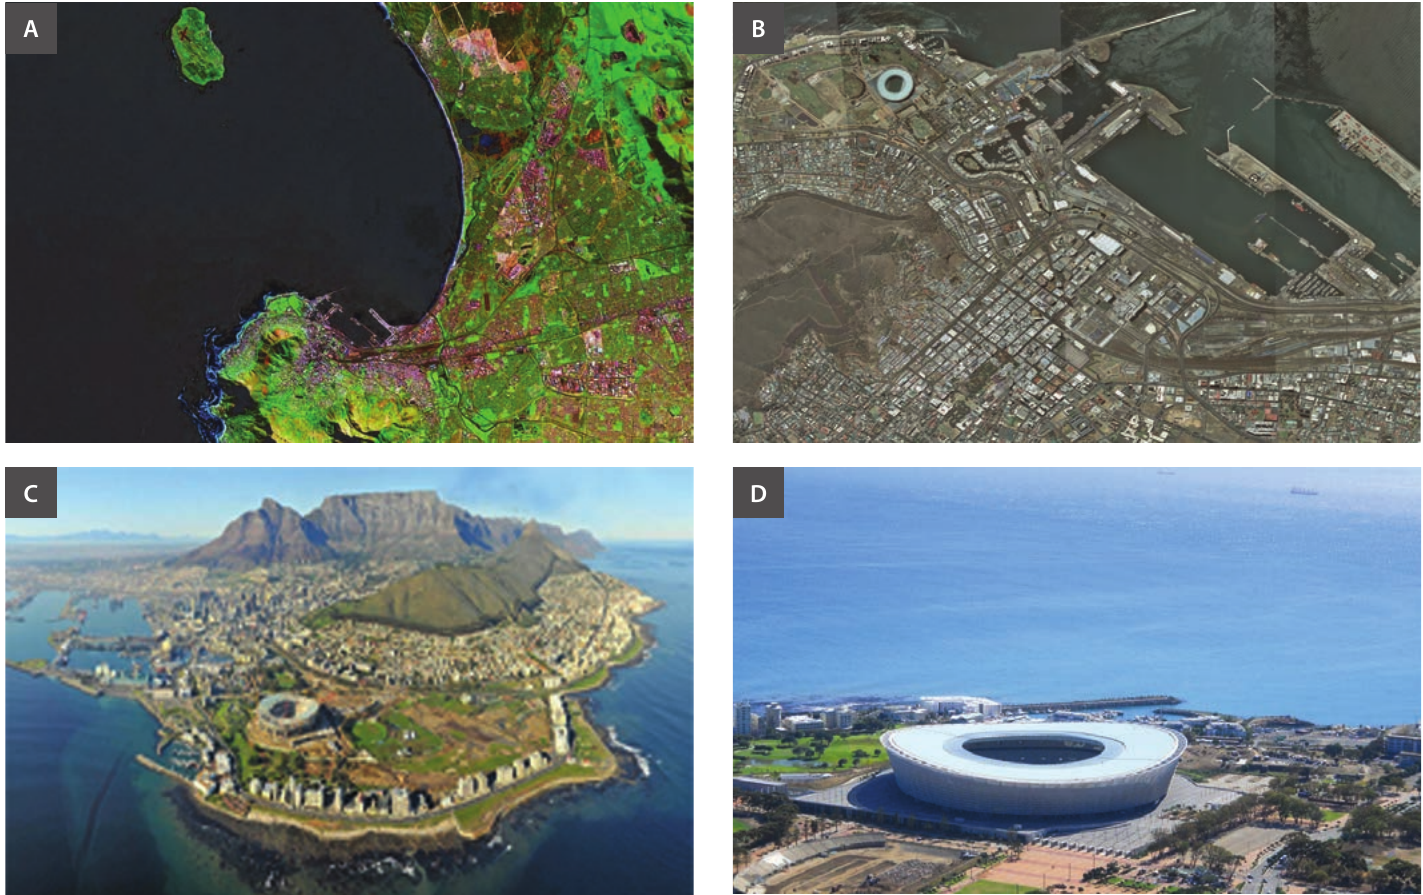
This image shows examples of different photography types: (A) satellite imagery with false colours, (B) vertical aerial photograph of a coastal city, (C) high-angle oblique aerial photograph of Cape Town showing Table Mountain, and (D) low-angle oblique aerial photograph of Cape Town Stadium.
Stereoscopy and 3D viewing
Stereoscopy is a special technique used to create three-dimensional views of landscapes using aerial photographs. This method involves taking overlapping vertical aerial photographs and viewing them through a special instrument called a stereoscope.
How stereoscopy works:
- Two vertical aerial photographs are taken of the same area
- Each photograph overlaps the previous one by approximately 60%
- The slight difference in viewing angle creates a 3D effect
- A stereoscope allows each eye to see a different image
- The brain combines these images to create depth perception
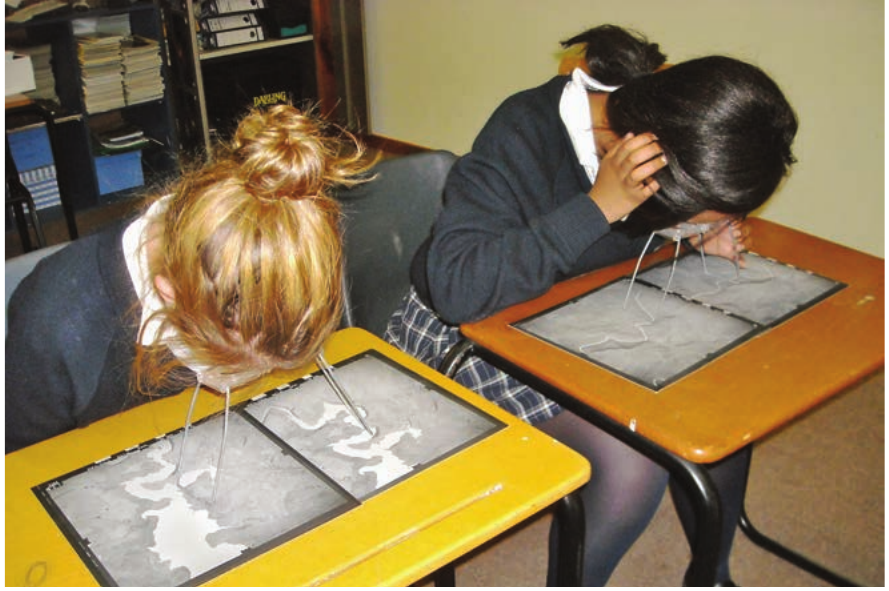
Before modern GPS and GIS technology became widely available, stereoscopy was the primary method for:
- Calculating heights of landscape features
- Drawing contour lines on topographic maps
- Creating accurate three-dimensional maps
Applications of aerial photography
Identifying landforms and features
Aerial photographs are excellent tools for identifying and studying various landscape features. They provide a comprehensive view that helps geographers, planners, and researchers understand land use patterns and natural features.
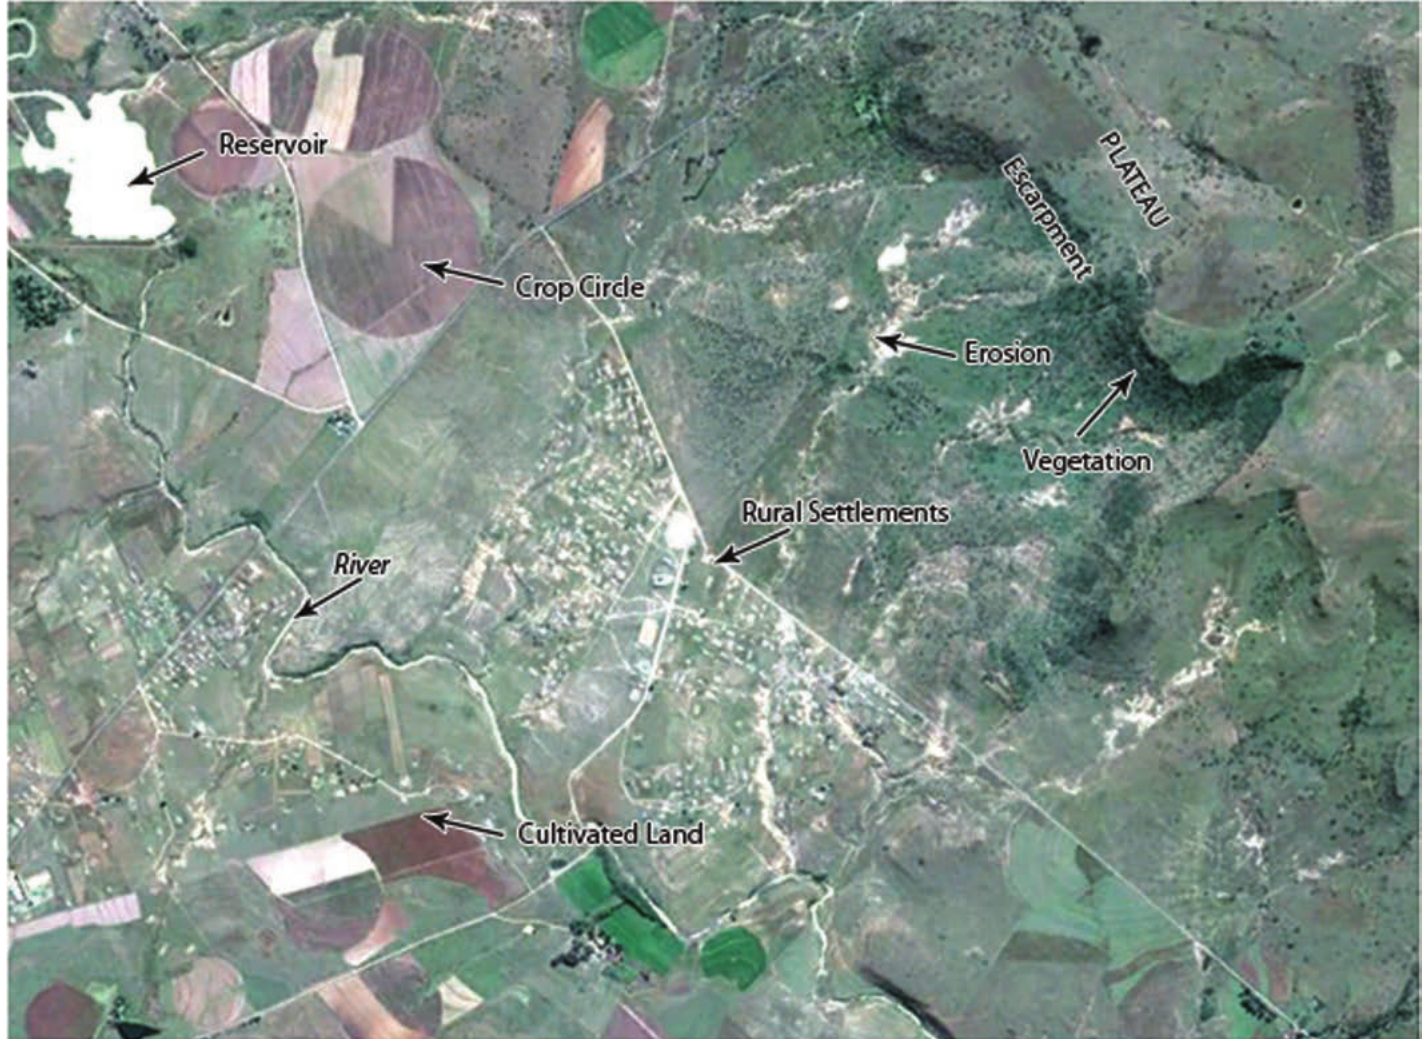
Common features visible in aerial photographs include:
- Water bodies: Rivers, reservoirs, lakes
- Agricultural areas: Crop circles from centre-pivot irrigation, cultivated fields
- Settlements: Rural villages, urban areas, individual buildings
- Natural vegetation: Forests, grasslands, scattered trees
- Erosion patterns: Soil erosion, gullies, weathered areas
- Topographical features: Plateaus, escarpments, valleys
Monitoring changes over time
One of the most valuable applications of vertical aerial photography is monitoring how landscapes change over time. By comparing photographs taken at different dates, researchers can track:
- Urban development and expansion
- Environmental changes
- Infrastructure development
- Land use changes
- Natural disaster impacts
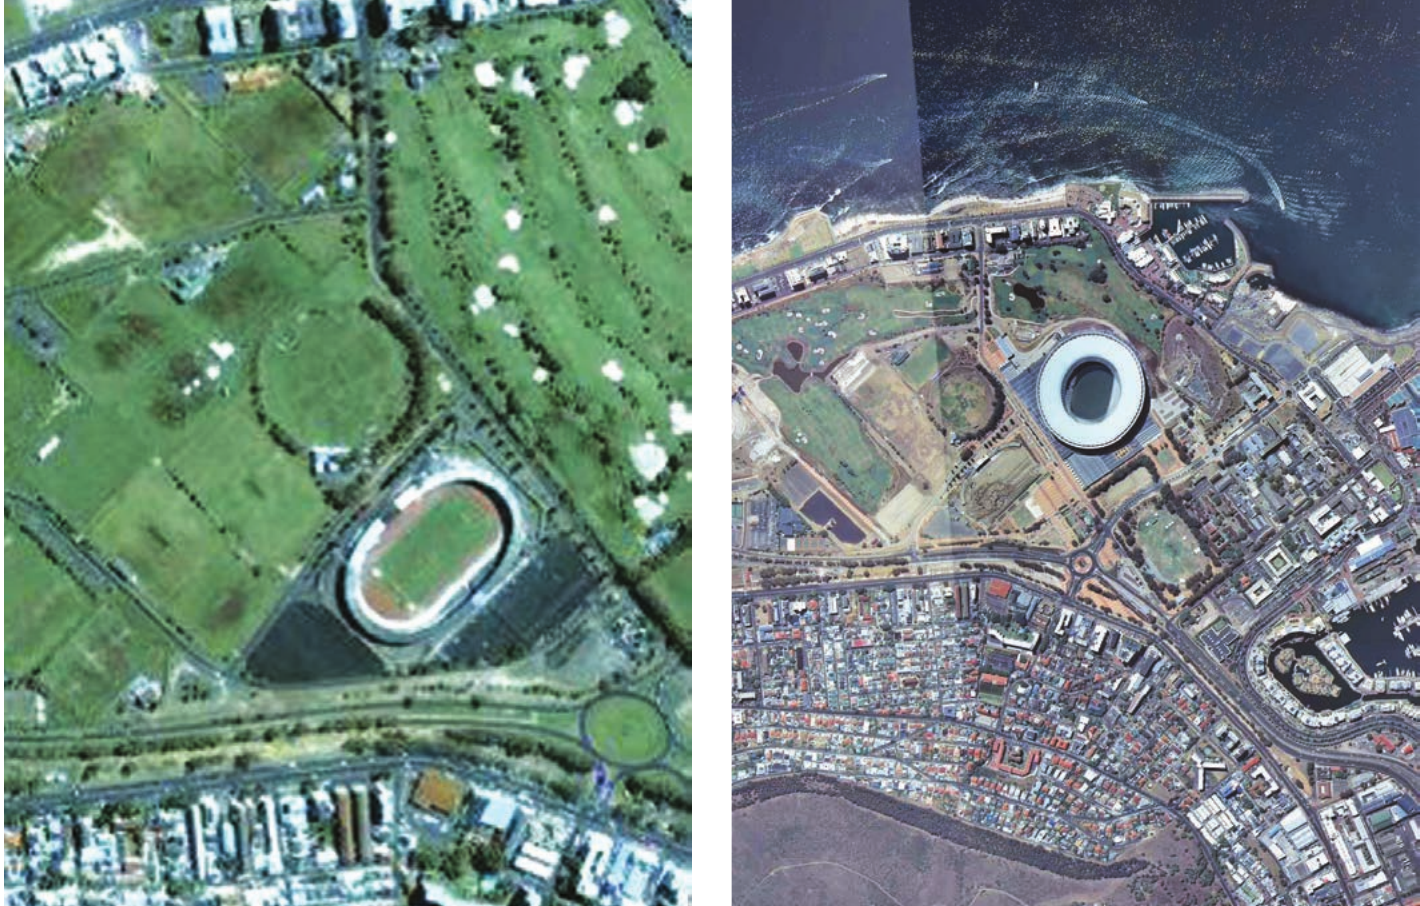
This dramatic comparison shows the transformation of an area around Cape Town Stadium, illustrating how aerial photography can document major development projects and urban growth over time.
Commercial and professional uses
Aerial photography has numerous practical applications across various industries:
- Map making: Creating and updating topographic maps
- Military applications: Strategic planning and reconnaissance
- Urban planning: City development and zoning decisions
- Census work: Population and housing surveys
- Geological studies: Rock formations and mineral exploration
- Engineering projects: Road construction and infrastructure planning
- Risk assessment: Flood zones, landslide areas, insurance evaluation
- Tourism industry: Promotional materials and site planning
Calculating scale from aerial photographs
Understanding how to calculate the scale of a vertical aerial photograph is a crucial skill. Scale tells us the relationship between distances measured on the photograph and actual distances on the ground.
Worked Example: Calculating Aerial Photograph Scale
The three-step method:
Step 1: Identify the same feature on both a topographic map and the aerial photograph
- Choose a feature near the centre of the photograph where distortion is minimal
- Linear features like roads or railways work well for measurement
Step 2: Measure the distance of this feature in centimetres
- Measure the feature length on the aerial photograph
- Measure the same feature length on the topographic map
Step 3: Apply the scale calculation formula
Example calculation:
- If a road measures 2 cm on the aerial photograph
- The same road measures 3.5 cm on the topographic map
- Calculation:
This means that 1 cm on the aerial photograph represents 28,571 cm (approximately 286 metres) on the ground.
Practical considerations for aerial photographs
When working with aerial photographs, remember these important points:
Optimal Photography Conditions:
- Timing matters: Most aerial photographs are taken between 10 a.m. and 2 p.m. to minimise shadow effects
- Weather conditions: Clear, cloudless days provide the best visibility
- Flight planning: Aircraft follow planned flight paths to ensure systematic coverage
- Colour options: Photographs can be taken in black and white or colour, depending on the intended use
- Overlap requirement: Each photograph typically overlaps 60% with the next one for stereoscopic viewing
Advantages and limitations
Advantages of aerial photography:
- Provides comprehensive overview of large areas
- Shows relationships between different landscape features
- Relatively cost-effective compared to satellite imagery
- High resolution and detail
- Can be taken on demand for specific projects
- Useful for both scientific research and practical applications
Limitations:
- Weather dependent (clouds, rain affect quality)
- Limited by aircraft accessibility to certain areas
- Scale distortion in oblique photographs
- May require specialised equipment for interpretation
- Temporal limitations (single point in time)
- Can be expensive for very large area coverage
Key Points to Remember:
- Vertical aerial photographs (90°) provide accurate, map-like views perfect for measurements and planning
- Low-angle oblique photographs (30°) show detailed foreground views but cannot be used for accurate scale calculations
- High-angle oblique photographs (60°) cover large areas and show landscape context including the horizon
- Stereoscopy uses overlapping photographs to create 3D views for better terrain analysis
- Scale calculation requires comparing the same feature on both the aerial photograph and a topographic map using the formula: