Cross-Sections (Grade 11 NSC Matric Geography): Revision Notes
Cross-Sections
What is a cross-section?
A cross-section is like taking a slice through the landscape to see what it looks like from the side. Think of it as cutting through a hill with a giant knife and looking at the shape you see on the cut surface. In geography, we create cross-sections to show the profile or side view of relief features like hills, valleys, and mountains.
There are two main types of cross-sections you need to know about:
- Cross-section: An accurate side view drawn to scale that shows the exact heights and distances of landforms
- Sketch section: A rough, freehand drawing that shows the general shape of the land but doesn't give exact measurements
Cross-sections help us understand how the land rises and falls along a particular line, making it easier to visualise the terrain that we see represented by contour lines on topographic maps.
The analogy of "cutting through a hill with a giant knife" helps you visualize what geographers are trying to achieve. Just as cutting an apple in half reveals its inner structure, a cross-section reveals the hidden profile of the landscape that contour lines represent on a map.
Understanding scales in cross-sections
Cross-sections use two different scales, and this is really important to understand:
Horizontal scale (HS)
- This measures distances along the ground (left to right on your cross-section)
- For topographic maps: always 1:50 000
- For orthophoto maps: always 1:10 000
- This means the horizontal scale stays the same as the original map
Vertical scale (VS)
- This measures height (up and down on your cross-section)
- This scale depends on the contour interval you choose
- The vertical scale is usually much larger than the horizontal scale
- This creates vertical exaggeration, making hills and valleys appear steeper and more dramatic than they actually are
Understanding Vertical Exaggeration
The different scales create vertical exaggeration, which makes slopes look much steeper than they really are in real life. This isn't a mistake - it's intentional! Without this exaggeration, elevation changes would be so small on your cross-section that you wouldn't be able to see the landscape features clearly.
The different scales help us see elevation changes more clearly, but remember that this makes slopes look much steeper than they really are in real life.
Six-step method for constructing cross-sections
Learning to draw cross-sections follows a systematic process. Here's the method geographers use:
Worked Example: Creating a Cross-Section
Following the six-step method ensures accurate and professional results every time. Let's walk through each step:
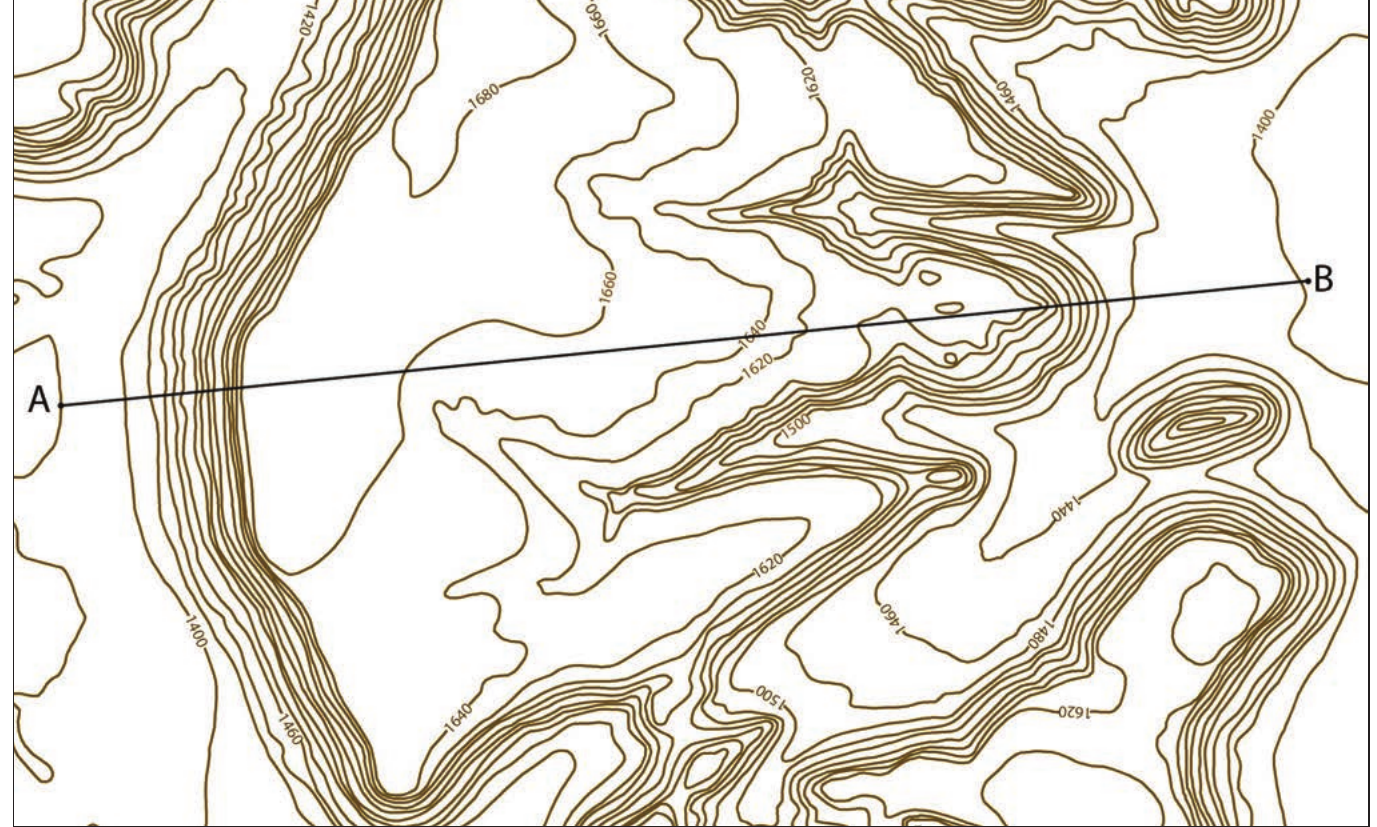
Step 1: Draw your line
Draw a straight line on the topographic map connecting your starting point to your ending point (like line A-B in the example above).
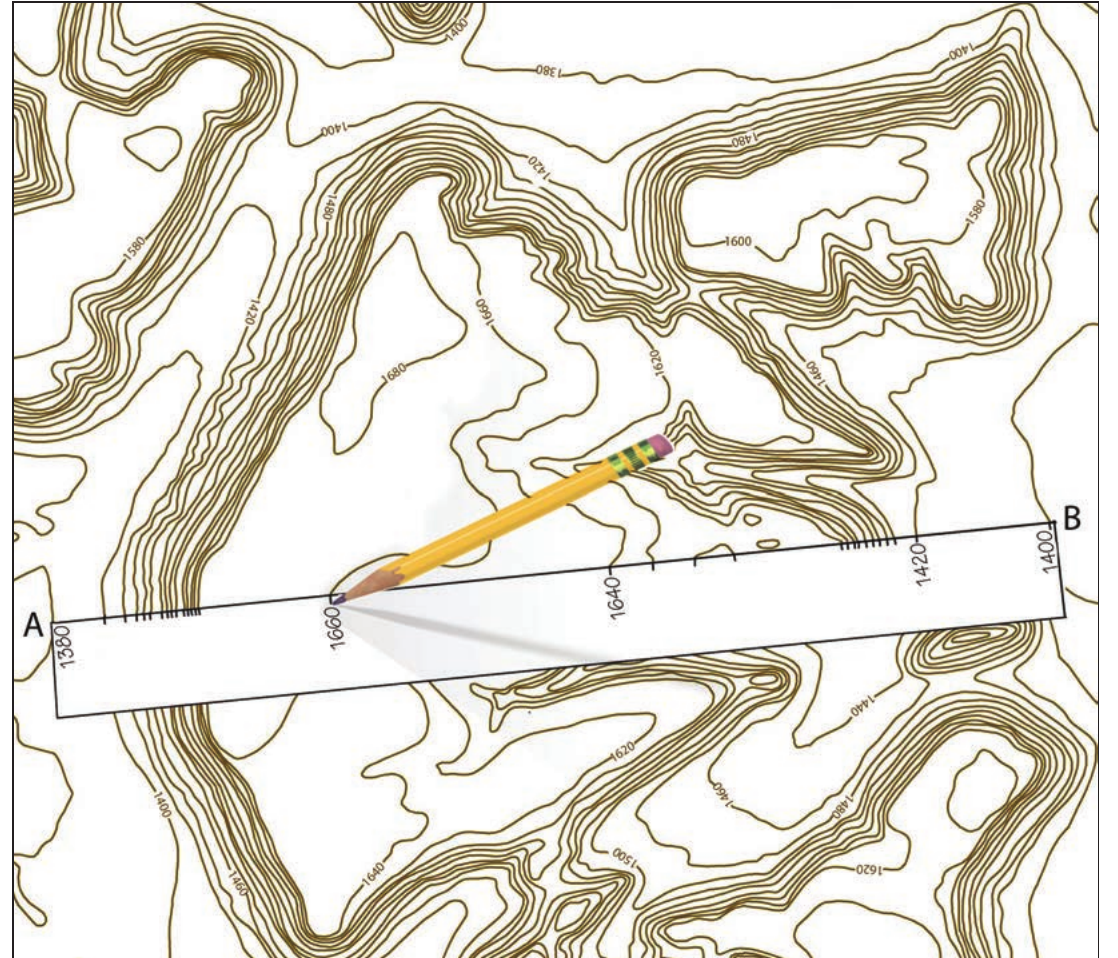
Step 2: Mark the contours
Place a piece of paper along your line and mark off each contour line where it crosses your line. Write the corresponding height next to each mark. Also mark any important features like roads, rivers, or railway lines.
Step 3: Set up your axes
Draw a set of axes on graph paper. Make sure your vertical axis (y-axis) starts one interval below the lowest elevation and ends one interval above the highest elevation on your cross-section.
Step 4: Transfer your marks
Place your marked paper onto the graph and align it with the horizontal axis. Mark the contour lines from your paper onto the corresponding horizontal lines of your graph using dots or small crosses.
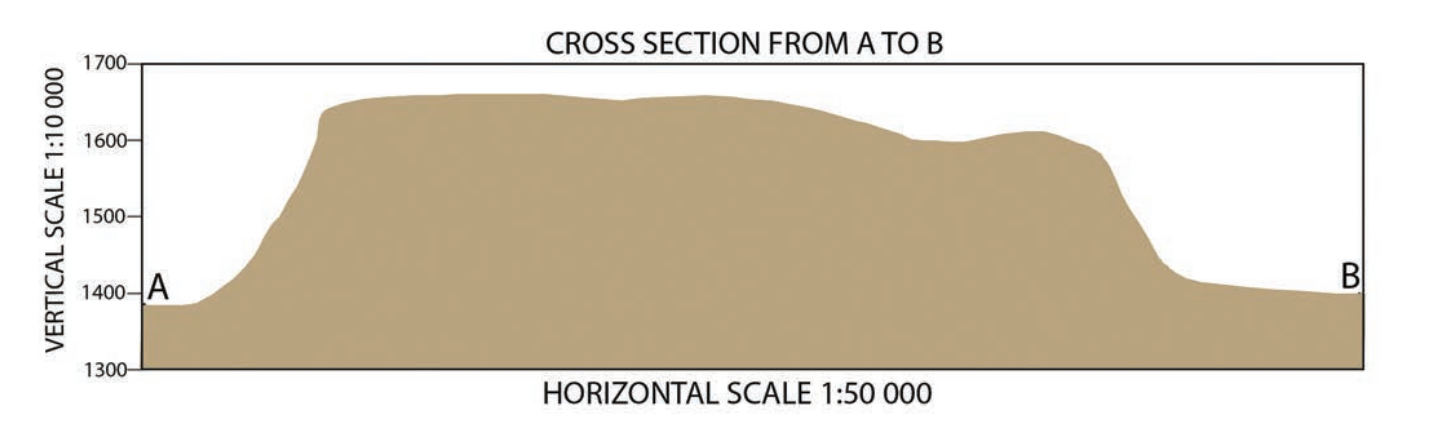
Step 5: Connect the dots
Join all your dots or crosses with a smooth, flowing line that shows the natural undulations of the landscape. Draw a vertical line down to the x-axis at each end point. If you need to show features like roads or rivers, add arrows pointing to their locations and label them clearly.
Step 6: Complete your cross-section
Give your cross-section an appropriate title and add shading underneath the profile line. Include both the vertical scale and horizontal scale labels on your axes, and mark the starting and ending points clearly.
Key Steps to Remember:
- Draw your line and mark all contour crossings accurately
- Set up proper axes with appropriate scale intervals
- Transfer marks carefully using dots or crosses
- Connect with smooth, flowing lines that reflect natural landscape
- Always include title, scales, and proper labeling
Reading and interpreting cross-sections
Once you have a completed cross-section, you can use it to understand the landscape much better than just looking at contour lines. The example above shows how a complex pattern of contour lines transforms into a clear picture of hills and valleys.
Key things to look for when reading cross-sections:
- Steep slopes appear as nearly vertical sections on your profile
- Gentle slopes show up as gradual inclines
- Valleys create dips or low points in your profile line
- Hills and peaks form high points and rounded tops
- Flat areas appear as horizontal sections
Developing the skill to "read" cross-sections takes practice, but once mastered, it becomes like having X-ray vision for understanding landscapes. You'll be able to visualize the three-dimensional terrain that lies behind any topographic map.
Remember that because of vertical exaggeration, the slopes will appear much steeper than they actually are. This is normal and helps us see elevation changes more clearly.
Practical applications
Cross-sections aren't just academic exercises - they have real-world importance. Architects and civil engineers use cross-sections when planning buildings to understand how the land slopes and what challenges they might face during construction. They often draw cross-sections from different angles to visualise a building site in three dimensions before construction begins.
Road builders, railway engineers, and urban planners also use cross-sections to plan routes that follow the most practical gradients and avoid unnecessarily steep slopes.
Professional Applications
In the professional world, cross-sections are essential tools for risk assessment and project planning. They help prevent costly mistakes by revealing potential challenges like unstable slopes, drainage issues, or construction difficulties before work begins.
Remember!
Key Points to Remember:
- Cross-sections show the side view of landscape features, like cutting through the land with a knife
- Two scales are involved: horizontal scale (distance) and vertical scale (height), with the vertical scale usually much larger
- The six-step method provides a systematic approach: draw line, mark contours, set up axes, transfer marks, connect dots, complete with title and scales
- Vertical exaggeration makes slopes appear steeper than they really are, but this helps us see elevation changes more clearly
- Cross-sections have practical applications in engineering, architecture, and planning, helping professionals understand terrain before building or developing land