Atomic Emission Spectroscopy and Flame Tests (HSC SSCE Chemistry): Revision Notes
Atomic Emission Spectroscopy and Flame Tests
What is atomic emission spectroscopy?
Under normal conditions, atoms don't emit light on their own, whether they exist in isolation or as part of compounds. However, when we give atoms extra energy—for example, by heating them—they can be made to emit light. This process forms the basis of atomic emission spectroscopy, a powerful analytical technique.
How atoms emit light
When atoms are heated to temperatures above 1500°C, something interesting happens to their electrons. Some electrons absorb this thermal energy and get "excited"—they jump from their normal energy levels (called orbitals) to higher energy levels. This normal state is called the ground state.
However, excited electrons don't stay in these higher energy levels for long. After a brief moment, they fall back down to their ground state. As they do this, the extra energy they absorbed is released as light. This light can be in the form of:
- Visible light (what we can see)
- Ultraviolet (UV) radiation
- Infrared (IR) radiation
Energy Conservation Principle
The energy emitted when an electron falls back to its ground state is exactly the same as the energy that was absorbed when it was raised to the excited state. This is a fundamental law of physics—energy cannot be created or destroyed, only transformed.
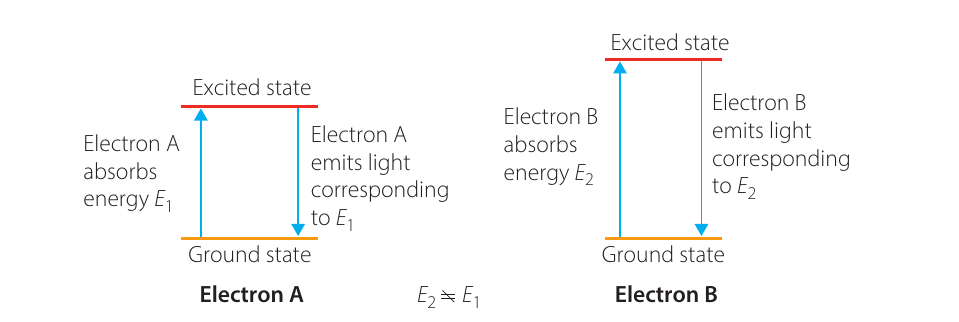
The diagram above shows how this works. Electron A absorbs energy to reach an excited state, then emits light corresponding to when it falls back. Similarly, Electron B absorbs energy and later emits light corresponding to . Each of these energy transitions produces a separate bright line in the emission spectrum.
The relationship between energy and wavelength
There's a mathematical relationship between the energy released by an excited electron and the wavelength of light produced:
Where:
- is the energy released
- is Planck's constant (a fundamental constant of nature)
- is the speed of light
- (lambda) is the wavelength of the emitted radiation
Inverse Relationship: Energy and Wavelength
This equation reveals a crucial relationship: the greater the energy released, the shorter the wavelength of light emitted. This inverse relationship means:
- Large energy jumps produce UV light (short wavelengths)
- Medium energy jumps produce visible light (medium wavelengths)
- Small energy jumps produce IR radiation (long wavelengths)
Understanding emission spectra
When we take the light emitted by heated atoms and break it into its different wavelength components (for example, by passing it through a prism or using a spectroscope), we discover something remarkable: the emissions occur at just a few discrete (separate or distinct) wavelengths, not at all wavelengths.
This pattern of lines at specific wavelengths is called an emission spectrum. It appears as a set of bright or coloured lines on a black background—each line represents a specific electron transition in the atom.
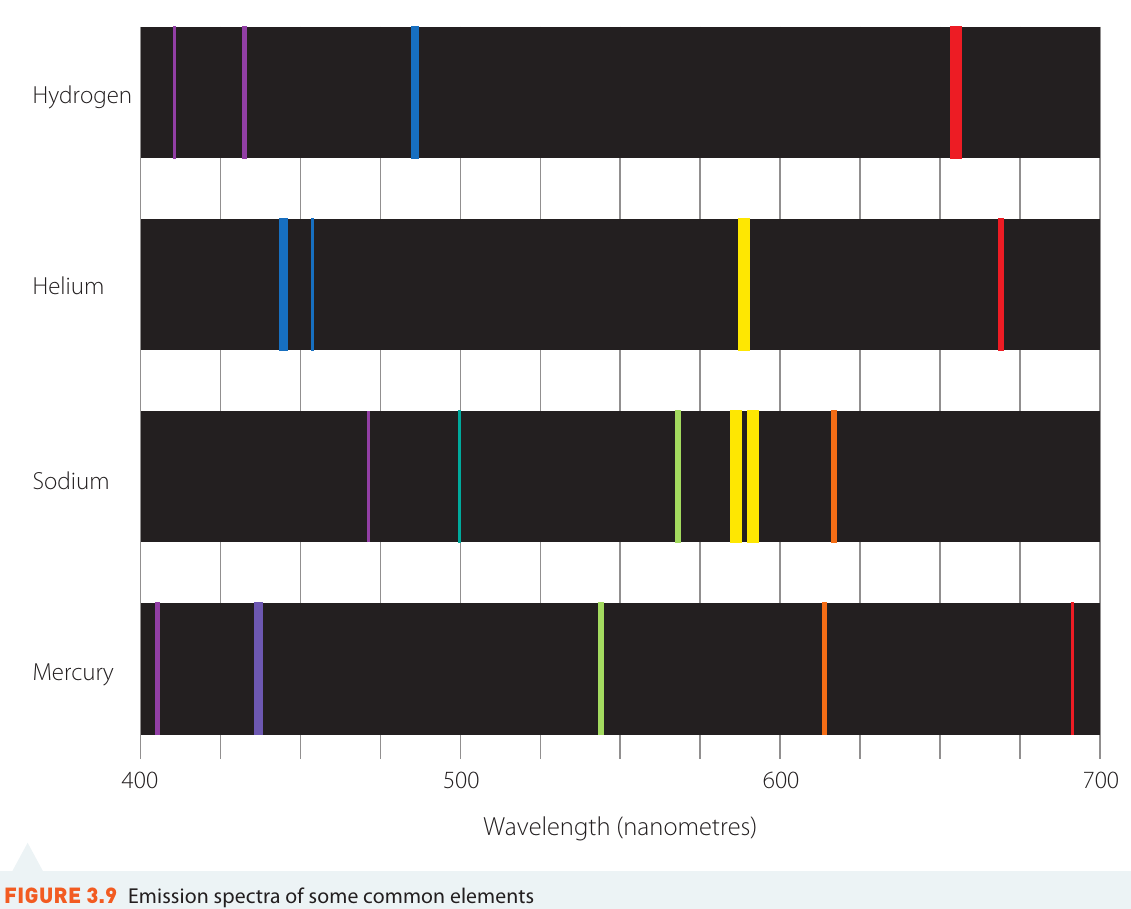
The diagram above shows the emission spectra of four common elements: hydrogen, helium, sodium, and mercury. Notice how different each pattern is—this is crucial for identification purposes.
Why emission spectra are unique
Each wavelength in an emission spectrum corresponds to the energy required to excite a particular electron from its ground state to an excited state. Since different elements have different arrangements of electrons and different energy sublevels (such as 2p, 3p, or 3d), each element has its own unique emission spectrum. It's like a fingerprint for elements!
The Power of Spectroscopic Identification
This uniqueness is incredibly useful. By examining the emission spectrum of an unknown sample, scientists can identify which elements are present. In fact, the element helium was first discovered by analyzing emission spectra from the Sun—hence its name, which comes from "Helios," the Greek word for Sun.
Flame tests for element identification
While emission spectroscopy uses sophisticated equipment, there's a simpler way to identify certain metallic elements: flame tests. When compounds containing some metallic elements are heated in a flame, they give the flame a distinctive colour.
How flame tests work
The high temperature of a Bunsen burner flame (typically 1000 to 1500°C) provides enough energy to:
- Decompose the compound into its component elements
- Excite electrons in atoms of one of the elements
- Cause these excited electrons to emit light of characteristic wavelengths
For flame tests to work, the element must be present as a compound that can vaporise at the flame's temperature. All elements that produce distinctive flame colours are metals.
Common flame colours
Different metallic elements produce different flame colours. Here are the most common ones you should know:
| Element | Flame colour |
|---|---|
| Lithium | Carmine (dull red) |
| Sodium | Yellow |
| Potassium | Light purple (lilac) |
| Calcium | Brick-red (orange-red) |
| Strontium | Scarlet (deep red) |
| Barium | Pale green (apple green) |
| Copper | Blue-green |
Exam tip: A helpful mnemonic to remember these elements is "Little Sally Put Calcium Stones By Creek" (Lithium, Sodium, Potassium, Calcium, Strontium, Barium, Copper).
Why some elements produce distinctive colours
Elements that produce distinctive flame colours have a special characteristic: their atoms have one electron transition that occurs much more frequently than any other transition. This means that when the element is excited, it predominantly emits light of one particular wavelength, and therefore one colour.
Elements without this characteristic produce a mixture of many wavelengths, which results in white or unclear colours that aren't useful for identification.
Investigation 3.1: Conducting flame tests
Aim
To observe the colours produced by metal ions when placed in a Bunsen flame.
Safety considerations
| What are the risks? | How to stay safe |
|---|---|
| Bunsen burner flame is hot and could cause burns | Set up on a heat-proof mat and place any used equipment onto the mat |
| Use of chemicals | Use the program RiskAssess or equivalent to determine safe handling procedures for each chemical |
Key materials needed
- Bunsen burner and heat-proof mat
- Nichrome wire loop mounted in glass tubing
- 1 mol L hydrochloric acid
- Distilled or demineralised water
- Various metal salt samples (copper sulfate, calcium nitrate, barium chloride, potassium chloride, sodium chloride, strontium nitrate, etc.)
Basic procedure
- Clean the nichrome loop by dipping it in distilled water, then in hydrochloric acid
- Heat the loop in the blue Bunsen flame until the flame returns to its normal blue colour (this confirms the loop is clean)
- Dip the clean loop into a solid metal salt sample
- Place the loop with the sample into the blue Bunsen flame
- Observe and record the flame colour
- Repeat for each metal salt sample
What to look for
When analyzing results, compare the colours produced by:
- Different metal salts containing the same metal (e.g., copper sulfate vs copper chloride)
- Different salts with the same anion (e.g., different nitrates, chlorides, or sulfates)
Key Finding
This helps you determine whether it's the cation (positive metal ion) or the anion (negative ion) that produces the distinctive colour. You'll find it's the metal cation that produces the colour.
Investigation 3.2: Observing emission spectra
Aim
To observe the emission spectra of different elements using discharge tubes.
Safety considerations
| What are the risks? | How to stay safe |
|---|---|
| The induction coil (high-voltage source) emits X-rays | Have a teacher demonstrate equipment setup. Stand at least 2 metres away from the equipment |
Key materials needed
- Darkened room (essential for observation)
- Discharge tubes containing different elements (hydrogen, helium, etc.)
- Induction coil (high-voltage source)
- Power pack
- Spectroscope or digital spectrometer
- Retort stand with clamp
Basic procedure
- Set up the discharge tube in a retort stand
- Connect the tube to the induction coil and power pack (teacher demonstration)
- Darken the room and turn on the power pack
- Look through the spectroscope to observe the spectrum
- Record the wavelengths of spectral lines and their intensities (bright or faint)
- Repeat with discharge tubes containing different elements
Important observations to make
- The colour of light emitted from each discharge tube
- The specific wavelengths of spectral lines in each spectrum
- The gaps between spectral lines
- Whether lines are faint or intense
- How the spectra differ between elements
Each element will show a unique pattern of lines, confirming that emission spectra are element-specific.
Practical applications: Fireworks
The distinctive flame colours produced by metallic elements have a spectacular practical application—fireworks! Pyrotechnicians use compounds containing specific metals to create different colours in fireworks displays.

Connecting Theory to Practice
The beautiful colours we see in fireworks are actually the same atomic emission phenomenon we observe in flame tests and emission spectra—just on a much larger and more dramatic scale!
For example:
- Red colours come from strontium compounds
- Green colours come from barium compounds
- Blue colours come from copper compounds
- Yellow colours come from sodium compounds
Remember!
Key Points to Remember:
-
Atoms emit light when energized: Under normal conditions, atoms don't emit light. However, when heated to high temperatures (above 1500°C), electrons absorb energy and move to excited states. When they fall back to ground states, they release this energy as light.
-
Each element has a unique emission spectrum: The pattern of spectral lines is like a fingerprint for each element because different elements have different electron energy levels. This makes emission spectroscopy a powerful tool for identifying elements.
-
Energy and wavelength are inversely related: The relationship shows that larger energy releases produce shorter wavelengths (UV light), while smaller energy releases produce longer wavelengths (IR radiation).
-
Flame tests identify metallic elements: Certain metals produce characteristic flame colours—lithium gives red, sodium gives yellow, potassium gives lilac, calcium gives brick-red, strontium gives scarlet, barium gives pale green, and copper gives blue-green.
-
One dominant transition creates distinctive colours: Elements that produce distinctive flame colours do so because they have one electron transition that occurs much more frequently than others, resulting in predominantly one wavelength (colour) of light being emitted.