Structured Programming (AQA A-Level Computer Science): Revision Notes
Structured Programming
Introduction to structured programming
When creating a computer program, there are many different aspects you need to think about carefully. These include:
- Working out what the main processes need to be
- Identifying what data is required and how it will be stored
- Determining what calculations will be performed on the data
- Deciding which types of statements and constructs are needed
- Organising the code into subroutines to create a working program
Taking time to design your program properly is always worthwhile. Good program design results in more efficient code with fewer errors, and it makes writing the actual code much easier if you plan ahead.
This chapter focuses on techniques that help you design programs effectively, particularly for procedural programming languages and imperative programming languages.
Procedural programming languages are those where you specify the exact steps that must be carried out in a specific order to achieve a result. Imperative programming languages work by giving the computer commands or procedures to follow. These languages use sequences of instructions in the form of algorithms and subroutines, which we explored in previous chapters.
Understanding how to structure programs properly is essential for A-Level Computer Science, as it forms the foundation of writing clear, maintainable code.
Hierarchy or structure charts
What are hierarchy charts?
A hierarchy chart (also called a structure chart) is a diagram that shows how a program is designed from the top down. It provides a visual representation of how your program breaks down into smaller, more manageable parts.
The key difference between these two terms is:
- A hierarchy chart shows the design of a system from the top down
- A structure chart is similar but also shows how data is passed around the system
Both use what's called a top-down approach to design. This means you start at the highest level (the whole program) and work your way down into smaller and smaller sub-processes.
How programs are broken down
The Five Levels of Program Decomposition:
When designing a program using hierarchy charts, you break it down through several levels:
- Programs are made up of modules
- Modules are made up of subroutines and functions
- Subroutines and functions are made up of algorithms
- Algorithms are made up of lines of code
- Lines of code are made up of statements (instructions) and data
For larger programs, a module is a self-contained part that can be worked on separately from all other modules. This allows different programmers to work independently on different sections, and then everything is put together at the end to create the complete program.
Understanding hierarchy chart layout
In a hierarchy chart, each level contains only a few words of text. If you want more detail about what a process involves, you need to move further down the diagram to the next level. The component parts are organised from left to right to show how the system will work sequentially.
Here's an example of part of a structure diagram for a program:
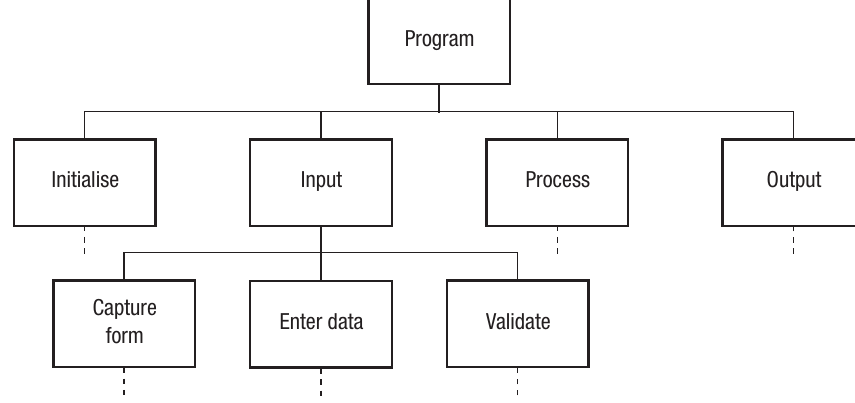
This diagram shows the program at the top level, with four main modules beneath it (Initialise, Input, Process, and Output). Under these modules are further sub-processes like "Capture form", "Enter data", and "Validate". This visual structure helps you see the overall program architecture at a glance.
Flowcharts
What are flowcharts?
A flowchart is a diagram that uses a set of recognised symbols to show how the components of a system or process work together. Flowcharts are particularly useful for visualising the logic flow of a program, including decisions and loops.
Standard flowchart symbols
Flowcharts use standardised symbols, each with a specific meaning:
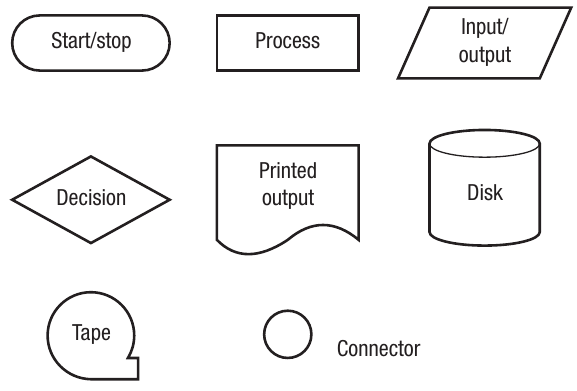
The main symbols you need to know are:
- Oval (terminal): Used for start and stop points
- Rectangle (process): Represents a process or action
- Parallelogram (input/output): Shows input or output operations
- Diamond (decision): Represents a decision point with Yes/No or True/False branches
- Document shape (printed output): Indicates output that is printed
- Cylinder (disk): Represents disk storage
- Circle with flag (tape): Represents tape storage
- Small circle (connector): Shows connections between different parts of the flowchart
System flowcharts
A system flowchart shows individual processes within a system. It displays the tasks to be completed, the files that will be used, and the hardware that will be needed, but only as an overview.
It's normally possible to create just one flowchart that shows the whole system, but this isn't always a good idea. Modern programs can be very large, and cramming every process onto one flowchart would make it too complex to be useful. It might be more advantageous to create a separate system flowchart for each section of the project.
Worked example: ATM system flowchart
Worked Example: ATM PIN Verification System
Here's an example of a system flowchart showing the first few processes when a person uses an ATM (Automated Teller Machine) at a bank:
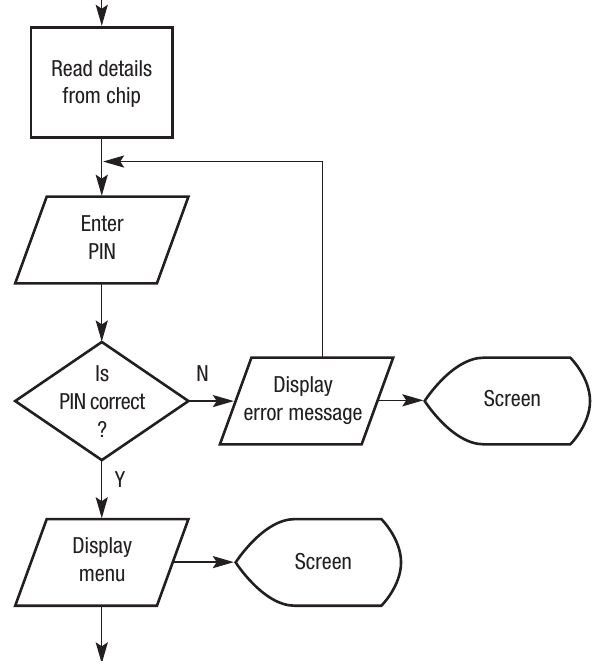
This flowchart demonstrates:
- The card is put in the machine (input)
- Details are read from the chip (process)
- The user enters their PIN (input)
- The system checks if the PIN is correct (decision)
- If incorrect, an error message is displayed and the user tries again (loop back)
- If correct, the menu is displayed (output)
Notice how the flowchart clearly shows the decision point and the loop that allows multiple PIN attempts. This is a typical pattern in authentication systems.
Pseudo-code
What is pseudo-code?
Pseudo-code is a method of writing code that doesn't require knowledge of a particular programming language. It allows you to plan the structure and logic of your program without worrying about using the correct syntax or constructs.
Pseudo-code consists of a series of commands that show the purpose of the program without getting bogged down in the intricacies of your chosen high-level language. You'll need to convert the pseudo-code into actual high-level code at a later stage.
Key features of pseudo-code
Pseudo-code is not a true programming language, though it may use some constructs and language from high-level languages. There's only one rule for writing good pseudo-code: the language you use must be consistent.
For example, using the command 'Save to File' in one place and then 'Write to File' in another will make converting it to actual code more difficult.
Using pseudo-code at different levels
Pseudo-code can be used at many levels of detail. For example, this simple line:
Sort NameFile by surname
does exactly the same as these more detailed lines:
Repeat
    Compare adjacent values, swap if necessary
Until No more swaps are needed
It's up to you as the programmer to decide how far down you need to break your pseudo-code before you can start to actually write the code.
Benefits of pseudo-code
Pseudo-code is very useful because it allows you to sort out the overall structure of the program as it will eventually appear. The fact that it can be used at many levels means you don't have to work out all the fine detail from the start. This makes it easier to focus on the logic and flow of your program before worrying about syntax details.
Naming conventions
Why naming conventions matter
Naming conventions refer to the process of giving meaningful names to subroutines, functions, variables, and other user-defined features in a program.
Adding variables to a program as you go along is a recipe for disaster and shows a serious lack of planning. Before you start writing actual code, you should draw up a list of all the variables you intend to use, including:
- Details of the data types
- Whether they are going to be local or global variables
- The purpose of each variable
Examples of good naming
Here are some examples of well-named variables being declared in a Visual Basic program:
Dim LoadFileName As String
Dim Counter As Integer
Dim AverageScore as Single
Dim RejectFlag As Boolean
These variable names are meaningful – they tell you what the variable will be used for. It makes much more sense to call a variable that stores the number of pupils in a group GroupSize than to call it Size or C3.
Planning functions and subroutines
In the same way that you should plan your variables, you should also draw up a list of the functions and subroutines you intend to use, along with details of:
- What each will do
- What it will be called
- What parameters it will need to have assigned to it
This planning stage is crucial for creating well-structured, maintainable code.
Code layout and comments
Making code programmer-friendly
The final step to good program construction is to use the features of your programming language to make the code as programmer-friendly as possible. This includes:
- Adding suitable comments, especially to more complex or unusual sections of code
- Using gaps and indents to show the overall structure of the program
- Indenting loops to help identify where a loop begins and ends (also helps when debugging)
Comparing code examples
The following two sets of code do the same thing – they place the first 12 values from the two times table into an array.
Example 1 (Poor style):
For X = 1 To 12
W(X) = 2 * X
Next
This example provides no support for the programmer at all.
Example 2 (Good style):
'routine to place multiples of 2 in array TwoTimes()
For Count = 1 To 12
    'counter counts from 1-12
    TwoTimes(Count) = 2 * Count
    'result in array TwoTimes
Next Count
'end loop
What Makes Good Code:
The helpful features in the second example are:
- Comments to show the purpose of the algorithm itself
- Comments to show the purpose of each line
- Sensible variable names such as Count and TwoTimes
- The contents of the loop have been indented
These features make the code much easier to understand, debug, and maintain.
Dry runs and trace tables
What are dry runs?
No matter how careful a programmer is, even the simplest programs are likely to contain bugs. Some bugs come from syntax errors and quirks, and some are trapped by the operating system. However, some bugs can remain elusive and the programmer might need to resort to dry running the appropriate section of code.
Dry running is the process of following code through on paper. You write down the variables that are used in a trace table and note how their values change through the execution.
Benefits of trace tables
A trace table is a method of recording the result of each step that takes place when dry running code. It's useful to dry run pseudo-code as any errors in the overall design of the algorithm can be identified before too much time has been spent programming it.
Note that dry running can be done on pseudo-code or actual programming code.
Worked example: Sorting algorithm
Worked Example: Dry Running a Sorting Algorithm
Here's a simple example of a dry run using a sorting algorithm:
For Counter = 1 To 3
    If StoreName(Counter) > StoreName(Counter + 1)_
    Then
        TempName ← StoreName(Counter)
        StoreName(Counter) ← StoreName(Counter + 1)
        StoreName(Counter + 1) ← TempName
    End If
Next Counter
The array called StoreName has four elements. The initial values for StoreName and the other variables are shown in this trace table:

First iteration (Counter = 1):
The program begins. Counter is set to 1 and the contents of StoreName(1) are compared with the contents of StoreName(2). Because "Kevin" is greater than "Jane" (alphabetically speaking), TempName takes the value "Kevin", StoreName(1) takes the value "Jane", and finally StoreName(2) takes the value held in TempName – "Kevin".

Second iteration (Counter = 2):
Counter now increments to 2 and StoreName(2) is compared to StoreName(3). "Kevin" is greater than "Beth" so TempName becomes "Kevin". Even though TempName already contains "Kevin", it's important to realise that this is overwritten by the same name.
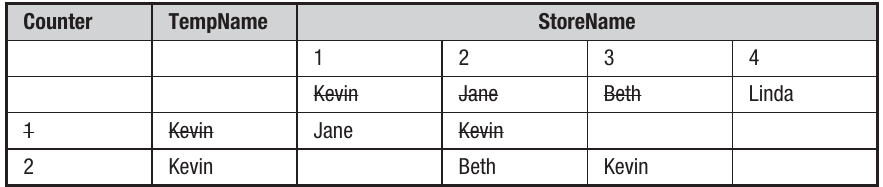
Third iteration (Counter = 3):
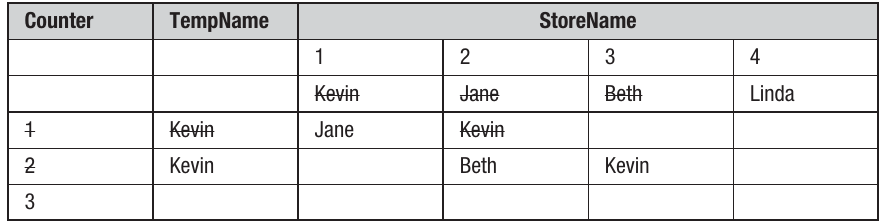
Counter now increases to 3, and "Kevin" is compared to "Linda". "Kevin" is less than "Linda" so the program jumps to the End If statement.
Counter has now reached the end value of the loop (3), so the program moves on to whatever comes next.
Understanding the algorithm
By working through this trace table, you can see that this algorithm is part of a simple sort routine. Whilst a program is being developed, a programmer might also use techniques such as single stepping, where the program is executed one line at a time. The programmer can see the values of the variables being used and may choose to insert breakpoints – points where the execution stops so the programmer can check variables or just confirm that a particular section of code has been executed.
Remember!
Key Points to Remember:
-
Hierarchy or structure charts use a top-down approach to show how a program breaks down from the overall program into modules, subroutines, algorithms, and individual lines of code.
-
Flowcharts use a set of recognised symbols to show how the components of a system or process work together. Key symbols include ovals for start/stop, rectangles for processes, diamonds for decisions, and parallelograms for input/output.
-
Pseudo-code allows you to write code without worrying about syntax or constructs. It's a flexible planning tool that can be used at different levels of detail and must maintain consistent language throughout.
-
Naming conventions are crucial for creating readable code. Plan all variables (including data types and scope) and functions (including purposes and parameters) before you start coding.
-
Good code layout includes appropriate comments explaining the purpose of code sections, indentation to show structure (especially in loops), and sensible variable names. These features make debugging and maintenance much easier.
-
Dry runs and trace tables let you test code logic on paper before running it. Trace tables record how variable values change through each step of execution, helping identify logic errors early in development.