Marking out (AQA GCSE Design and Technology): Revision Notes
Marking out
Marking out is a crucial first step in any design and technology project. Before you can cut, drill, or join any material, you need to accurately mark where these operations will take place. Getting this stage right ensures your final product will be precise and fit together properly.
Understanding marking tools
Marking tools are designed to leave a visible mark or imprint on your chosen material. These marks guide you when cutting, drilling, or joining pieces together. Different materials require different marking tools to ensure the marks are visible and accurate.
The key to successful marking out is selecting the right tool for your specific material. Using the wrong marking tool can result in invisible marks, permanent damage, or inaccurate guidelines that compromise your entire project.
Tools for metal work
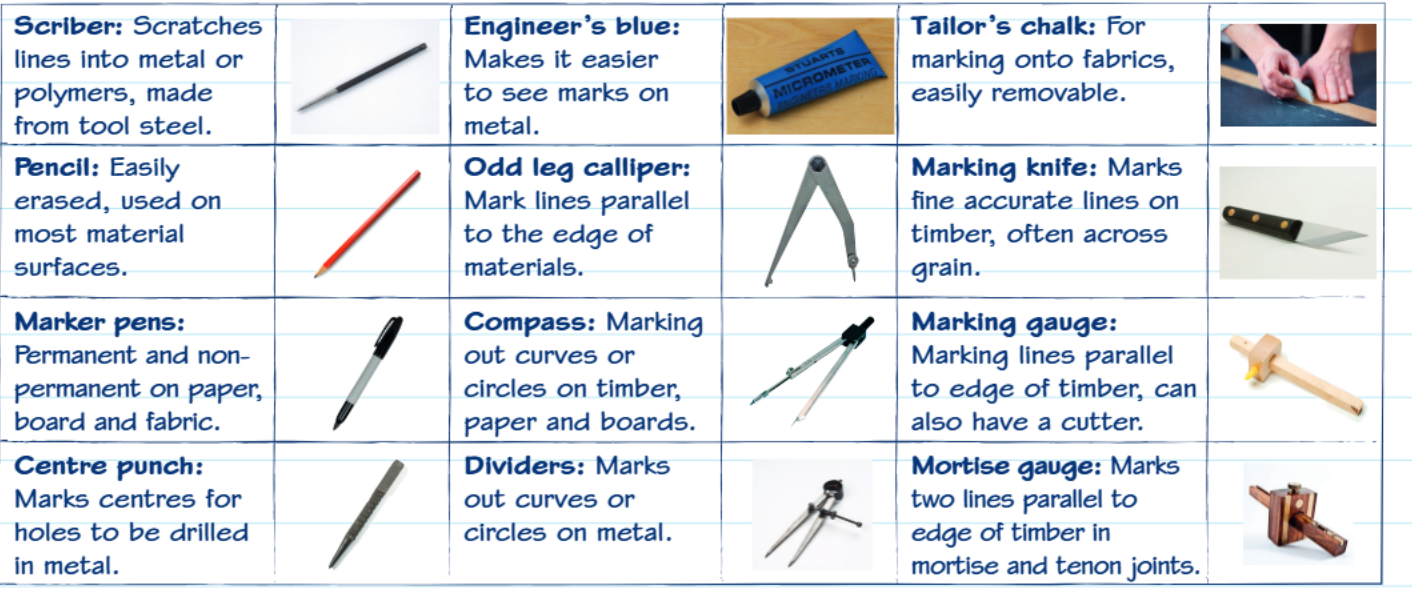
When working with metal, you need tools that can create visible marks on hard surfaces. A scriber scratches fine lines directly into metal surfaces, creating permanent guidelines that won't rub off during work.
Engineer's blue and scribing technique: Engineer's blue is applied to the metal first - this special coating makes scribed lines stand out clearly against the blue background. This combination provides excellent visibility for precise metalwork.
A centre punch serves a specific purpose in metalwork by creating small dimples that prevent drill bits from wandering when you start drilling holes. The odd leg calliper helps you mark lines that run parallel to the edge of your metal piece, which is essential for consistent spacing.
Tools for wood work
Timber requires different marking approaches due to its softer nature and visible grain patterns. The marking knife creates the most accurate lines on wood by actually cutting into the surface slightly. This prevents the wood fibres from tearing when you saw along the line, giving you cleaner cuts.
A marking gauge is invaluable for creating parallel lines at a set distance from the edge of timber. The mortise gauge takes this further by marking two parallel lines simultaneously, which is perfect for creating mortise and tenon joints in woodworking projects.
General purpose tools
Some tools work well across multiple materials. Pencils are the most versatile option, suitable for most surfaces and easily erasable when needed. Marker pens work on various materials but create permanent marks, so they're best used when you're confident about your measurements.
A compass allows you to draw perfect circles and arcs on timber, paper, and boards, while tailor's chalk provides removable marks on fabrics that won't damage delicate materials.
Measuring tools
Unlike marking tools, measuring tools provide precise dimensional readings that you can use to ensure accuracy in your work. These tools are essential for checking measurements and transferring dimensions from plans to materials.
Understanding the difference: Measuring tools give you exact dimensions and readings, while marking tools show you where to work on your material. Both are essential but serve different purposes in the marking out process.
Precision measuring instruments
The micrometer offers exceptional accuracy, measuring thicknesses and diameters to within 0.01mm. This level of precision makes it ideal for engineering projects where exact dimensions are critical. Vernier callipers provide similar accuracy and can measure both internal and external dimensions, making them incredibly versatile for detailed work.
Everyday measuring tools
A steel rule provides straight-line measurements and can also be used for drawing straight guidelines. Its rigid construction makes it reliable for both measuring and marking tasks. Tape measures excel at measuring longer distances and curved surfaces, though they're less precise than rigid measuring tools.
Guide tools
Guide tools combine the functions of marking and measuring, helping you achieve consistent angles and parallel lines. These tools are essential for ensuring your project components fit together properly.
Square tools for right angles
The try square is fundamental for marking 90-degree angles on wood, ensuring your corners are perfectly square. An engineer's square serves the same purpose for metalwork, providing the precision needed for engineering applications.
A mitre square specialises in marking 45-degree angles, which are commonly needed for creating neat corner joints in frames and boxes. The sliding bevel goes beyond fixed angles, allowing you to mark and transfer any angle that isn't 90 degrees.
Callipers for precision
Outside callipers help measure external dimensions like pipe diameters or thickness of materials. Inside callipers do the opposite, measuring internal dimensions such as the inside diameter of tubes or holes. Both types work with a steel rule to provide accurate readings.
Practical applications
Understanding when to use each tool is just as important as knowing how they work. The choice of tool depends on your material, the permanence required, and the precision needed for your specific project.
Worked Example: Choosing the Right Marking Approach
Scenario: You need to mark a line parallel to the edge of a piece of timber.
Option 1: Marking gauge for permanent accuracy
- Use when: The line needs to be precise and permanent
- Advantage: Creates a fine scored line that won't rub off
Option 2: Pencil with a ruler for temporary guidelines
- Use when: You might need to adjust the measurement
- Advantage: Can be erased and remarked if needed
Decision factors: Consider whether the mark needs to survive rough handling and whether you might need to make adjustments.
The choice between a scriber and engineer's blue versus a marker pen on metal depends on whether you need permanent marks that survive rough handling or temporary marks that can be easily removed after cutting.
When checking that a mitre cut is exactly 45 degrees, a mitre square provides immediate verification, while a protractor would give you the flexibility to check any angle but with less convenience for this specific measurement.
Key Points to Remember:
- Always mark out your materials accurately before cutting - mistakes at this stage affect the entire project
- Choose your marking tool based on the material you're working with - metal needs different tools than wood or fabric
- Measuring tools give you precise dimensions, while marking tools show you where to work
- Guide tools like squares and callipers help ensure your angles and parallel lines are perfect
- Practice using these tools regularly to develop the skill and confidence needed for accurate marking out