Constructions (OCR GCSE Maths): Revision Notes
Constructions
What are Constructions?
Constructions involve drawing geometric figures with precision using only a compass and a ruler. This was a fundamental part of mathematics before the advent of computers.
Historically, the Ancient Greeks and Egyptians made significant contributions to the development of constructions. Their work laid the groundwork for many of the concepts we study in geometry today.
- Why Learn Constructions?
- Constructions are crucial for understanding spatial relationships and properties in geometry.
- They form the basis of many mathematical concepts and are frequently tested in exams.
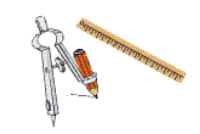
Basic Tools for Constructions
- Compass: Used to draw arcs and circles and to transfer distances.
- Ruler: Used to draw straight lines and measure distances
Worked Example:
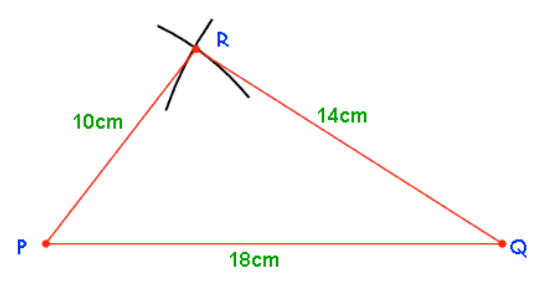
Example Constructing a Triangle Given Three Sides (SSS Construction)
Problem: Construct the triangle with sides: , , and .
Steps:
- Draw the Base:
- Start by selecting the longest side cm as the base.
- Use your ruler to draw a straight line that is cm long. Label the ends as and .

- Draw the First Arc:
-
Set your compass to the length of cm.
-
Place the pointy end of the compass on and draw an arc above the line .

- Draw the Second Arc:
-
Without changing the compass width, set your compass to cm.
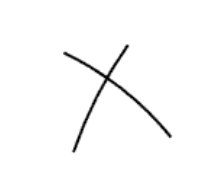
-
Place the pointy end on and draw another arc that intersects the first arc.

- Complete the Triangle:
- Label the intersection of the arcs as .
- Draw straight lines from to and from to to form the triangle .
- Verify the lengths with your ruler to ensure accuracy.
What is a Perpendicular Bisector?
Perpendicular means at right angles (90°).
Bisector means cutting something in half.
A perpendicular bisector is a line that cuts another line segment exactly in half and at a right angle. This means that every point on the perpendicular bisector is equidistant from the endpoints of the original line segment.
Worked Example:
Example
Constructing a Perpendicular Bisector
Problem: Construct a perpendicular bisector to the line .

Steps:
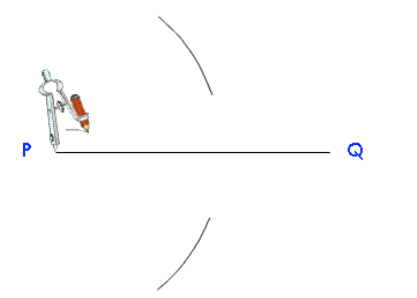
- Set Up the Compass:
- Place the pointy end of your compass at point
- Open the compass to a width that is more than half the length of line .
- Draw an arc above and below the line .
- Repeat from the Other Endpoint:
- Without changing the compass width, place the pointy end at point .
- Draw another arc that crosses the first set of arcs above and below the line.
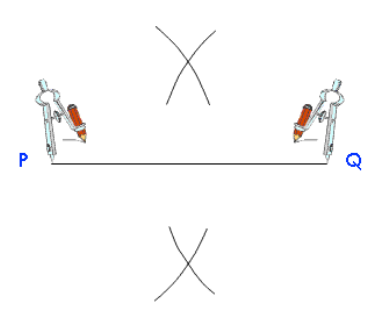
3. Draw the Perpendicular Bisector:
- Using your ruler, draw a straight line through the two points where the arcs intersect. This line is the perpendicular bisector.

Key Points:
- Ensure Accuracy: The compass width must remain the same when drawing arcs from both and .
- Label Clearly: Mark the intersection points of the arcs and label the bisector appropriately. Result: The line you have drawn is the perpendicular bisector of meaning it cuts into two equal parts and forms a right angle with it.
What is an Angle Bisector?
Angle Bisector: A line that divides an angle into two equal parts.
When you construct an angle bisector, every point on the bisector is equidistant from the two arms of the angle. This property is crucial in many geometric problems and proofs.
Worked Example:
Example
Constructing an Angle Bisector
Problem: Construct an angle bisector for the angle made by lines and .
Steps:
- Draw the First Arc:
- Place the pointy end of your compass at the angle's vertex, .
- Draw an arc that crosses both lines and .
- This arc creates two points of intersection on and
- Draw Two More Arcs:
- Without changing the compass width, place the pointy end on one of the intersection points and draw an arc within the angle.
- Repeat the process from the second intersection point, ensuring that this arc crosses the first arc.
- The intersection of these two arcs inside the angle is crucial.
- Draw the Angle Bisector:
-
Using your ruler, draw a straight line from the vertex through the intersection of the two arcs inside the angle.
-
This line is the angle bisector. Key Points:
-
Consistency: The compass width must remain the same when drawing both arcs inside the angle.
-
Labeling: Clearly label the intersection points and the bisector to avoid confusion. Result: The line you have drawn is the bisector of the angle meaning it divides into two equal angles.