Early telescopes (AQA A-Level Physics): Revision Notes
Early telescopes
Historical development of telescopes
Around 400 years ago, Galileo became the first astronomer known to use a telescope for studying the night sky. His observations revolutionised our understanding of the solar system and the Universe. Galileo constructed several telescopes and used them to observe:
- The moons of Jupiter
- The rings of Saturn
These discoveries fundamentally changed how we understand our place in the cosmos, providing the first observational evidence that not all celestial bodies orbit the Earth.
Galileo's telescope design
Galileo's telescope was a refracting telescope, meaning it used glass lenses to alter the direction of light rays through refraction. The telescope consisted of two lenses:
- A primary convex lens (converging lens)
- An eyepiece with a single concave lens (diverging lens)
The best telescope Galileo constructed achieved a magnification of approximately ×30. While this may seem modest by modern standards, it was sufficient to make groundbreaking astronomical discoveries.
Types of optical lenses
To understand how astronomical telescopes work, you need to know how lenses form images. There are two basic types of optical lens used in various optical instruments including telescopes, binoculars, cameras, spectacles and magnifying glasses.
Concave lenses
A concave lens, also called a diverging lens, spreads an incident beam of light into a diverging emergent beam. The lens causes parallel light rays to spread out, never actually meeting at a focal point.
Unlike converging lenses, concave lenses always produce virtual images that appear smaller than the object. This property makes them useful in certain optical instruments, including Galileo's telescope eyepiece.
Convex lenses
A convex lens, also called a converging lens, can focus an incident beam of light. When parallel rays from a distant object pass through a convex lens, they converge to meet at a specific point.
How converging lenses work
For a single converging lens, several key features define its optical properties:
Principal axis and principal focus
The principal axis (or optical axis) is the line that passes through the centre of the lens at right angles to it.
Light rays from a distant object that are essentially parallel to the principal axis converge to a point called the principal focus, F.
The focal length, f, is the distance between the principal focus and the centre of the lens. A shorter focal length indicates that the lens converges light rays more strongly.
Understanding Focal Length
The focal length is a critical property of any lens. A shorter focal length means the lens bends light more strongly and converges rays more quickly. A longer focal length indicates weaker convergence. This property is essential when designing optical instruments like telescopes and cameras.
Constructing ray diagrams
Ray diagrams provide an excellent visual method for understanding how light behaves when passing through a lens system. When drawing ray diagrams for converging lenses, follow these conventions:
- Light rays that pass through the centre of the lens are undeviated (they continue in a straight line)
- Light rays parallel to the principal axis converge to the focal point
- By convention, rays are shown changing direction just once when passing through the lens
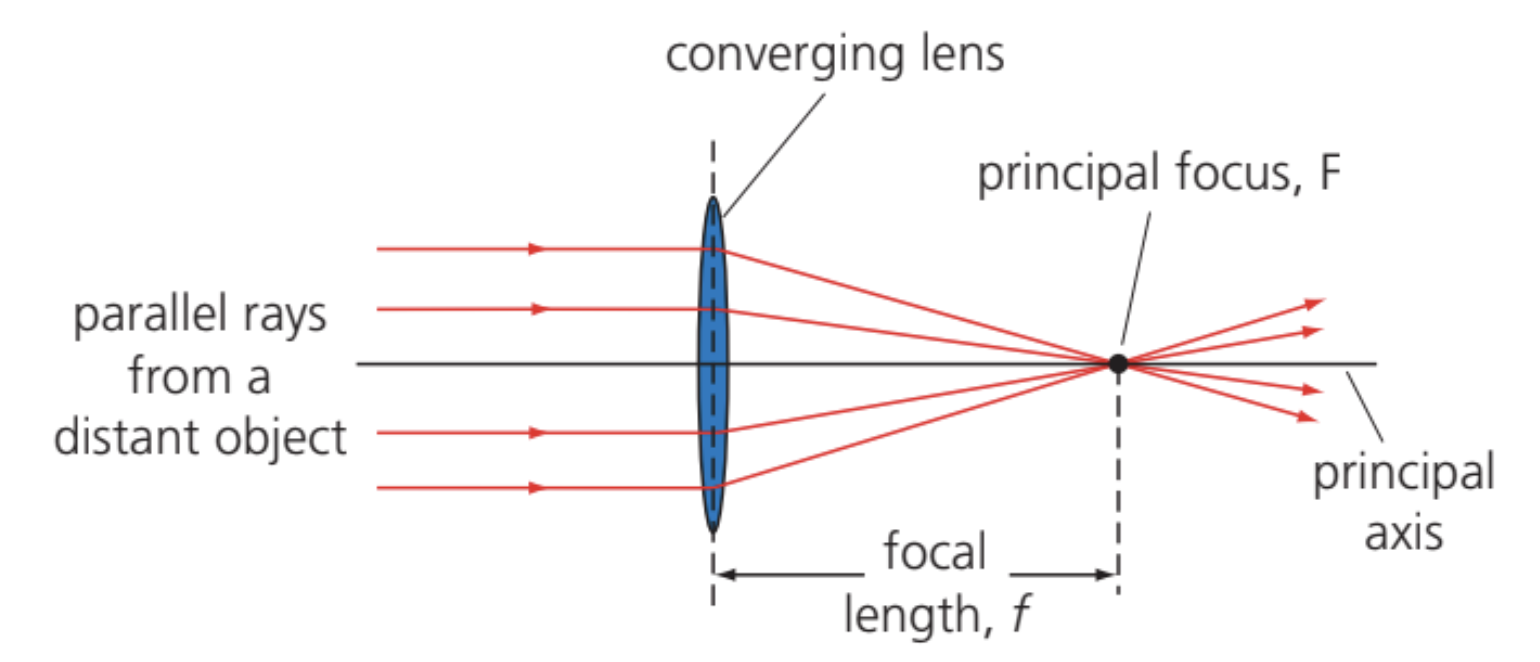
Image formation by converging lenses
A converging lens can produce two types of image depending on the object's position relative to the focal length.
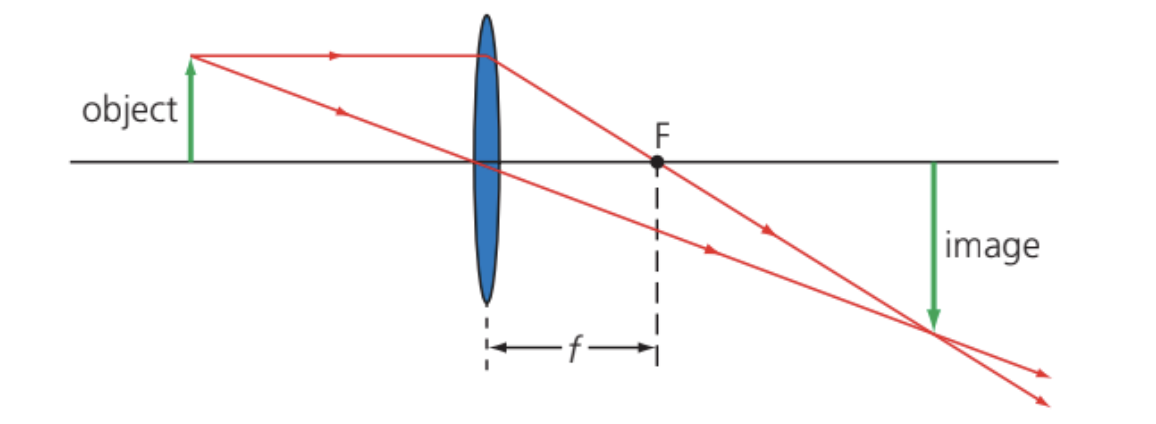
Real images
A real image is one that can be formed on a screen. When an object is positioned further away from the lens than the focal length, a real image forms on the far side of the lens. The real image is:
- Inverted (upside down)
- Located on the opposite side of the lens from the object
- Capable of being projected onto a screen
Real images are essential in devices like cameras and projectors, where the image needs to be captured on film or displayed on a screen. The ability to project a real image is what distinguishes it from a virtual image.
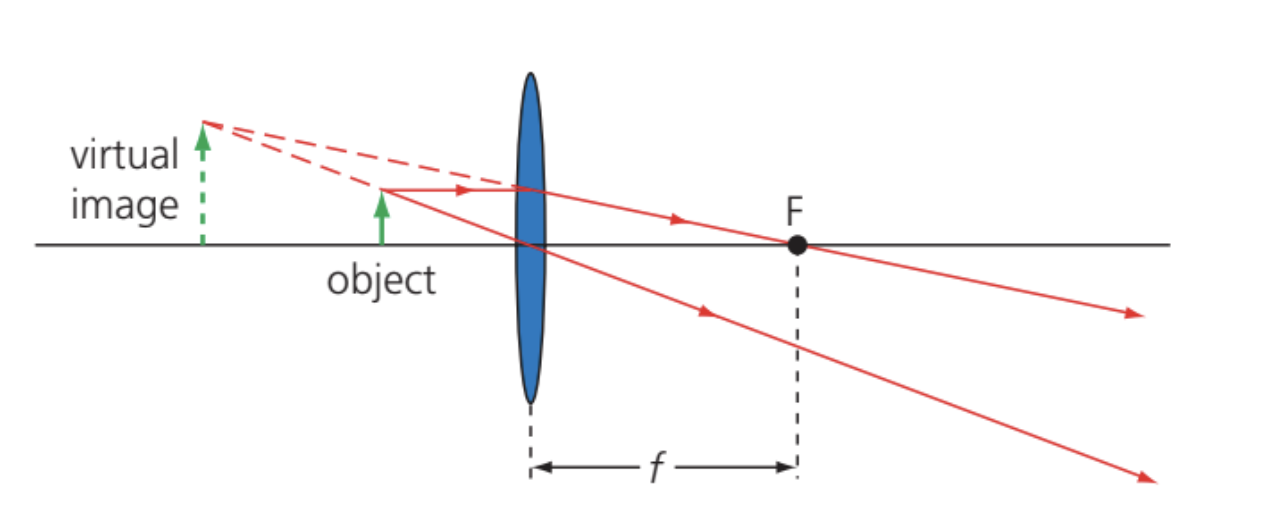
Virtual images
A virtual image cannot be formed on a screen. When an object is positioned closer to the lens than the focal length, the lens acts as a magnifying glass. The virtual image is:
- Magnified (larger than the object)
- The right way up (not inverted)
- Located on the same side of the lens as the object
- Light rays that pass through the centre of the lens are undeviated.
- Light rays parallel to the principal axis converge at the focal point.
- By convention, rays are shown changing direction only once as they pass through the lens.
Key Difference Between Image Types
The critical distinction is the object's position relative to the focal length:
- Object beyond focal length → Real image (inverted, can be projected)
- Object within focal length → Virtual image (upright, cannot be projected)
This principle is why a magnifying glass only works when held close to an object, creating a virtual image.
Key Points to Remember:
- Galileo was the first known astronomer to use a telescope, around 400 years ago, making discoveries about Jupiter's moons and Saturn's rings
- Concave lenses (diverging lenses) spread light out; convex lenses (converging lenses) bring light together
- The focal length is the distance from the lens centre to the principal focus where parallel rays converge
- Real images can be projected on a screen and form when the object is beyond the focal length; virtual images cannot be projected and form when the object is within the focal length