Wastage (AQA GCSE Design and Technology): Revision Notes
Wastage in timber-based materials
What is wastage?
Wastage refers to the systematic process of removing excess material from timber to achieve the required shape and dimensions for your project. This involves using various cutting, shaping, and finishing techniques to transform raw timber into your desired final product. Understanding wastage is crucial because it helps you work efficiently while minimising material waste and achieving professional results.
Proper understanding of wastage techniques not only saves materials and costs but also ensures you achieve professional-quality results in your woodworking projects.
Cutting tools for timber
Hand saws for different purposes
Different types of hand saws are designed for specific cutting tasks, and choosing the right one can make your work much more accurate and efficient.
 Handsaws are your go-to tools for making straight cuts across pieces of timber. The length of these saws is measured from heel to toe, and they come in different types including rip saws (for cutting along the grain), panel saws (for general purpose cutting), and cross-cut saws (for cutting across the grain).
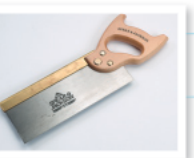
Backsaws are perfect when you need precision and accuracy. These saws are designed for cutting smaller pieces of timber with straight, clean lines. The depth of cut is limited by the back of the saw, which actually helps maintain accuracy. Common types include tenon saws, dovetail saws, and gent saws.
Frame saws are specifically designed for cutting curves and irregular shapes. The teeth point towards the handle, making them ideal for coping cuts and bow cuts where you need to follow curved lines.
When selecting a hand saw, consider both the type of cut you need to make and the grain direction of the timber. Using the wrong saw type can result in rough cuts and wasted material.
Understanding saw blade mechanics
One of the most important concepts in sawing is understanding how the blade interacts with the wood to prevent problems like jamming.
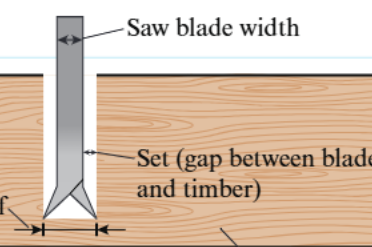 The kerf is the groove that gets created as the saw cuts through the timber. This groove is actually wider than the thickness of the saw blade itself, and this is intentional.
The set refers to how the teeth of the saw are bent slightly outward - alternating left and right. This creates a gap between the blade and the timber that's slightly wider than the blade thickness. This prevents the blade from getting stuck or jamming in the groove as you cut, allowing for smooth, continuous cutting motion.
It's essential to keep saw teeth sharp for effective cutting. When teeth become dull, they can be re-sharpened, and the set can be adjusted to ensure the teeth alternate properly in either direction from the blade. Dull teeth not only make cutting harder but can also cause dangerous kickback.
Shaping and smoothing tools
Planes for surface finishing
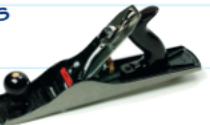 Planes are essential tools for taking thin shavings off the surface of timber to create smooth, flat surfaces. They can be adjusted to control the depth of cut, making them versatile for different finishing tasks.
Smoothing planes are used for finishing work, where the larger version is called a jack plane. These create the final smooth surface on your timber.
Shoulder planes are specialised tools designed for cutting into rebates to create square corners and precise joints.
The key to successful planing is taking very thin, consistent shavings. Trying to remove too much material at once will result in tear-out and rough surfaces.
Chisels for detailed work
Chisels are used to remove shavings from the edge of timber and are particularly useful for cutting wood joints with precision. The main types include bevel edge chisels and mortise chisels, each designed for specific joint-cutting applications.
Drilling techniques
Basic drilling tools
Twist drills are your standard drilling tools for creating relatively small holes in timber. Made from high-speed steel, they use a 'wedge' cutting action that efficiently removes material as they drill.
 Specialist drilling applications
There are several specialised drill bits designed for specific tasks:
Countersink drills have a 90° angle and are used to create a recessed seating area for screw heads, allowing them to sit flush with the timber surface.
 Forstner bits are designed to cut larger, flat-bottomed holes ranging from 10-50mm in diameter. These create clean, precise holes with flat bottoms.
Flat bits are used for cutting larger holes that are deep, while hole saws can cut large holes in timber with sizes typically ranging from 19-75mm.
When drilling, always ensure your timber is properly secured and consider using a backing board to prevent tear-out as the drill bit exits the material.
Fine finishing processes
Surforms for rapid material removal
 Surforms are excellent tools for shaping timber quickly. They feature blades made from steel strips with perforations, where the edges of each perforation are sharpened to cut into the wood. These blades can be flat, curved, or circular depending on the shape you need to create. When the blades become dull, they can be easily replaced. Surforms are particularly useful for fast removal of wood material.
Rasps for detailed shaping
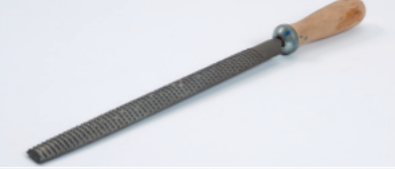
Rasps are similar to files but are specifically designed for shaping timber. They remove smaller amounts of material compared to surforms, making them ideal for more precise work. Each tooth cuts into the surface of the timber to remove small pieces of material.
 Rasps have coarse teeth with different cross-sectional shapes that create various profiles in the wood - square, round, half round, and flat profiles are all available.
Proper technique for rasps and surforms:
Step 1: Hold the tool at a 45° angle to the work being abraded
Step 2: Grip the rasp or surform at both ends for better control
Step 3: Move along the length of the grain of the timber for best results
Abrasive papers for final finishing
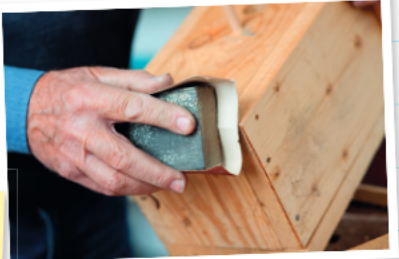
 Abrasive papers, commonly known as sandpaper, are used to smooth timber surfaces through a process called sanding. Understanding the different grades of coarseness is crucial for achieving the right finish.
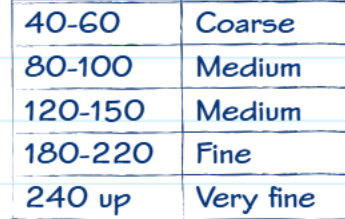
The grading system works as follows:
- 40-60 grit: Coarse - for heavy material removal
- 80-100 grit: Medium - for general smoothing
- 120-150 grit: Medium - for preparing surfaces
- 180-220 grit: Fine - for smooth finishes
- 240+ grit: Very fine - for final finishing
An important principle to remember: the bigger the grit number, the finer the grade of paper. Always progress from coarse to fine grits - skipping grades can leave scratch marks that are difficult to remove.
Types of abrasive papers:
- Glasspaper contains quartz particles (not actual glass) bonded to a backing paper and is relatively inexpensive
- Aluminium oxide paper serves as an alternative and contains aluminium oxide particles instead of quartz, making it suitable for different materials
 Abrasive papers can come in sheets, rolls, discs, and belts, and can be used with both hand tools and power tools like sanders.
Safety considerations
When using handheld sanding machines, you must follow important safety precautions.
Essential Safety Measures:
- Ensure there is no loose dust that could cause extraction problems
- Always protect your eyes with safety goggles
- Make sure there are no trailing cables that could cause tripping hazards
- Wear appropriate dust masks when sanding, especially with fine grits
- Maintain good ventilation in your work area
Key Points to Remember:
-
Wastage is systematic removal - it's about carefully removing excess timber to achieve your desired shape and size, not random cutting
-
Choose the right tool for the job - handsaws for straight cuts, backsaws for precision, frame saws for curves, and specialised drills for different hole types
-
Understand saw mechanics - the kerf (groove) should be wider than the blade thickness, and the set (tooth spacing) prevents jamming
-
Work from coarse to fine - start with coarser tools like surforms and rasps, then progress to finer abrasive papers for the final finish
-
Safety first - always wear appropriate protective equipment, especially eye protection when sanding, and keep work areas free from hazards like trailing cables