Loci and Constructions (Edexcel GCSE Maths): Revision Notes
Loci and constructions
What is a locus?
A locus represents a line or region that contains all the points which satisfy a specific rule or condition. The word "loci" is simply the plural form of "locus". Understanding loci is essential for solving geometric problems and creating accurate constructions using only a compass and ruler.
In mathematics, loci are fundamental to geometric problem-solving. They help us visualise and understand spatial relationships between points, lines, and shapes.
The four main types of loci
There are four fundamental types of loci that you need to understand and be able to construct accurately.
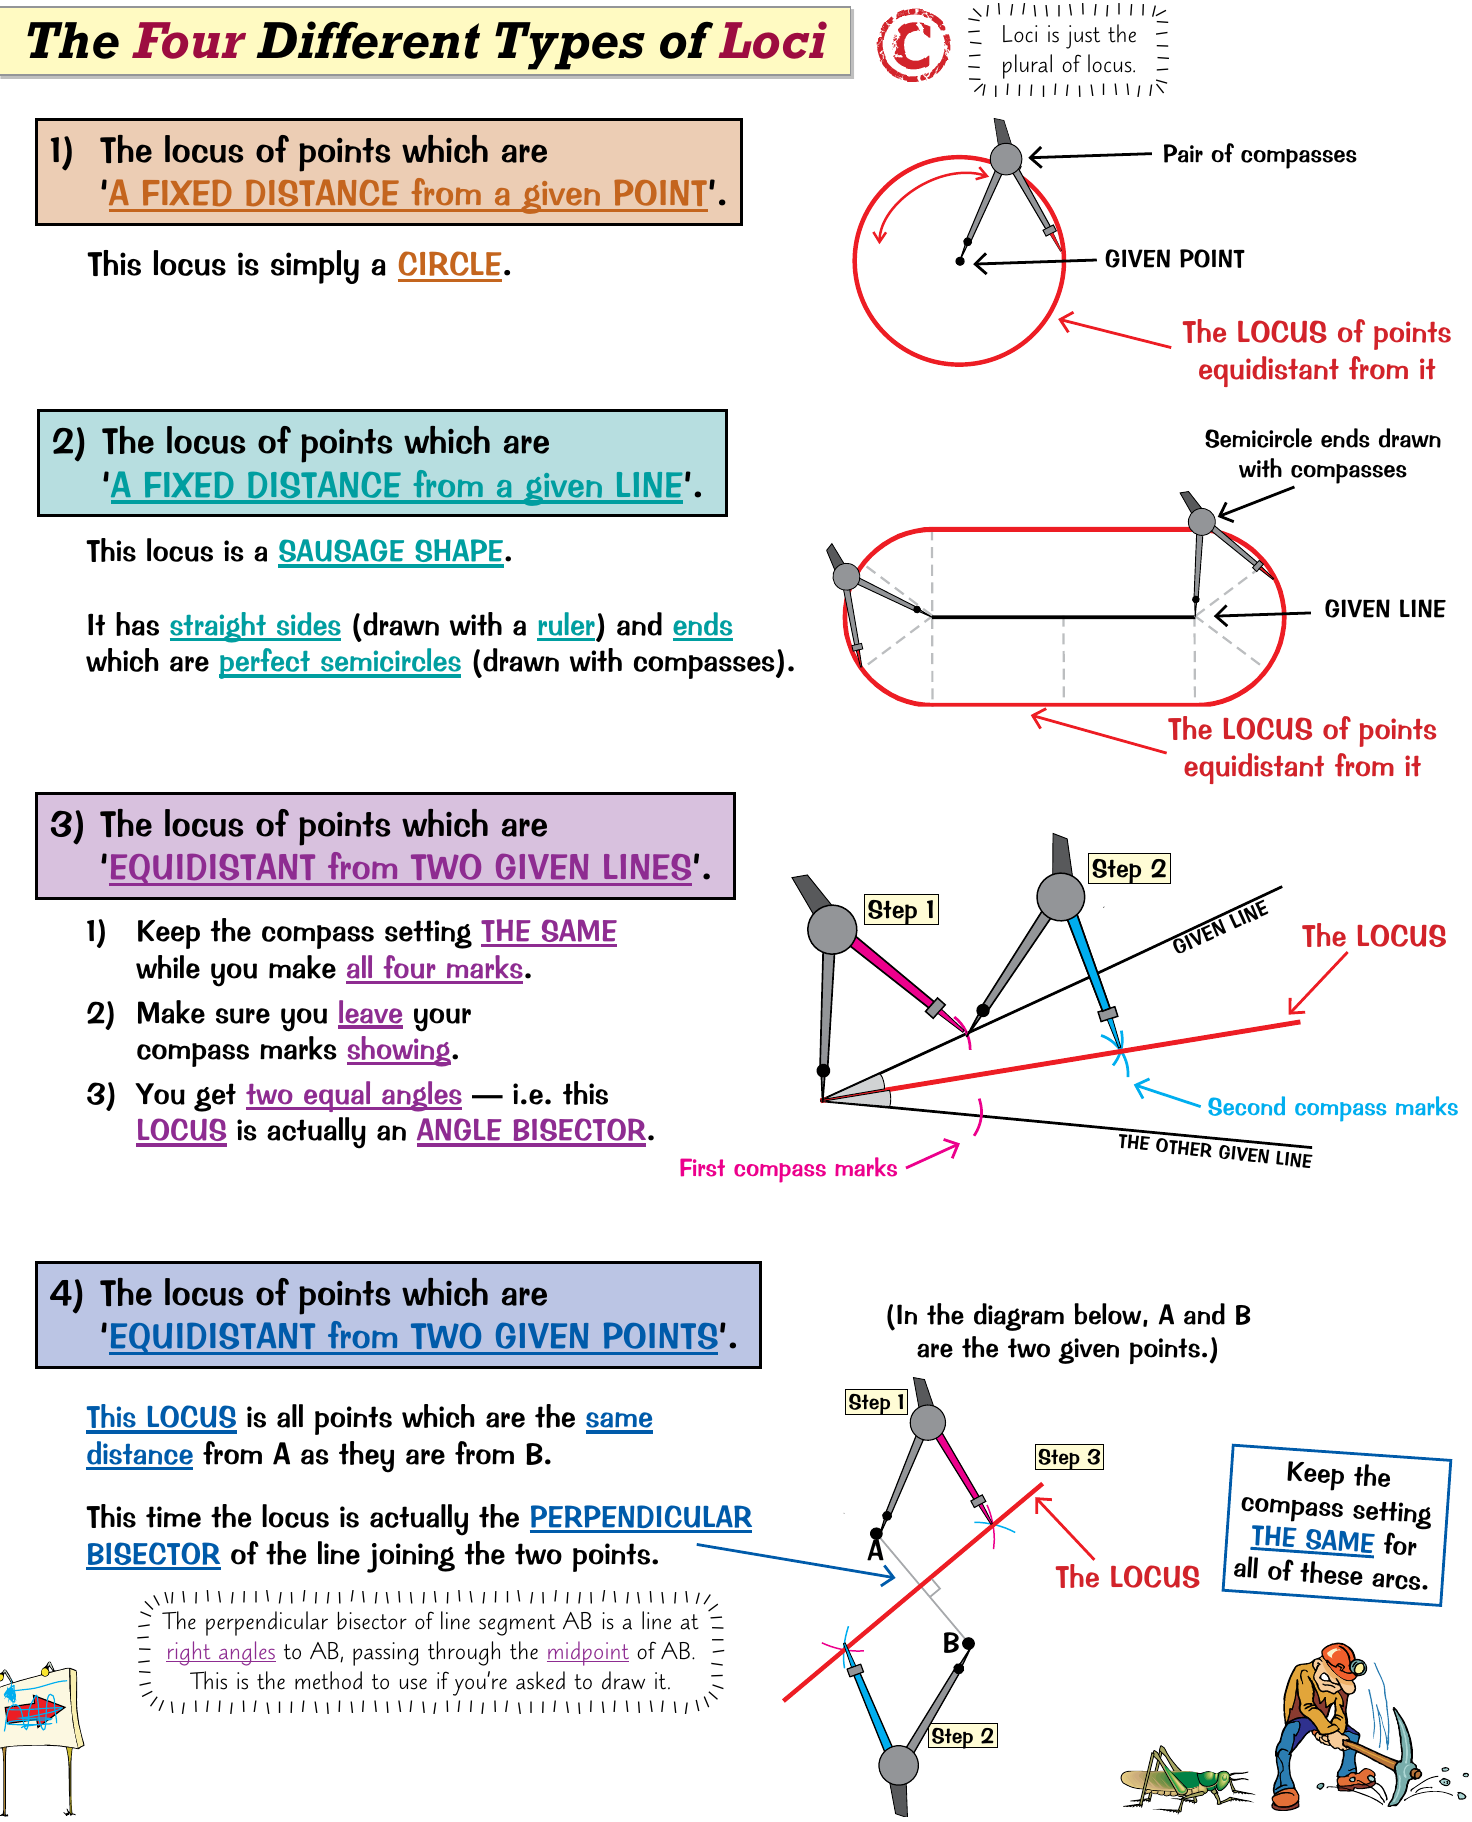
Circle locus - fixed distance from a point
When you need to find all points that are exactly the same distance from a given point, you create a circle locus. This is the simplest type of locus to understand and construct.
To create this locus, you place your compass point on the given point and draw a complete circle with the required radius. Every point on this circle is exactly the same distance from the centre point.
The circle locus is the most commonly used type in examinations. Remember that every point on the circle is equidistant from the centre - this is the defining property of a circle.
Sausage-shaped locus - fixed distance from a line
This locus shows all points that are a fixed distance away from a given straight line. The resulting shape looks like a sausage or stadium, with straight parallel sides and semicircular ends.
To construct this locus, you draw two parallel lines (using a ruler) on either side of the given line, both at the required distance. Then you add semicircular ends using your compass to complete the shape.
The "sausage" shape is formally called a stadium or racetrack shape. The straight sections are parallel to the original line, while the curved ends ensure all points maintain the exact required distance.
Angle bisector locus - equidistant from two lines
This locus represents all points that are exactly the same distance from two given lines. The result is an angle bisector that splits the angle between the two lines into two equal parts.
The construction process involves keeping your compass setting the same throughout and making arcs from both lines. When you connect the intersection points of these arcs, you create the angle bisector. This line contains all points that are equidistant from both original lines.
Worked Example: Constructing an Angle Bisector
Step 1: Set your compass to any convenient radius Step 2: Place compass point at the vertex of the angle Step 3: Draw arcs that intersect both lines of the angle Step 4: From each intersection point, draw arcs with the same radius Step 5: Connect the vertex to where these new arcs intersect
Perpendicular bisector locus - equidistant from two points
This locus shows all points that are exactly the same distance from two given points. The result is a perpendicular bisector of the line segment joining the two points.
To construct this locus, you keep your compass setting the same and make arcs from both given points. The line passing through the intersection points of these arcs is the perpendicular bisector you need.
Constructing accurate angles
When working with constructions, you must use proper compass and ruler techniques rather than measuring with a protractor.
Creating 60° angles
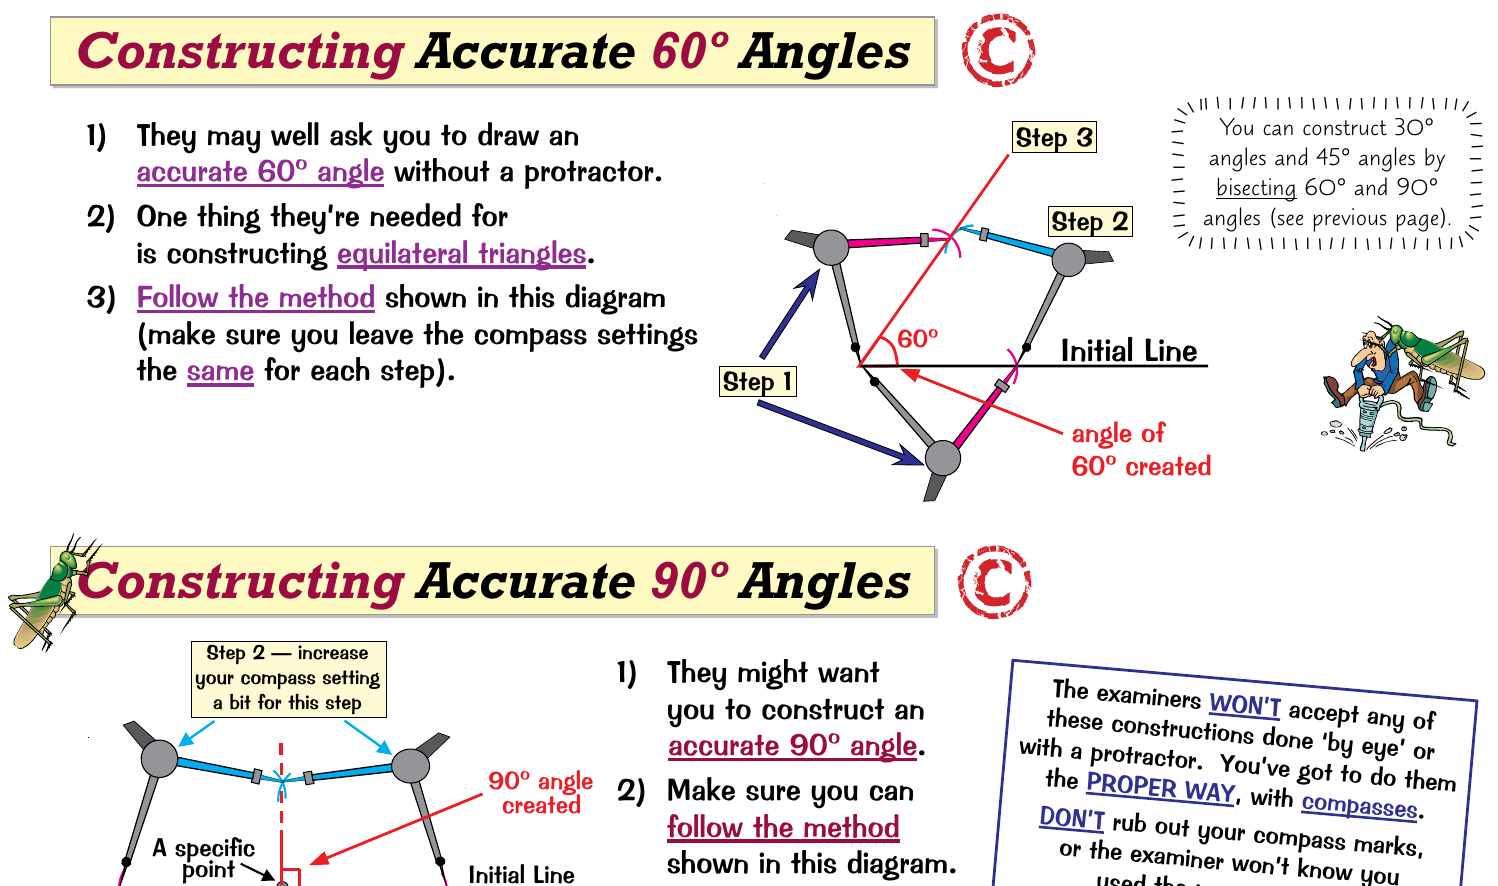
To construct an accurate 60° angle, you use the properties of an equilateral triangle. The method involves making arcs with your compass to create the vertices of an equilateral triangle, which naturally contains 60° angles.
Worked Example: Constructing a 60° Angle
Step 1: Draw your initial line Step 2: Set compass to desired radius and make an arc from one end Step 3: Keep the same compass setting and make another arc from where the first arc crosses the line Step 4: Connect these intersection points to create your 60° angle
Start with your initial line, then use your compass to make an arc from one end of the line. Keep the same compass setting and make another arc from where the first arc crosses the line. Connect these intersection points to create your 60° angle.
You can also create 30° angles by bisecting a 60° angle, and 45° angles by bisecting a 90° angle.
Creating 90° angles
Constructing right angles requires a specific compass technique. You cannot simply estimate or measure with a protractor in formal geometric constructions.
The method involves making arcs above and below your initial line, then using these reference points to create perpendicular lines. The key is maintaining consistent compass settings throughout the construction process.
Drawing perpendiculars from a point to a line
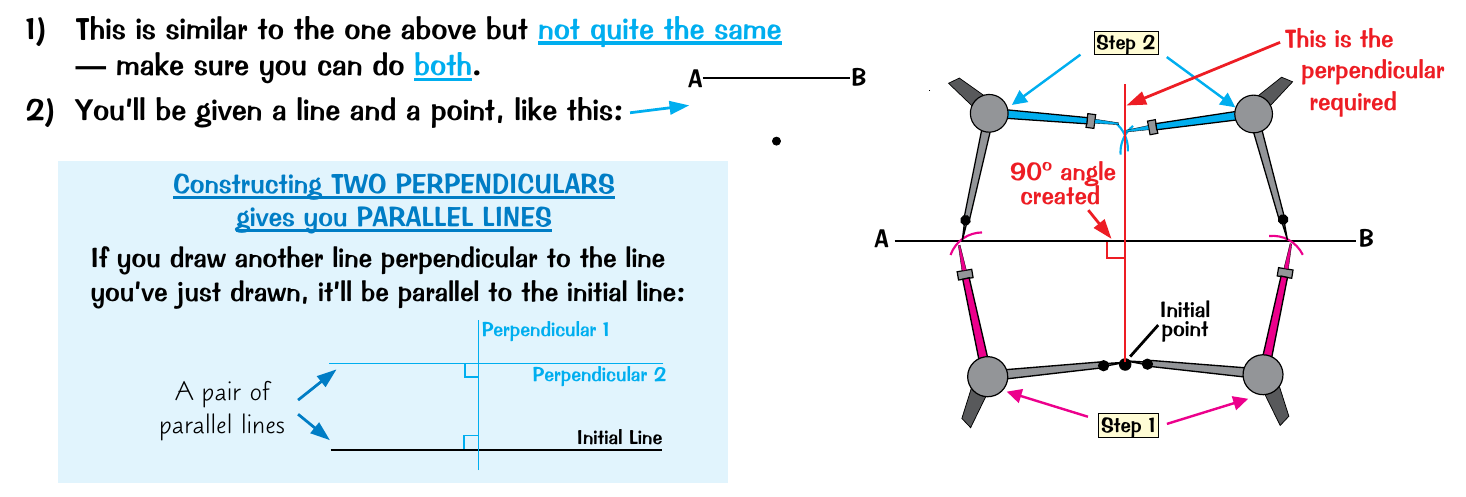
This construction technique allows you to draw a line perpendicular to a given line that passes through a specific point. The method is similar to constructing 90° angles but adapted for this particular situation.
Worked Example: Drawing a Perpendicular from a Point to a Line
Step 1: Set your compass to a suitable radius Step 2: From your given point, make arcs that intersect the line at two points Step 3: From each intersection point, draw arcs with the same radius Step 4: Connect your original point to where these new arcs intersect
The process involves making arcs from your given point that intersect the line, then using these intersection points to construct the perpendicular line. This creates a perfect 90° angle between your new line and the original line.
Creating parallel lines through perpendicular construction
An important principle to remember is that constructing two perpendiculars gives you parallel lines. If you draw a line perpendicular to a given line, and then draw another line perpendicular to your first perpendicular, the original line and your second line will be parallel to each other.
This principle is frequently tested in examinations. Remember: perpendicular to perpendicular equals parallel!
Important construction principles
Always remember that examiners expect you to use proper compass construction methods. They will not accept constructions done by eye or measured with a protractor. You must show all your construction arcs and marks clearly.
Keep your compass setting consistent throughout each construction - this is crucial for accuracy. Don't rub out your compass marks, as examiners need to see evidence that you used the proper method.
Construction marks are your evidence of proper technique. Examiners look for these marks to confirm you've used the correct method rather than guessing or using a protractor.
Practice these constructions regularly with your compass and ruler to build confidence and accuracy. The more you practice, the more natural these techniques will become.
Remember!
Key Points to Remember:
- A locus is a line or region containing all points that fit a specific rule
- There are four main types of loci:
- Circle (fixed distance from point)
- Sausage (fixed distance from line)
- Angle bisector (equidistant from two lines)
- Perpendicular bisector (equidistant from two points)
- Always use compass and ruler constructions, never protractors or estimation
- Keep your compass setting consistent throughout each construction
- Constructing two perpendiculars creates parallel lines