Paragraphs (Grade 11 NSC Matric Computer Application Technology): Revision Notes
Paragraphs
Paragraph formatting is a crucial skill in document creation that helps you organise and present your text in a clear, professional manner. In this unit, you'll learn how to enhance your documents using various paragraph formatting tools available in word processing software.
Basic bullets and numbering
The Paragraph group in the Home ribbon contains essential tools for formatting your text. You can add structure to your content by applying bullets or numbers to create organised lists that are easy to read and understand.
When you want to create a simple list, you first need to select the text you want to format. Then, navigate to the Paragraph group on the Home tab where you'll find the bullet and numbering options. These tools allow you to choose from various bullet styles including dots, squares, arrows, and checkmarks, or different numbering formats like 1,2,3 or A,B,C.
To customise your bullets or numbers further, you can click the drop-down arrow next to the bullet or numbering button. This opens a library of options where you can select recently used styles or define completely new bullet or number formats to suit your document's needs.
If you need to change the level of individual items in your list, simply place your cursor on the line you want to modify and use the Increase Indent or Tab key to move the item to a sub-level, or Decrease Indent to move it back to a higher level.
Multi-level lists
Sometimes your documents require more complex organisation with multiple levels of information. Multi-level lists are perfect for creating structured content like outlines, procedures, or hierarchical information where you need different levels of detail.
For simple multi-level formatting, you can place your cursor at the beginning of a line and press the Tab key. This automatically moves the item to the next level and applies a different bullet or number style. However, when you need more control over your list structure, you should set up a formal multi-level list.
Creating a Custom Multi-level List:
Step 1: Select your text first
Step 2: Find the Multilevel List option in the Paragraph group
Step 3: Click on "Define New Multilevel List" to open the formatting dialogue box
Step 4: Customise each level individually - choose numbering styles, indentation, and spacing
Step 5: Apply your settings to create a professional hierarchical structure
In the multilevel list dialogue, you can specify different numbering styles for each level, such as using numbers for level 1, letters for level 2, and Roman numerals for level 3. You can also set the starting number for each level and choose what characters should follow each number (like periods, brackets, or dashes).
The positioning settings allow you to control how far each level is indented from the margin and how much space appears between the number and the text. You can also choose whether to apply your changes to the whole document or just the current paragraph.
For professional documents, you might want to use Legal Style Numbering, which follows a specific format often used in legal and business documents. This creates a consistent numbering system that's easy to reference and cite.
Line spacing
Proper line spacing makes your documents more readable and professional-looking. You might need to use double spacing for drafts, single spacing for final documents, or custom spacing for specific formatting requirements.
The quickest way to adjust line spacing is through the Line and Spacing icon in the Paragraph group. Clicking this button opens a dropdown menu with common spacing options including 1.0 (single spacing), 1.15, 1.5, 2.0 (double spacing), 2.5, and 3.0 (triple spacing).
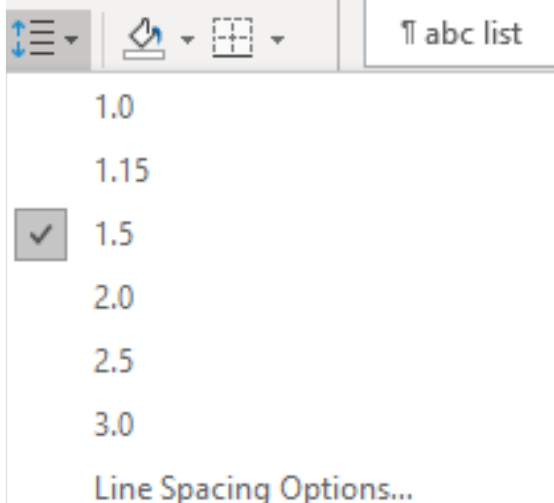
If the standard options don't meet your needs, select "Line Spacing Options" at the bottom of the menu. This opens the Paragraph dialogue box where you can set custom spacing values and control spacing before and after paragraphs.
When you need to change line spacing for an entire document, first select all text using Ctrl+A, then apply your chosen spacing option. For specific sections, simply select the text you want to modify before changing the spacing.
The spacing settings also include options to remove space before or after paragraphs, which is useful when you want tighter control over the vertical spacing in your document.
Columns
Columns help you create professional layouts similar to newspapers and magazines. This formatting technique is particularly useful for newsletters, brochures, or any document where you want text to flow in multiple vertical sections across the page.
To set up columns, you can either format existing text or prepare the column layout before typing. If you already have text, select it first. Then navigate to the Layout tab and find the Page Setup group where the Columns option is located.
The Columns dropdown menu offers preset options including One, Two, Three, Left, and Right column layouts. For basic needs, these presets work well and automatically adjust the column widths to fit your page.
Setting Up Custom Columns:
Step 1: Select your text (if already typed)
Step 2: Go to Layout tab → Page Setup group → Columns
Step 3: Choose "More Columns" for custom settings
Step 4: Specify number of columns and adjust width/spacing
Step 5: Choose whether to apply to whole document or from current point
Step 6: Check "Line between" for visual column separation
You can add column breaks to control where text moves from one column to the next. Place your cursor where you want the break and select Breaks from the Page Setup group, then choose Column. This forces the text following the break to start at the top of the next column.
For visual separation between columns, check the "Line between" option in the Columns dialogue. This adds a vertical line between each column, creating clear divisions that help readers follow the text flow.
Practical applications
Understanding paragraph formatting helps you create professional documents for various purposes. Business reports often use numbered lists for recommendations, while academic papers might require specific line spacing. Marketing materials frequently use columns to create eye-catching layouts.
When working with complex documents, plan your formatting approach before you begin typing. Consider what type of lists you'll need, whether multi-level organisation is necessary, and what line spacing requirements you must meet.
For consistency across documents, consider creating custom styles that combine your preferred bullet formats, line spacing, and other paragraph settings. This saves time and ensures all your documents maintain a professional appearance.
Key Points to Remember:
- The Paragraph group in the Home tab contains most basic formatting tools including bullets, numbering, and line spacing options
- Use the Tab key to quickly create multi-level lists, or define custom multilevel lists for complex documents
- Line spacing options range from 1.0 to 3.0, with 1.5 and 2.0 being common choices for different document types
- Columns are found in the Layout tab's Page Setup group and work best when planned before adding content
- Always select your text first before applying paragraph formatting to ensure changes apply to the correct content