Cell Structure (OCR A-Level Biology A): Revision Notes
Studying Cells by Microscopy
Microscopy has been central to understanding cell structure since cells were first observed by Robert Hooke in the 1660s. While early microscopes used glass lenses to magnify light, the development of electron microscopes in 1931 revolutionised cell biology by enabling scientists to observe cellular structures in far greater detail. Today, different types of microscope serve distinct purposes in biological research and education.
Types of microscopes
Light microscopes
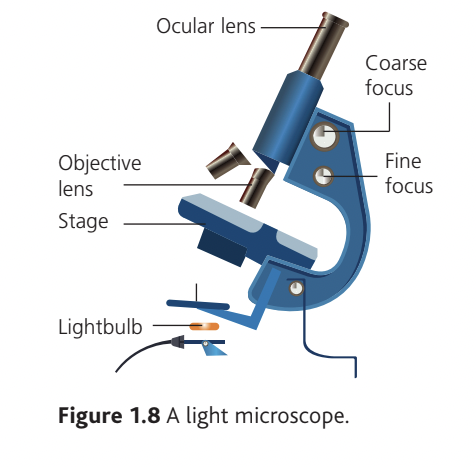
Light microscopes are the standard instruments used in school and university laboratories. They work by passing visible light through a specimen and using a system of glass lenses to magnify the image. These microscopes allow you to easily observe larger cellular structures such as cell walls, nuclei, chloroplasts and vacuoles. At higher magnifications, mitochondria become visible, though you cannot see their internal structure. Smaller organelles like endoplasmic reticulum and ribosomes remain invisible because the wavelength of light limits what can be resolved.
The wavelength of light is the fundamental limiting factor for light microscope resolution. No matter how powerful the lenses, structures smaller than approximately half the wavelength of visible light cannot be distinguished clearly.
The light microscope consists of several key components. The objective lens sits just above the specimen stage, while the ocular lens (or eyepiece) is positioned at the top where you look through. Focusing is achieved using coarse and fine adjustment knobs, and illumination comes from a light source at the base. The total magnification you observe equals the eyepiece magnification multiplied by the objective lens magnification.
Transmission electron microscopes
Transmission electron microscopes (TEM) use beams of electrons instead of light. The electrons pass through very thin sections of specimen, and electromagnetic lenses focus the electron beam to create an image. Because electrons have a much shorter wavelength than visible light, TEMs can achieve far superior resolution and magnification compared to light microscopes. This makes it possible to examine the internal structure of organelles and see details like the cristae within mitochondria or the ribosomes attached to endoplasmic reticulum.
TEMs can magnify specimens up to approximately and achieve a maximum resolution of around , meaning two points just nanometres apart can be distinguished as separate structures. This represents a 1000-fold improvement in resolution compared to light microscopes.
Scanning electron microscopes
Scanning electron microscopes (SEM) also use electron beams, but instead of passing through the specimen, the electrons bounce off its surface. This produces a three-dimensional image showing the external features and surface topography of specimens. While SEMs have lower magnification ( maximum) and resolution () than TEMs, this is not a disadvantage because the two instruments serve different purposes. SEMs reveal surface details and overall structure, while TEMs expose internal ultrastructure.
Complementary Tools
The different roles of these microscopes make them complementary tools. TEMs cannot show surface features because they only detect electrons that have passed through tissue, whereas SEMs cannot reveal internal structures. Scientists often use both types to get a complete picture of cellular structures.
Laser scanning confocal microscopes
A more recent development in microscopy is the laser scanning confocal microscope. This technique involves staining cells with fluorescent dyes, then scanning the specimen with a laser beam at different depths. The laser causes the dyes to emit light, which is detected to build up an image.
This approach offers two significant advantages:
- The laser can be focused at a very specific depth within the specimen, which eliminates the blur created by out-of-focus tissue above and below the focal plane. This produces much sharper, clearer images than conventional light microscopy.
- By capturing images at successive depths and processing them with computer software, a three-dimensional reconstruction of the tissue can be generated.
Important Distinction
Despite both names including the word 'scanning', laser scanning confocal microscopes and scanning electron microscopes use completely different technology. One scans with a laser beam, the other with electrons. Don't confuse the two!
Magnification and resolution
Understanding the difference between magnification and resolution is essential when working with microscopes.
Key Definitions
Magnification describes how much larger a lens or optical system makes an object appear in the image produced. It is a numerical ratio comparing the size of the image to the actual size of the object.
Resolution refers to the ability of a microscope to distinguish two adjacent points as separate from one another. An instrument with high resolution can differentiate between two points even when they are very close together, which increases image clarity and detail.
Resolution is the more important property in microscopy—simply magnifying a specimen is useless if the resulting image is blurred and lacks detail.
The table below summarises the magnification and resolution capabilities of different microscope types:
| Instrument | Maximum magnification | Maximum resolution |
|---|---|---|
| Light microscope | ||
| Transmission electron microscope | ||
| Scanning electron microscope |
The resolution value indicates how close (in nanometres) two points can be while still being distinguishable as separate. A light microscope can theoretically distinguish objects separated by less than approximately half the wavelength of visible light (–), giving a maximum resolution of about . In practice, this theoretical maximum is rarely achieved. The wavelength of light fundamentally limits the resolution of light microscopes.
Electrons have a much shorter wavelength than light, which is why electron microscopes can achieve far superior resolution. This explains why structures invisible under light microscopy become clearly visible using electron microscopy.
Units of Measurement in Microscopy
- Nanometre (nm): or
- Micrometre (µm): or
Remember:
Calculating magnification
Magnification when using a light microscope
When viewing a specimen through a light microscope, calculating the magnification is straightforward. You multiply the magnification of the eyepiece lens by the magnification of the objective lens:
Worked Example: Calculating Total Magnification
If the eyepiece is and the objective lens is :
The overall magnification you observe is .
Magnification of drawings and photographs
When you create a drawing or photograph of what you have observed, it is essential to record the magnification of that image (not what you saw through the microscope). Without this information, others cannot judge the actual size of the structures shown. Magnification can be indicated in two ways:
- Writing the magnification value (e.g. )
- Drawing a scale bar showing a unit of measurement
Both methods require you to know the actual measurements of the structures observed. To calculate magnification:
To find the real length when magnification is known:
Worked Example 1: Calculating Magnification from Measurements
A photograph shows a structure measuring . The structure's real measurement is . What is the magnification?
Step 1: Convert both measurements to the same unit (mm)
Step 2: Apply the magnification formula
Answer: The magnification is .
Worked Example 2: Calculating Real Length
A drawing shows a structure as long. The magnification is . What is the real length?
Step 1: Apply the real length formula
Step 2: Convert to micrometres (often more convenient for microscopy)
Answer: The real length is or .
Using an eyepiece graticule and micrometer slide
To measure structures accurately under a light microscope, you need an eyepiece graticule and a micrometer slide.
The micrometer slide is a special slide with a scale engraved into it, calibrated in known divisions (typically ). The eyepiece graticule is a circular disc fitted into the eyepiece with a scale of equally-spaced divisions. The length these divisions represent changes when you change the objective lens, so you must calibrate the graticule for each objective lens you use.
To calibrate the eyepiece graticule:
- Place the micrometer slide on the microscope stage
- Focus on the engraved scale
- Align the zero point of the eyepiece graticule with a division on the micrometer scale
- Count how many eyepiece divisions correspond to a known number of micrometer divisions
- Calculate the actual length of one eyepiece division
Worked Example: Calibrating an Eyepiece Graticule
Using a calibration where eyepiece divisions align with micrometer divisions, calculate the real length of one eyepiece graticule division.
Step 1: Determine the total length of the aligned micrometer divisions
- Each micrometer division
- Therefore: eyepiece divisions
Step 2: Calculate the length of one eyepiece division
Step 3: Convert to micrometres
Answer: Each eyepiece division equals when using this objective lens.
Once calibrated, the eyepiece graticule can measure any structure viewed under that objective lens. Each division equals when using the same objective.
Practical Tip
Each microscope is slightly different, so record which specific microscope you used and keep notes on the calibration values for each objective lens. This saves time as you won't need to recalibrate every time you use the microscope. Consider creating a calibration table for quick reference!
Preparing specimens for microscopy
Why specimens need preparation
Much living tissue is transparent, allowing light to pass through and not blocking electrons. This means biological material often does not show up well under light or electron microscopes. To make cellular structures visible, specimens must be stained with appropriate dyes or chemicals.
Preparing specimens for light microscopy
For light microscopy, very thin sections of fresh specimens can be cut using a sharp blade. For more permanent preparations, the following steps are required:
- Specimens are fixed using preservatives such as formaldehyde to prevent decay
- The tissue is dehydrated using a series of increasingly concentrated ethanol solutions
- The tissue is impregnated with paraffin wax or resin to provide support
- Very thin sections are cut using an instrument called a microtome
- The paraffin is removed from the sections
- Sections are stained to make structures visible
- Sections are mounted on a glass slide using resin and covered with a cover slip
Alternatively, specimens can be rapidly frozen in liquid nitrogen or solid carbon dioxide and sectioned using a cryostat, which cuts frozen tissue into very thin slices.
Staining for light microscopy
Coloured dyes make tissue structures visible by absorbing certain wavelengths of light and reflecting others. Different tissues absorb different dyes according to their chemical composition. This property allows differential staining, where multiple dyes are applied to a single section to distinguish different tissue types.
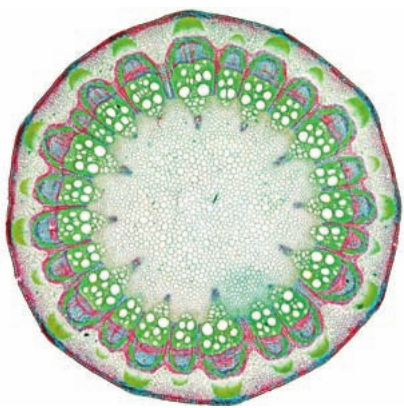
Artificial vs Natural Colours
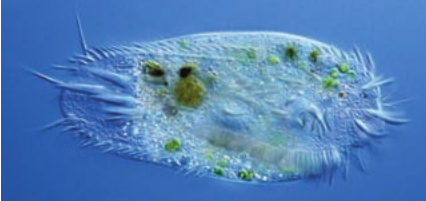
When viewing coloured images from light microscopy, remember that many or all of the colours are artificial—added by stains rather than naturally present. However, some structures do have natural colour; chloroplasts, for instance, are genuinely green and do not require staining to be visible.
Staining for transmission electron microscopy
Because transmission electron microscopes use electrons rather than light, they require stains that absorb electrons. These stains typically include heavy-metal compounds such as:
- Phosphotungstic acid
- Osmium tetroxide
- Ruthenium tetroxide
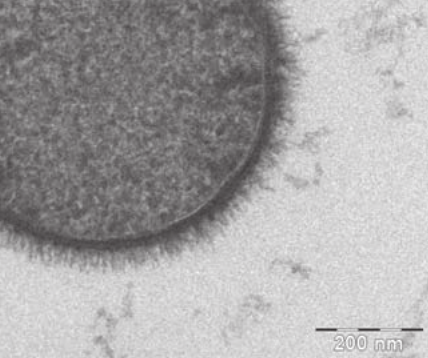
Electrons have no colour, so electron microscope images originally appear in black and shades of grey. Structures that absorb more electrons appear darker. When you see coloured electron micrographs in textbooks and scientific publications, the colours have been added artificially using image-processing software after the original image was captured. This false colouring helps distinguish different structures but does not represent actual colours.
Key Points to Remember
-
Magnification describes how much larger an image appears, while resolution determines the clarity and detail by indicating how close two points can be while remaining distinguishable.
-
Light microscopes ( max, resolution) are suitable for observing larger structures like nuclei and chloroplasts; electron microscopes are needed for ultrastructure.
-
Transmission electron microscopes ( max, resolution) show internal detail by passing electrons through specimens; scanning electron microscopes ( max, resolution) reveal three-dimensional surface features.
-
Calculate magnification using: , ensuring both measurements use the same units.
-
Eyepiece graticules must be calibrated separately for each objective lens using a micrometer slide to enable accurate measurements.
-
Biological specimens require staining to become visible: coloured dyes for light microscopy, heavy-metal compounds for electron microscopy. Most colours in microscope images are artificial.