25 – Preparing Soap (LC 2027) (Leaving Cert Chemistry): Revision Notes
25 – Preparing Soap
Introduction to soap making
Soap making is a fascinating chemical process that transforms everyday fats and oils into useful cleaning products. Fats and oils are naturally occurring esters that plants and animals use for energy storage. When a fat is liquid at room temperature, we call it an oil, but when it's solid, we simply call it a fat. These substances are not soluble in water but dissolve readily in organic solvents.
The key difference between fats and oils is simply their physical state at room temperature. Both are chemically similar triglycerides - esters formed from glycerol and three fatty acid molecules.
The key to soap making lies in understanding esterification - the process that creates esters. More importantly for our experiment, we need to understand the reverse process: hydrolysis, which breaks esters apart by reacting them with water.
Understanding saponification
Saponification is the specific name given to the base hydrolysis of an ester that produces soap and an alcohol. Let's break this down:
- Hydrolysis is a chemical reaction where a compound breaks apart by reacting with water
- Base hydrolysis means we use a base (like sodium hydroxide) to speed up this breaking apart process
- The result is soap (which is a salt of a carboxylic acid) and an alcohol
The process works particularly well when we use sodium hydroxide as our base. This forms the sodium salt of the carboxylic acid, which is what we know as soap.
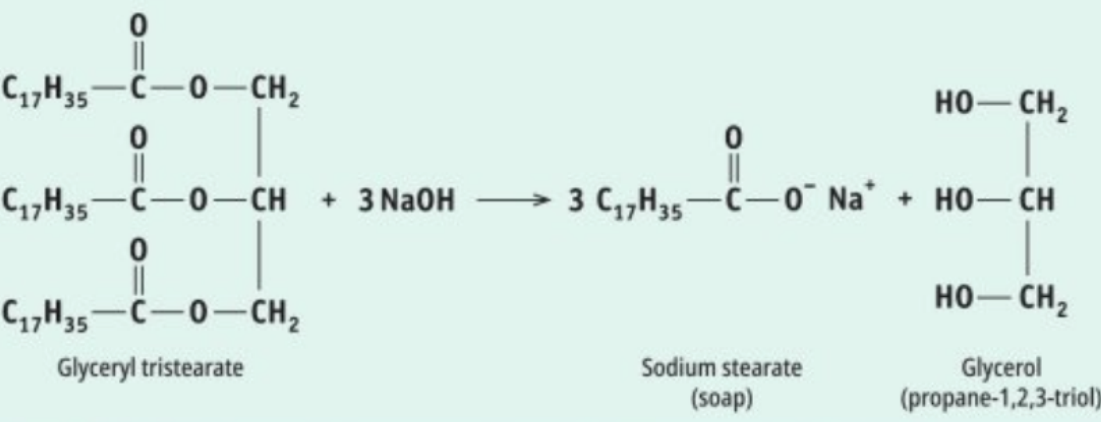
The chemical reaction shows how glyceryl tristearate (a common triglyceride found in animal fats) reacts with three molecules of sodium hydroxide to produce sodium stearate (soap) and glycerol.
The soap making procedure
Materials and setup
- Beef dripping (solid fat) or rapeseed oil (liquid oil)
- Sodium hydroxide (NaOH) solution - handle with extreme care!
- Water bath for heating
- Moulds for shaping the soap
- Universal indicator paper for pH testing
Key procedural steps
Worked Example: Complete Saponification Process
Step 1: Preparation of fats
- If using solid fat like beef dripping, melt it gently in a water bath
- Ensure the fat or oil is warm but not too hot before proceeding
Step 2: Sodium hydroxide solution
- Dissolve solid NaOH carefully in water to create a highly concentrated solution
- This solution is extremely caustic - always wear eye protection and avoid skin contact
Step 3: The saponification reaction
- Heat the fat/oil and NaOH solution in a water bath to start the reaction
- The mixture will be stirred continuously to ensure good mixing of the two substances
- The NaOH solution brings about hydrolysis of the esters in the fats and oils to form soap and glycerol
Step 4: Formation of emulsion
- During stirring, an emulsion forms where the aqueous and organic layers mix
- The consistency gradually changes to a thicker, honey-like texture as saponification progresses
Step 5: Moulding and curing
- Pour the emulsion into moulds and leave for 24 hours
- After 24 hours, remove the soap from moulds carefully
- The soap must be handled with gloves as it's still caustic
Step 6: Testing and final curing
- Use universal indicator paper to check the pH
- The soap should cure for 4-6 weeks before safe use
- During curing, saponification continues and the soap hardens
Safety considerations
Critical Safety Information - Read Carefully!
This experiment requires serious attention to safety:
- Sodium hydroxide is extremely dangerous - it can cause severe burns to skin and eyes
- Always wear eye protection throughout the entire experiment
- Never allow NaOH to contact your skin directly
- The soap remains caustic (high pH) until fully cured
- Uncured soap should never be used on skin as it will cause burns
- Only use soap when the pH drops below 10 and it has hardened sufficiently
Understanding limiting reactants in soap making
When preparing soap, the amount of NaOH used is crucial. Using limiting amounts of NaOH means there isn't enough base present to react with all the esters in the oil or fat. This has several important consequences:
Advantages of using limiting NaOH:
- The final product contains unreacted fat or oil, making it more oily or greasy
- This actually improves the moisturising properties of the soap
- The soap is safer for skin because all the NaOH has been used up, making it less alkaline and less likely to irritate
- If excess NaOH were present and not removed, it could cause severe skin irritation
Why Limiting NaOH Works Better
By using slightly less NaOH than theoretically required, we ensure that all the harsh sodium hydroxide is consumed in the reaction. Any remaining unreacted fats actually benefit the final product by providing natural moisturising properties.
The importance of pH testing:
- We test the pH of soap to ensure it's safe for use
- If the pH is greater than 10, the soap should not be used on skin
- The soap should continue curing until the pH drops to a safer level
Key Points to Remember:
- Saponification is the base hydrolysis of esters (fats/oils) using sodium hydroxide to produce soap and glycerol
- Safety is paramount - sodium hydroxide is extremely caustic and dangerous
- Limiting NaOH creates milder, more moisturising soap that's safer for skin
- Curing takes time - soap needs 4-6 weeks to become safe for use
- pH testing is essential - only use soap when pH drops below 10