Mailings (Grade 11 NSC Matric Computer Application Technology): Revision Notes
Mailings
What is mail merge?
Mail merge is a powerful feature in Microsoft Word that helps you create personalised written communication quickly and efficiently. Instead of typing individual letters or labels one by one, you can create batches of personalised letters, emails, envelopes, and mailing labels that include both standard content and customised information for each recipient.
The beauty of mail merge lies in its ability to combine a template document with a database of information. For example, you could create one letter template and automatically generate hundreds of personalised copies using names and addresses from a spreadsheet. This saves enormous amounts of time when sending communications to multiple people.
Mail merge is particularly useful for businesses, schools, and organisations that need to send regular communications to large groups while maintaining a personal touch. The automation aspect can save hours of manual work that would otherwise be required for individual document creation.
The three documents in mail merge
Understanding the mail merge process requires knowing about the three key documents involved:
The main document contains all the images, text, and formatting that remain the same for each letter, email, envelope, or label. This is your template that provides the consistent structure and content.
The mailing list (also called the data source) contains all the variable information that will be used to personalise each communication. This data is typically stored in a spreadsheet file created in Excel, Word, or Access. The mailing list includes details like names, addresses, phone numbers, and any other personalised information you want to include.
The merged document is the final result - a combination of your main document template and the personalised information from your mailing list. This creates individual documents for each recipient with their specific details inserted into the template.
Think of mail merge as a recipe: the main document is your recipe template, the mailing list is your list of ingredients (personalised data), and the merged document is the finished dish (personalised communications) ready to serve to each recipient.
Mail merge letters
Creating mail merge letters allows you to produce fully customisable correspondence that maintains the same layout, formatting, text, and graphics throughout, whilst including specific sections that vary for each recipient. Word uses data from your chosen data source to customise these variable sections automatically.
Before beginning any mail merge project, ensure your mailing list is complete and up to date. If you're using an Excel spreadsheet for your data, remember to format cells containing postal codes and telephone numbers as text. This prevents Excel from removing important leading zeros that might be part of these numbers.
Critical Preparation Step: Always format postal codes and telephone numbers as text in your Excel spreadsheet before starting the mail merge. This prevents Excel from automatically removing leading zeros, which could result in incorrect addresses or phone numbers in your final documents.
Creating mail merge letters - step by step
Here's how to create personalised letters using mail merge:
Step-by-Step Guide: Creating Mail Merge Letters
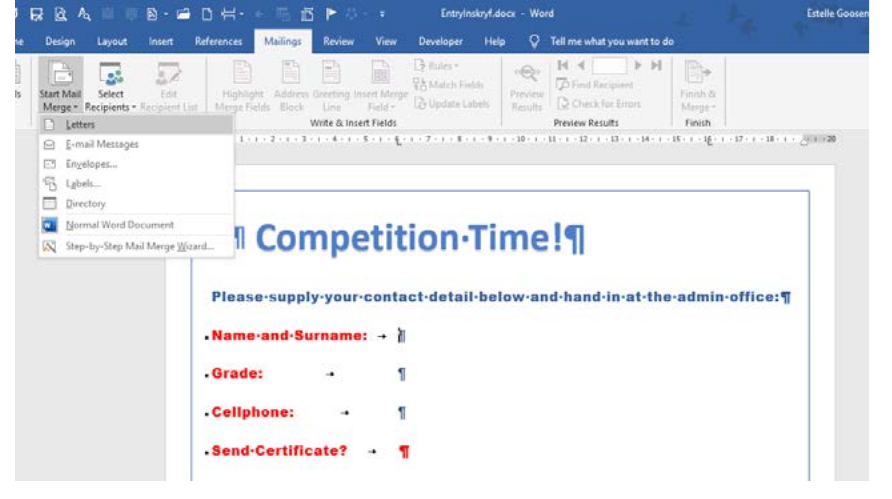
Step 1: Start the process Open a blank document or use an existing document as your template. Navigate to the Mailings tab in the ribbon and choose Start Mail Merge, then select Letters from the dropdown menu.
Step 2: Select your recipients Choose Select Recipients and then Use an Existing List. Browse to locate your data file (such as an Excel spreadsheet) and select it. This connects your document to the data source containing all the personalised information.
Step 3: Edit your recipient list Click Edit Recipients List to modify who will receive your communication. You can use various methods like sorting, filtering, or unticking specific recipients to control exactly who receives the final documents. For instance, you might philtre to show only Grade 11 learners if that's your target audience.
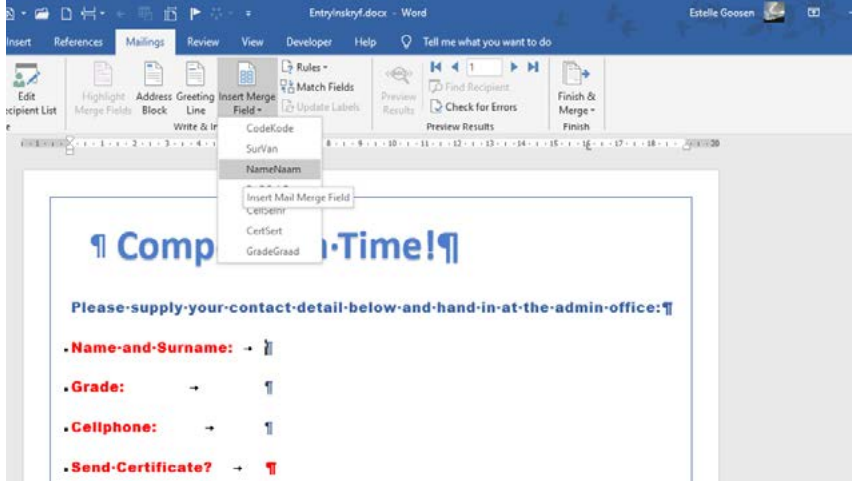
Step 4: Insert merge fields Position your cursor where you want personalised information to appear in your document. Click Insert Merge Field and choose the appropriate field from your data source (such as Name and Surname, Grade, or Cellphone). Repeat this process for all the personalised information you want to include.
The merge fields will appear in your document with special formatting (like «NameNaam» or «GradeGraad») before you complete the merge process.
Step 5: Complete the merge The most important step is finishing the merge process. Choose Finish & Merge, then select Edit Individual Documents and choose All. This creates a new document containing personalised versions for each recipient in your mailing list.
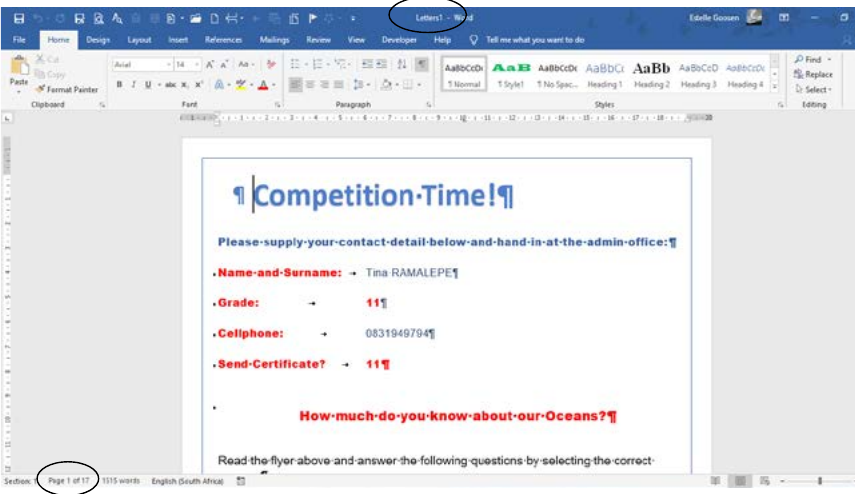
After completing the merge, you'll have a new document with individual personalised letters for each recipient. Notice that the document name changes, and you can see the total number of pages at the bottom of the screen, showing how many personalised documents have been created.
Mail merge labels
Creating personalised mailing labels using mail merge is an excellent way to address envelopes or packages efficiently. It's always advisable to use the built-in label templates before starting your mail merge process, as these ensure proper formatting and sizing for standard label sheets.
Using Word's built-in label templates saves time and ensures your labels will print correctly on standard label sheets. These templates are designed to match common label manufacturers' specifications.
Creating mail merge labels - step by step
Follow these steps to create professional mailing labels:
Step-by-Step Guide: Creating Mail Merge Labels
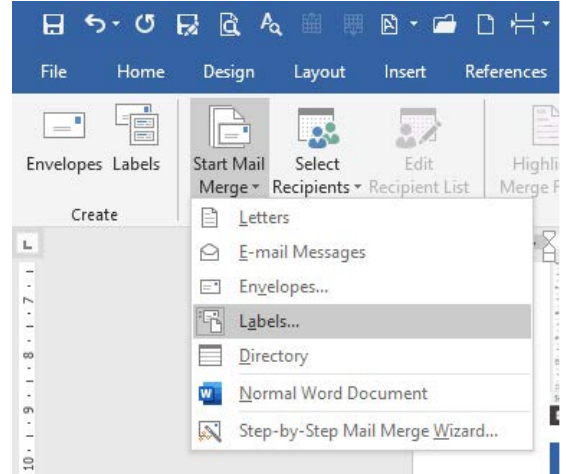
Step 1: Start with labels Open a blank document and navigate to Mailings. Choose Labels from the Create section. This opens the label creation interface where you can specify the type and size of labels you're using.
Step 2: Choose your label type Select New Label and enter the measurements as indicated for your specific label sheets. Save the new label format, but don't close the blank document yet. You can also choose from pre-existing label formats if they match your label sheets.
Step 3: Set up mail merge for labels Open Start Mail Merge and choose Labels from the dropdown menu. This prepares your document specifically for label creation using mail merge.
Step 4: Choose your saved label Select the label format you created in Step 2 and click OK. This sets up your document with the correct label layout and spacing.
Step 5: Connect to your data source Choose Select Recipients and Use an Existing List. Select the same spreadsheet you used for your previous mail merge activity. This ensures consistency in your data source.
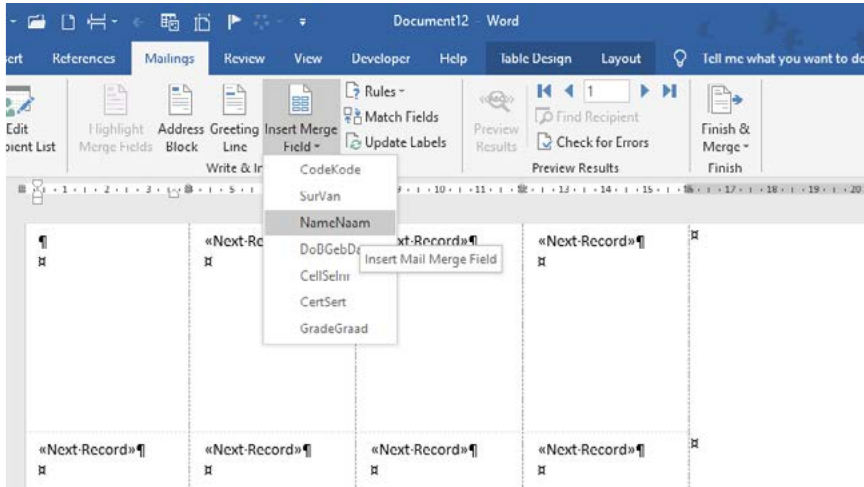
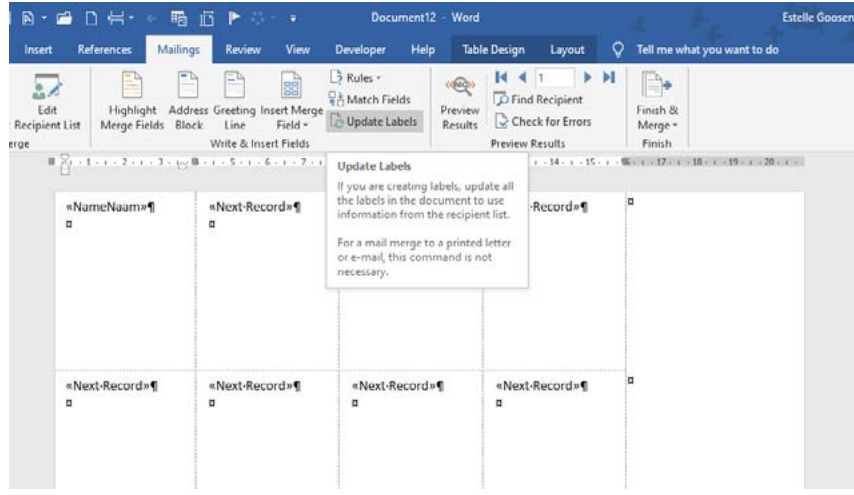
Step 6: Insert merge fields Choose Insert Merge Fields and select Update Labels. This displays all the available fields from your data source. Insert the fields you want to appear on each label, such as names and addresses.
Step 7: Complete the label merge Just like with letters, choose Finish & Merge and Edit Individual Documents to complete the process. Your final document will show personalised labels ready for printing.
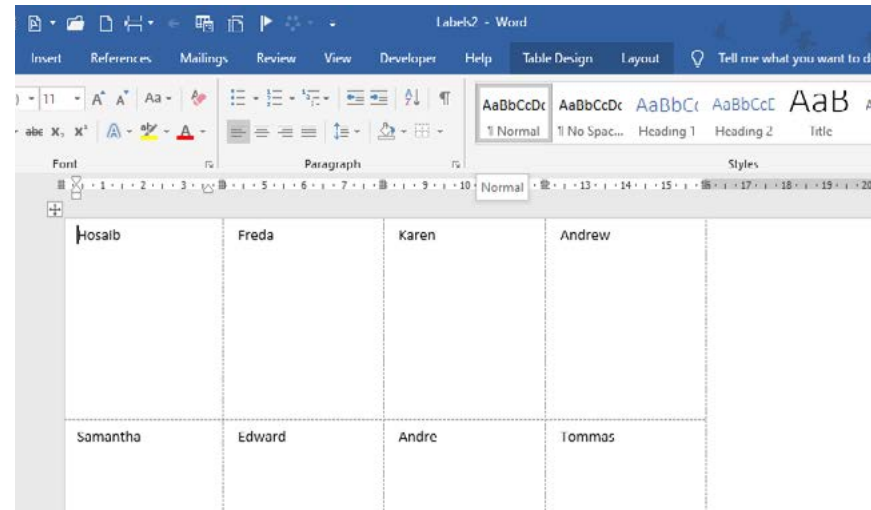
The completed merged labels display individual names or information for each label position. Save and close your document when finished.
The mail merge wizard can also create envelopes for individually addressed recipients, following similar principles to label creation. This provides another option for personalising your correspondence delivery.
Key Points to Remember:
- Mail merge combines three documents: the main document (template), mailing list (data source), and merged document (final result)
- Always format Excel data properly: Set postal codes and phone numbers as text to preserve leading zeros
- Use built-in templates: For labels and envelopes, start with Word's built-in templates for best results
- Filter your recipients: Use the Edit Recipients List feature to control exactly who receives your communications
- Complete the merge properly: Always use Finish & Merge > Edit Individual Documents > All to create your final personalised documents