Core Practical: Drawing specimen from microscope (Edexcel GCSE Biology Combined Science): Revision Notes
📚 Revision Notes
Core Practical: Drawing specimen from microscope
infoNote
When drawing specimens from a microscope, it's important to accurately represent the size and scale of the specimen you are observing. This requires an understanding of the magnification, size, and proportions of the structures you are viewing. Here's a guide on how to approach this process, including tools, steps, and when to use estimation.
infoNote
Aims
- To use a light microscope to examine and observe plant or animal cells.
- To make accurate observations and draw scale diagrams of cells.
- To measure the size of individual cells using a calibrated eyepiece graticule.
infoNote
Risks
- Eye Safety: When using a microscope, ensure that the light source is not too bright to avoid eye strain or damage.
- Handling Stains: Be cautious when using microscope stains, such as iodine or methylene blue, as some may be harmful if mishandled. Always use gloves and handle stains carefully.
- Glassware: Take care when handling microscope slides and coverslips as they are fragile and can easily break, potentially causing cuts.
Tools Needed
infoNote
- Microscope: This is used to view the specimen. Make sure you know the magnification level (e.g., 40x, 100x, 400x) to accurately represent the size of the specimen.
- Pencil and Paper: For creating a clear, precise drawing.
- Ruler or Scale Bar: Used to measure and scale your drawing accurately.
- Eyepiece Graticule (Optional): A small scale inserted into the eyepiece of the microscope to help measure the specimen.
- Stage Micrometre: A microscope slide with a precise scale to calibrate the microscope's magnification.
Method
infoNote
- You'll need a thin slice as the specimen needs to let light through
- Take a clean slide & use the pipette to put one drop of water in the middle of it (secure specimen in place) use tweezers to put the specimen on the slide
- Add a drop of stain if the specimen is transparent/colourless so it is easier to see (different stains highlight different structures)
- Place a cover slip at one end of the specimen holding it at an angle with a mounted needle & carefully lower it onto the slide then clip the slide onto the stage
- Select the lowest-powered objective lens
- Use the coarse adjustment knob to move the stage up so it's just under the objective lens then looking down eyepiece move it downwards till it's in focus
- Position a ruler on the stage to measure the diameter of the circular area (field of view) Swap to higher powered objective lens to see in greater magnification & recalculate field of view
Resolution- how well a microscope distinguishes 2 points close together
Variables
Independent Variable: The type of specimen (plant or animal cells) being observed under the microscope.
Dependent Variable: The size of the cells observed.
Control Variables:
- The magnification used during observation.
- The staining method applied to the cells.
- The microscope settings, such as the brightness of the light source.
Drawing the Image
Determine the Magnification:
- Check the magnification of the objective lens and the eyepiece. Multiply the two to get the total magnification (e.g., 10x eyepiece and 40x objective lens = 400x total magnification).
- This helps you understand the scale of the specimen in relation to real life.
- Low-Power Magnification:
- Use low magnification (e.g., 10x) to get a broad view of the tissue. This allows you to observe the general arrangement of cells but not in fine detail.
- Draw a diagram that shows the regions of the tissue and its overall structure.
- High-Power Magnification:
- Switch to a higher magnification (e.g., 40x or 100x) to observe the individual cells in detail.
- Draw a detailed diagram of the specimen at this magnification, focusing on the shapes and structures of the cells. Make sure to label important parts of the cell, such as the nucleus, cytoplasm, and cell membrane (or cell wall in plant cells).
- Drawing Guidelines:
- Use sharp pencils for clear diagrams.
- Draw smooth lines without shading.
- Label all significant features of the cell or tissue, and indicate magnification.
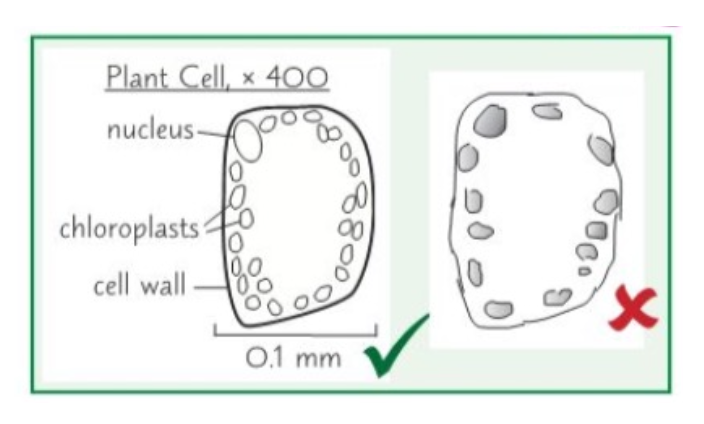
- Draw What You See, Not What You Expect:
- Focus on the main structures that are visible. Label organelles or features such as the nucleus, cell membrane, or chloroplasts (if viewing plant cells).
- Avoid artistic interpretation – draw what is actually visible under the microscope, even if it's unclear or incomplete.
- Label Your Drawing:
- Include the magnification used, the scale (e.g., 1 cm = 50 µm), and any important features (e.g., cell wall, nucleus, flagella).
- Adding a scale bar on your drawing helps others understand the size of the specimen without needing to refer back to the microscope's magnification.
infoNote
Use Estimation for Simplification:
Measuring Cell Size
- Eyepiece Graticule:
- This is a small glass or plastic disc with a scale marked on it that is fitted into the microscope's eyepiece. It allows you to measure the size of cells.
- Calibrating the Graticule:
- To accurately measure cells, you must calibrate the eyepiece graticule using a stage micrometre.
- A stage micrometre is a glass slide with a finely etched scale. Place the stage micrometre on the microscope stage and align it with the divisions on the eyepiece graticule.
- Steps to Measure Cell Size:
- Align one division of the eyepiece graticule with a fixed point on the stage micrometre.
- Count the number of graticule divisions that correspond with a set length on the stage micrometre.
- Calculate the length of one division of the eyepiece graticule (in micrometres, µm).
- Once the eyepiece graticule is calibrated, use it to measure the size of the cells in the specimen. Multiply the number of divisions by the calibrated value to get the cell size.
- Example:
- If one division of the graticule equals 10 µm, and the cell spans 4 divisions, then the size of the cell is: