The Battle of Falkirk, 1298 (Edexcel GCSE History): Revision Notes
The Battle of Falkirk, 1298
Overview of the battle
The Battle of Falkirk took place on 22 July 1298 during the Scottish Wars of Independence. This significant engagement saw English forces under Edward I defeat a Scottish army led by William Wallace. The battle demonstrated the evolving nature of mediaeval warfare, particularly highlighting the effectiveness of English longbow tactics against traditional Scottish formations.
The English army numbered approximately 14,000 troops, while Wallace commanded around 10,000 Scottish soldiers. Despite being outnumbered, the Scots initially held a strong defensive position on elevated ground, but tactical decisions ultimately led to their defeat.
The numerical advantage wasn't overwhelming - Edward's forces outnumbered the Scots by roughly 1.4 to 1. This makes the decisive nature of the English victory even more significant from a tactical perspective.
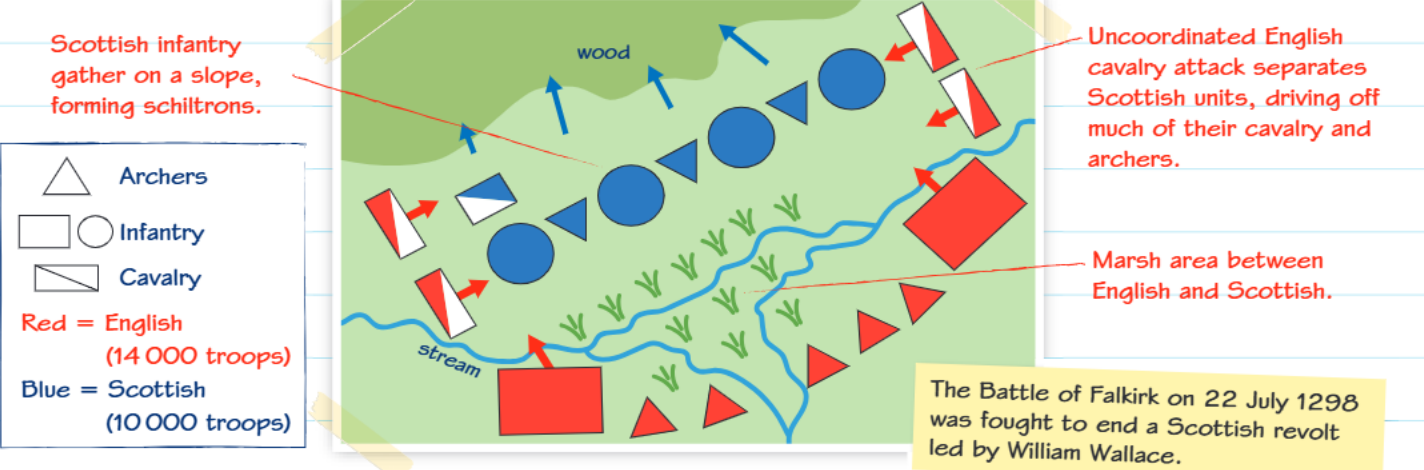
The battlefield map shows how the Scottish forces positioned themselves on higher ground, forming defensive schiltrons (tight formations of spearmen), while the English approached from lower terrain across marshy ground near a stream.
Tactical innovations and formations
The longbow's decisive impact
Edward I's deployment of approximately 5,000 longbowmen proved to be the turning point of the battle. The English king had learned from previous encounters with Scottish forces and recognised that traditional cavalry charges were ineffective against well-organized spear formations.
When the English cavalry struggled to break through the Scottish schiltrons, Edward ordered his archers forwards. The longbows created devastating volleys of arrows that rained down on the Scottish infantry. This tactic was so successful that it became a cornerstone of English military strategy for the next 150 years, influencing famous later victories like Crécy and Agincourt.
The success of longbow tactics at Falkirk fundamentally changed mediaeval warfare. This battle established the template for English military dominance that would persist well into the Hundred Years' War.
The arrows created gaps in the Scottish defensive lines, allowing English cavalry to exploit these weaknesses and charge through the broken formations.
The schiltron formation
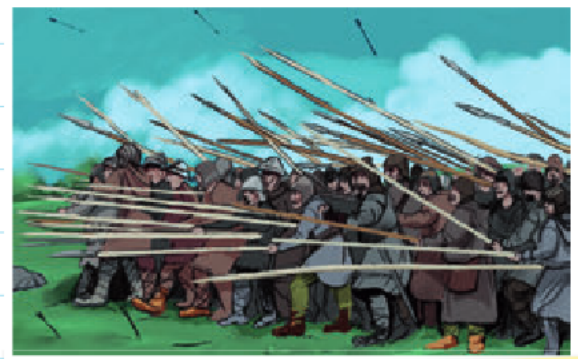
The Scottish forces employed schiltron formations - tight circles or squares of spearmen with their weapons pointing outward like a hedgehog. This defensive tactic had proven effective against cavalry charges in previous battles and represented sophisticated military thinking.
Wallace positioned his schiltrons on sloped ground with woods protecting their rear, which initially gave them a strong defensive advantage. However, once the formations became isolated from each other due to English attacks, they became vulnerable to archer fire from multiple angles.
Tactical Example: The Schiltron vs. Longbow
Step 1: Scottish schiltrons form tight defensive circles with spears pointing outward Step 2: English cavalry charges are repelled by the spear wall Step 3: English longbowmen move into position and rain arrows from above Step 4: Gaps appear in the schiltron as men fall, breaking the formation's integrity Step 5: English cavalry exploits the gaps to complete the breakthrough
Leadership and decision-making
Edward I's strategic choices
Edward demonstrated effective military leadership through several key decisions. He ensured his army was well-supplied by using sea routes, avoiding the logistical challenges of overland campaigns in hostile territory. His tactical flexibility in switching from cavalry-focused attacks to archer-led assaults showed adaptive thinking on the battlefield.
However, Edward struggled to maintain control over his cavalry units, which launched premature and uncoordinated attacks against the Scottish positions. Fortunately for the English, this tactical error didn't prove decisive due to the effectiveness of their archers.
Edward I was known as "Longshanks" and had extensive military experience from campaigns in Wales and the Crusades. This experience proved invaluable in adapting his tactics during the battle.
William Wallace's tactical approach
Wallace showed sound defensive planning by positioning his forces on elevated ground with natural protection from woodland. His use of schiltron formations demonstrated understanding of how to counter cavalry charges, which had been devastatingly effective in previous mediaeval battles.
Despite these strengths, Wallace made several critical errors. He failed to adequately protect his army's flanks, fought despite having significantly fewer troops, and couldn't prevent some Scottish nobles from deserting the field. Most importantly, he didn't effectively utilise his remaining cavalry and archers to support the infantry formations.
Wallace's defeat at Falkirk was largely due to tactical isolation of his schiltrons. Once separated, each formation became vulnerable to concentrated archer fire without mutual support.
Significance and long-term impact
The Battle of Falkirk marked a crucial development in mediaeval warfare tactics. The English victory demonstrated how combined arms tactics - using archers to disrupt enemy formations before sending in cavalry - could overcome traditional defensive strategies.
This battle established the longbow as a dominant weapon in English military thinking, influencing tactics for generations. The defeat also temporarily ended Wallace's leadership of Scottish resistance, though it didn't end Scottish independence movements.
The battle showed how technological advantages and tactical innovation could overcome numerical disadvantages and strong defensive positions when properly coordinated.
The combined arms approach pioneered at Falkirk would become the foundation of English military success for the next century and a half, proving its effectiveness at battles like Crécy (1346) and Poitiers (1356).
Timeline of events
- 22 July 1298: Battle of Falkirk fought
- Morning: Scottish forces take defensive positions on elevated ground
- Early battle: Uncoordinated English cavalry attacks fail against schiltrons
- Mid-battle: Edward I deploys 5,000 longbowmen against Scottish formations
- Late battle: Arrow volleys create gaps in Scottish lines, allowing cavalry breakthrough
- Outcome: English victory, Wallace's forces scatter
Key Points to Remember:
- The longbow was the decisive factor: Edward I's 5,000 archers broke the Scottish schiltron formations and established longbow tactics as central to English strategy for 150 years
- Defensive positioning wasn't enough: Despite Wallace's good choice of elevated ground and schiltron formations, tactical errors and numerical disadvantage led to defeat
- Combined arms tactics emerged: The battle showed how coordinating different types of troops (archers, cavalry, infantry) could overcome strong defensive positions
- Leadership decisions mattered: Edward's tactical flexibility and Wallace's failure to protect his flanks and control his nobles directly influenced the outcome
- This battle shaped future warfare: The success of English longbow tactics at Falkirk influenced later famous victories like Crécy and Agincourt