Practical Techniques in Organic Chemistry (OCR A-Level Chemistry A): Revision Notes
Practical Techniques in Organic Chemistry
Introduction
Preparing organic compounds in the laboratory requires mastery of several key practical techniques. These methods allow you to carry out reactions safely, purify your products, and obtain high-quality samples of organic liquids. Understanding both the apparatus and the procedures is essential for successful organic synthesis.
Mastering these fundamental techniques is crucial before attempting any organic synthesis work. Each technique builds upon the others, and proper execution ensures both safety and high-quality results.
Quickfit apparatus
Quickfit apparatus is a standardised system of laboratory glassware designed for organic preparations. The key advantage of Quickfit is that all pieces have ground-glass joints that fit together securely, creating an airtight seal without the need for corks or bungs.
A basic Quickfit set consists of five main components:
- Round-bottom or pear-shaped flask - holds the reaction mixture
- Receiver - collects the product
- Screw-tap adaptor - allows controlled release of products
- Condenser - cools and condenses vapours
- Still head - connects flask to condenser and receiver
These components can be assembled in different configurations depending on the specific technique being used, such as heating under reflux or distillation. The versatility of Quickfit glassware makes it the standard choice in organic chemistry laboratories.
Heating under reflux
Many organic reactions proceed very slowly at room temperature due to high activation energies. Heating the reaction mixture speeds up the reaction by providing the energy needed to overcome the activation barrier. However, simply heating an organic mixture in an open container would cause volatile components to evaporate, resulting in loss of reactants, products, or solvent.
Reflux is a technique that allows continuous heating of a reaction mixture at a fixed temperature while preventing the loss of any volatile substances. This is achieved using a condenser positioned vertically above the reaction flask.
Equipment needed for reflux
- Round-bottom or pear-shaped flask
- Condenser (Liebig condenser)
- Rubber tubing
- Stand and clamp
- Heat source (Bunsen burner with tripod and gauze, water bath, or heating mantle)
Setting up and carrying out reflux
The flask is clamped securely by its neck to a stand. Before attaching the condenser, you must add the reaction mixture and anti-bumping granules to the flask.
Anti-bumping granules are crucial safety items. These small, porous beads provide surfaces for smooth bubble formation during boiling. Without them, large bubbles can form suddenly at the bottom of the liquid, causing the mixture to boil violently and potentially making the glassware vibrate or jump.
The ground-glass joints between the flask and condenser should be lightly greased. This serves two purposes: it ensures a good seal during the experiment, and it allows the apparatus to be dismantled easily afterwards. Apply only a thin layer of grease to the joint, then gently rotate the condenser back and forth as you insert it to spread the grease evenly.
During reflux, the condenser must be kept upright. Condensers should be clamped only loosely at the glass outer jacket, as this part is very fragile and easily broken.
Never place a stopper in the top of the condenser - the system must remain open to the atmosphere. If sealed, pressure would build up as heated air expands, potentially causing the apparatus to explode.
Rubber tubing connects the condenser to the water supply. Water always enters the condenser at the bottom inlet and leaves through the top outlet. This ensures that the outer jacket remains completely filled with cold water at all times, providing maximum cooling efficiency.
How reflux works
When the reaction mixture is heated, it begins to boil. The vapours rise up through the inner tube of the condenser. As they meet the cold outer jacket containing flowing water, the vapours cool down and condense back into liquid. This liquid then drips back down into the flask. The process is similar to placing a lid on a saucepan when cooking.
This continuous cycle means the reaction can be heated at the boiling point of the solvent for extended periods without any loss of material. Volatile components are constantly being condensed and returned to the reaction mixture.
Worked Example: Understanding the Reflux Process
Consider a reaction using ethanol as the solvent (boiling point 78°C):
- The mixture is heated to 78°C and begins to boil
- Ethanol vapour rises into the condenser
- Cold water (around 15-20°C) flows through the outer jacket
- The vapour cools and condenses back to liquid ethanol
- Liquid drips back into the flask
- The cycle repeats continuously
Result: The reaction can be maintained at exactly 78°C for hours without losing any ethanol, ensuring maximum reaction efficiency while maintaining safety.
Safety considerations with flammable liquids
When heating flammable organic solvents, a heating mantle should be used instead of a Bunsen burner. This eliminates the naked flame, providing an essential extra level of safety. If any apparatus leaks or cracks during the experiment, a heating mantle greatly reduces the risk of fire.
For reactions that can be carried out below 100°C, a water bath may be used. This provides gentle, even heating and also eliminates naked flames.
Distillation
Chemical reactions may not proceed to completion, or they may produce by-products alongside the desired product. After reflux is complete, the crude product in the flask typically contains impurities such as unreacted starting materials and unwanted by-products. Distillation is a purification technique that separates a pure liquid from these impurities based on differences in boiling points.
Equipment needed for distillation
The distillation apparatus uses similar components to reflux, but arranged differently:
- Round-bottom or pear-shaped flask
- Condenser
- Rubber tubing
- Heat source
- Stand and clamp
- Screw-cap adaptor
- Receiver adaptor
- Still head
- Thermometer
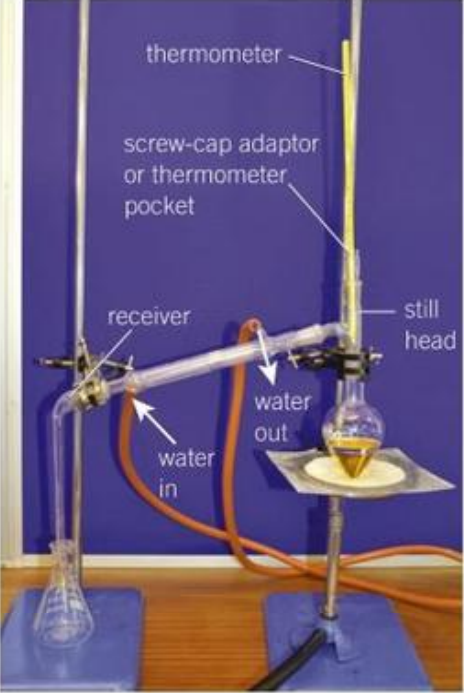
Setting up the distillation apparatus
The apparatus setup differs from reflux in several key ways:
The flask is again clamped by its neck. The still head is a T-shaped piece of glassware with two ground-glass joints - one fits the screw-cap adaptor (where the thermometer enters) and one fits the condenser. The joints should be greased so the apparatus can be dismantled easily after use.
A second clamp is placed around the receiver adaptor where it attaches to the condenser. This clamp provides sufficient support at both ends of the condenser, eliminating the need to clamp the fragile outer jacket directly - a key difference from the reflux setup.
The condenser is positioned at an angle (not vertically as in reflux). This allows condensed liquid to flow down and drip into the collecting flask rather than falling back into the reaction flask.
As with reflux, rubber tubing connects the water supply to the condenser. Water enters at the bottom and exits at the top - for distillation, the inlet is at the lowest point of the condenser (closest to the receiver adaptor).
A flask is positioned to collect the distillate. The apparatus should not be completely airtight - there must be an opening to the atmosphere to prevent pressure build-up.
How distillation works
Once the apparatus is set up, the flask is heated and the mixture begins to boil. Different liquids in the mixture have different boiling points. The liquid with the lowest boiling point is the most volatile and will boil first.
The vapour travels out of the flask and up into other parts of the apparatus, leaving behind less volatile components in the flask. When the vapour reaches the cold condenser, it cools down and condenses back into liquid. This purified liquid then drips down into the collecting flask.
By monitoring the thermometer, you can determine which substance is currently distilling over. The temperature will remain relatively constant while one component is boiling off, then rise as the next component begins to distil.
Worked Example: Separating a Mixture
Suppose you have a mixture of:
- Ethanol (boiling point 78°C)
- Water (boiling point 100°C)
- Propanol (boiling point 97°C)
Distillation sequence:
- Heat the mixture - temperature rises to 78°C
- Ethanol begins to distil (most volatile)
- Thermometer remains steady at ~78°C while ethanol distils
- When ethanol is depleted, temperature rises to 97°C
- Propanol distils at 97°C
- Finally, water distils at 100°C
Each component can be collected separately by changing the receiving flask when the temperature indicates a new component is distilling.
Purifying organic products
After distillation, your organic product may still contain water. You'll often see two distinct liquid layers in your collection flask - one organic layer and one aqueous (water) layer. These layers form because many organic liquids are immiscible with water, meaning they don't mix together.
It's essential to identify which layer is organic so you don't accidentally discard your product. The simplest method is to add a small amount of water to the mixture. Whichever layer increases in volume is the aqueous layer.
Using a separating funnel
Once you've identified the organic layer, the two layers are separated using a separating funnel.
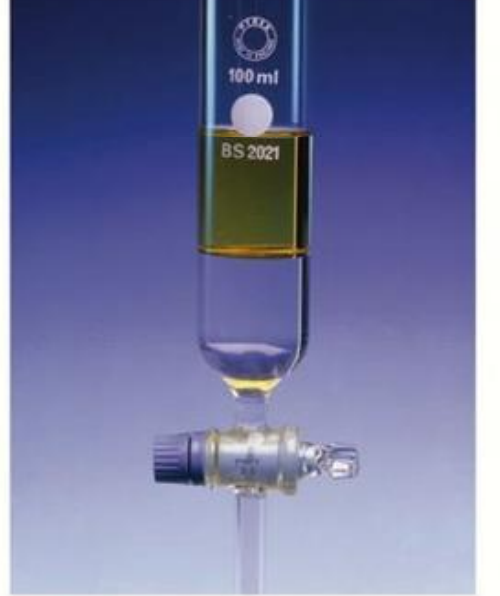
A separating funnel is a conical glass vessel with a tap at the bottom and a stopper at the top. Follow these steps:
- Ensure the tap of the separating funnel is closed
- Pour the mixture of liquids into the funnel and place a stopper in the top
- Invert the funnel to mix the contents by swirling
- Allow the layers to settle - they will separate into two distinct phases
- Place a conical flask under the separating funnel and remove the stopper
- Slowly open the tap until the entire lower layer has drained into the first flask
- Place a second conical flask under the funnel
- Open the tap to collect the upper layer in the second flask
- Label both flasks clearly so you don't muddle them
Removing acid impurities
If your preparation involved acids, the organic product may contain acid impurities. These can be removed by washing with aqueous sodium carbonate ().
Return the mixture to the separating funnel and add aqueous sodium carbonate solution. Shake the mixture. Any acid present will react with sodium carbonate, releasing carbon dioxide gas:
The tap must be opened slowly while holding the stoppered funnel upside down. This releases any gas pressure that builds up - if pressure is allowed to accumulate, it could force the stopper out suddenly or even crack the glassware.
The aqueous sodium carbonate layer (which now contains dissolved sodium salts of the acids) is then removed, and the organic layer is washed with water. Both layers are run off into separate flasks.
Drying the organic product
Even after separating from the aqueous layer, traces of water remain dissolved in the organic liquid. These must be removed using a drying agent.
A drying agent is a water-free (anhydrous) inorganic salt that readily absorbs water molecules to form a hydrated salt. Common drying agents used in organic chemistry are shown in the table below:
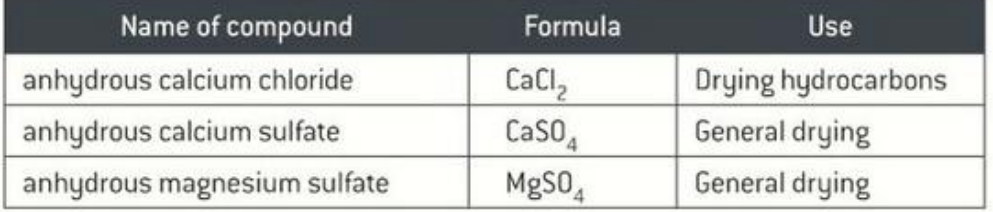
| Name of compound | Formula | Use |
|---|---|---|
| Anhydrous calcium chloride | Drying hydrocarbons | |
| Anhydrous calcium sulfate | General drying | |
| Anhydrous magnesium sulfate | General drying |
Procedure for drying an organic liquid
- Add the organic liquid to a conical flask
- Using a spatula, add a portion of the drying agent to the liquid and gently swirl to mix
- Place a stopper on the flask to prevent evaporation
- Leave the mixture to stand for approximately ten minutes
- Check if all the solid has clumped together. If so, water is still present - add more drying agent until some remains dispersed in the solution as a fine powder, indicating all water has been absorbed
- Carefully decant (pour off) the clear liquid from the solid into another flask
The liquid should now be completely dry and free from water. The key indicator that drying is complete is when some drying agent remains as a fine powder dispersed in the liquid, rather than all of it clumping together.
Redistillation
Sometimes organic liquids have boiling points that are very close together. After your first distillation, the sample may still contain small amounts of organic impurities with similar boiling points.
If this is the case, the distillation apparatus should be cleaned thoroughly, dried, and set up again for a second distillation (redistillation). This time, you should only collect the fraction that distils within a narrow temperature range - specifically, the temperature corresponding to the boiling point of your desired product.
By using a narrower collection range, you separate your product from any remaining impurities. The result is a purer final product. This technique is particularly useful when dealing with mixtures where components have boiling points within 5-10°C of each other.
Key Points to Remember:
- Reflux prevents volatile substances from escaping during heating by continuously condensing vapours back into the reaction flask
- Anti-bumping granules must be added before heating to ensure smooth boiling and prevent violent bubbling
- Water enters the condenser at the bottom and exits at the top to ensure complete cooling
- Distillation separates liquids based on different boiling points - the most volatile component (lowest boiling point) distils first
- Always grease ground-glass joints to ensure good seals and easy dismantling
- Use a separating funnel to separate immiscible organic and aqueous layers - add water to identify which layer is aqueous
- Drying agents are anhydrous salts that absorb water from organic products - continue adding until some solid remains dispersed as fine powder
- Redistillation can further purify products when impurities have similar boiling points - collect only the fraction at the desired boiling point
- Never seal the top of a reflux condenser or distillation apparatus - the system must remain open to atmosphere to prevent dangerous pressure build-up