Measuring and drawing angles (AQA GCSE Maths): Revision Notes
Measuring and drawing angles
Introduction
Understanding how to measure and draw angles accurately is a fundamental skill in geometry.
You should only measure angles in your exam if you are told that a diagram is drawn accurately. This is an important exam tip that can save you from making errors.
What is a protractor
A protractor is a mathematical instrument used to measure and draw angles. It measures angles in degrees (°) and typically shows measurements from 0° to 180°.
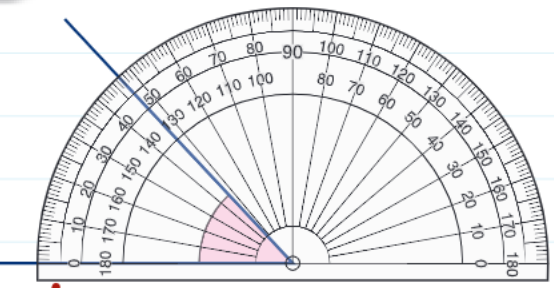
Most protractors are semicircular in shape and have two scales running in opposite directions. This dual-scale design allows you to measure angles regardless of which direction they open.
Measuring angles
Step-by-step process
Step 1: Position the protractor correctly
- Place the centre point of the protractor exactly on the vertex (corner point) of the angle
- This positioning is crucial for accurate measurement
Step 2: Align the zero line
- Line up the zero line of the protractor with one of the lines that forms the angle
- Make sure the alignment is precise
Step 3: Choose the correct scale
- Use the scale that starts with 0° on the line you've aligned
- Protractors have two scales - choose the one where your aligned line shows 0°
Step 4: Read the measurement
- Look where the second line of the angle crosses the protractor scale
- Read the angle measurement at this point
Measuring reflex angles
Reflex angles are angles greater than 180°. Since standard protractors only measure up to 180°, we need a special technique to measure them:
- First measure the smaller angle (the one less than 180°)
- Subtract this measurement from 360°
- Formula: 360° - smaller angle = reflex angle
Worked Example: Measuring a Reflex Angle
If the smaller angle measures 133°, then: 360° - 133° = 227° The reflex angle is 227°.
Important measuring tip
Always estimate the size of an angle before measuring it. This helps you check that your answer makes sense and allows you to spot any errors in your measurement.
Angle estimation becomes easier with practice. Remember that a right angle is 90°, so you can use this as a reference point for estimating other angles.
Drawing angles
Step-by-step process
Step 1: Draw the first line
- Use a ruler to draw a straight line
- This will be one side of your angle
Step 2: Position the protractor
- Place the centre of the protractor on one end of your line
- Make sure the zero line lies along your drawn line
Step 3: Find the angle on the scale
- Locate the required angle measurement on the appropriate scale
- Use the scale that starts with 0° on your drawn line
Step 4: Mark and complete
- Make a small dot at the angle measurement
- Use a ruler to join this dot to the end of your original line
- Label your angle with its measurement
Key points for drawing
Drawing accurate angles requires attention to detail and the right technique:
- Always use a ruler to ensure straight lines
- Choose the correct scale on your protractor
- Mark your angle clearly before drawing the second line
- Label your completed angle
When drawing angles, it's helpful to use a sharp pencil for precise marking. Blunt pencils can lead to inaccurate measurements and unclear angle marks.
Exam tips
Critical Exam Reminders:
- Only measure angles when told the diagram is drawn accurately
- Always estimate angles first to check your measurements are reasonable
- When measuring reflex angles, remember to subtract from 360°
Additional Tips for Success:
- Use a sharp pencil for accurate marking
- Double-check which scale you're reading from on the protractor
- Take your time with positioning - rushing leads to errors
Key Points to Remember:
- A protractor measures angles in degrees and is essential for accurate angle work
- Position the centre point on the vertex and align the zero line with one side of the angle
- Choose the correct scale - use the one that starts with 0° on your aligned line
- For reflex angles, measure the smaller angle and subtract from 360°
- Always estimate first to check your answer makes sense