Gel Electrophoresis (VCE SSCE Biology): Revision Notes
Gel Electrophoresis
Introduction
Gel electrophoresis is a fundamental laboratory technique used in molecular biology to analyse DNA. After DNA has been amplified using the polymerase chain reaction (PCR) or cut using restriction enzymes, scientists need a way to separate and identify different DNA fragments. Gel electrophoresis provides this capability by separating DNA fragments according to their size, allowing researchers to determine both how many different fragment sizes exist in a sample and the precise length of each fragment.
This technique has numerous practical applications in modern biology and medicine:
- Diagnosing genetic diseases before symptoms appear
- Identifying suspects in criminal investigations
- Establishing biological relationships in paternity testing
- Matching organ donors with recipients
- Identifying disaster victims
Understanding how to perform and interpret gel electrophoresis is essential for modern biological analysis.
The process of gel electrophoresis
Gel electrophoresis is a technique that separates DNA fragments based on their molecular size. The process involves using an electrical current to pull DNA fragments through a gel matrix, with smaller fragments moving further than larger ones.
The gel electrophoresis procedure consists of four main steps:
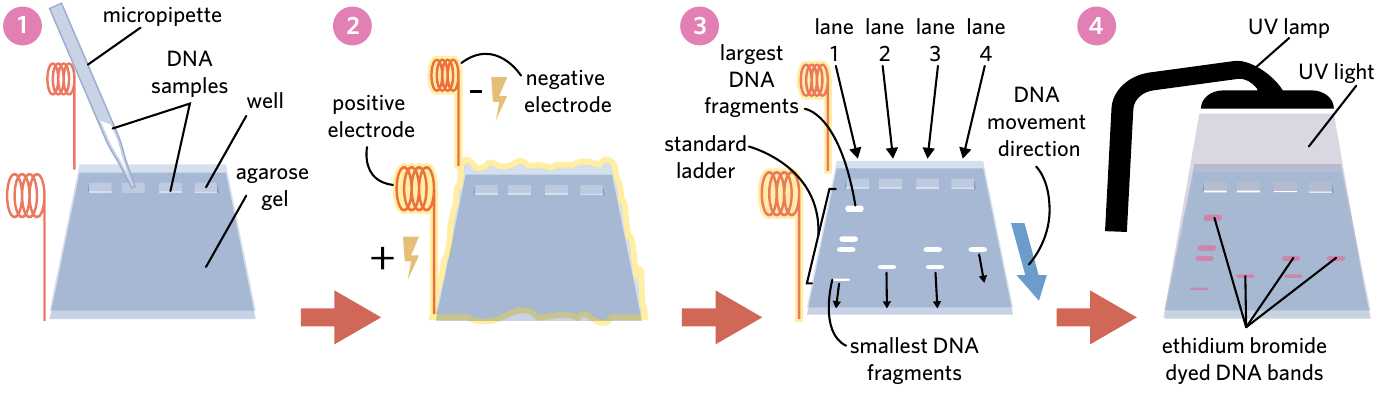
Step 1: Loading DNA samples
DNA samples are placed into wells (small indents in the gel) at one end of the gel using a micropipette. The gel itself is made of agarose, a sponge-like jelly filled with tiny pores that allow DNA fragments to move through it. Additionally, a standard ladder is loaded into one well. This ladder contains DNA fragments of known lengths and serves as a reference for determining the size of unknown fragments in the other samples. The entire gel is immersed in a buffer solution, which is an ion-rich liquid that helps carry electrical current through the gel.
Step 2: Applying electrical current
Two electrodes are attached to opposite ends of the gel - one negative and one positive. The negative electrode is positioned near the wells where the DNA samples were loaded, whilst the positive electrode sits at the far end.
This positioning is crucial because DNA molecules carry a negative charge due to their phosphate backbone. When the electrical current is switched on, the negatively charged DNA is attracted to the positive electrode and begins moving through the gel towards it - like opposites attracting.
Step 3: Separating DNA fragments
As DNA fragments move through the agarose gel, they separate according to size. Smaller DNA fragments can slip through the tiny pores in the gel more easily, allowing them to travel further and faster. Larger fragments struggle to navigate through the pores and therefore move more slowly, travelling less distance in the same amount of time. After several hours, the current is switched off and the DNA fragments stop moving, settling into distinct bands based on their size.
Step 4: Visualising the results
DNA is difficult to see with the naked eye, so the gel must be stained with a fluorescent dye such as ethidium bromide. This dye binds to the DNA fragments, making them visible when the gel is placed under an ultraviolet (UV) lamp. Each visible band represents thousands of DNA fragments of the same molecular size.

Understanding fragment separation
Memory Aid: The Forest Analogy
Think of DNA fragments moving through a gel like animals running through a dense forest. An elephant would struggle to move through thick brush and densely packed trees, whilst a fox could easily squeeze between narrow gaps and dodge obstacles. Similarly, small DNA fragments slip through the pores in the agarose gel with ease, whilst large fragments become tangled up and travel less distance in the same amount of time.
Each lane (vertical column) in the gel corresponds to one DNA sample. The distance a fragment travels from the well is inversely related to its size - the further from the well, the smaller the fragment. It's important to remember that each band actually contains thousands of identical DNA fragments, not just a single molecule. This allows specific bands to be isolated and cut out of the gel for use in further experiments.
Interpreting gels
Understanding how to read gel electrophoresis results is essential for analysing DNA samples. The key to interpretation lies in comparing sample bands to the standard ladder.
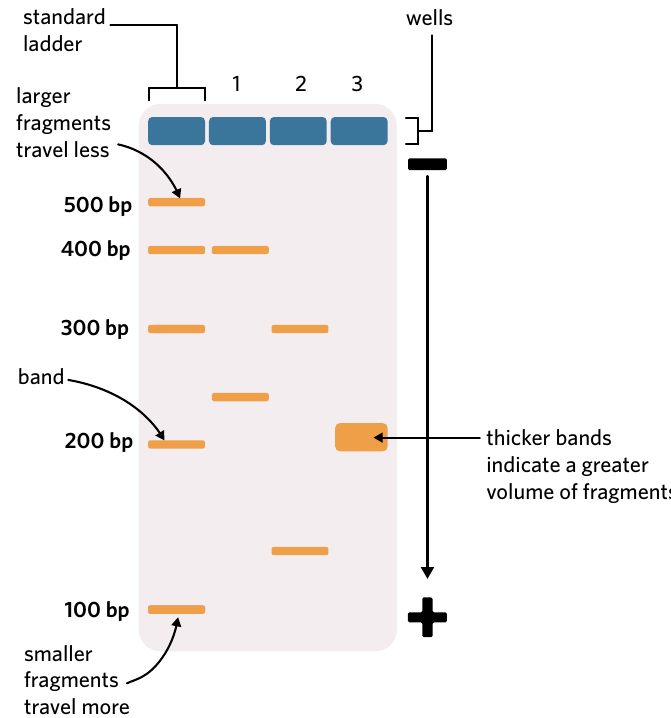
Using standard ladders
A standard ladder contains multiple DNA fragments with precisely known molecular sizes. Molecular size indicates the length of a DNA sequence and is measured in base pairs (bp) or kilobases (kb). One base pair corresponds to a single nucleotide, whilst one kilobase equals one thousand nucleotides.
When interpreting a gel, you compare the position of bands in your sample lanes to the bands in the standard ladder lane. If a sample band lines up with a ladder band of known size, you can estimate that your sample contains DNA fragments of approximately that length.
Reading gel features
Several important features help you interpret gel results:
Band position: Larger fragments remain closer to the wells at the top of the gel, whilst smaller fragments travel further toward the positive electrode at the bottom. By comparing where a sample band aligns with the standard ladder, you can estimate the fragment size. For example, if a band in your sample aligns with the 200 bp marker in the ladder, your sample contains DNA fragments approximately 200 nucleotides long.
Number of bands: Each band in a lane represents a different fragment size present in that sample. A single band indicates only one fragment size was present in the original sample. Multiple bands show that the sample contained DNA fragments of several different sizes.
Band thickness: Thicker, more intense bands indicate a greater volume or concentration of DNA fragments at that particular size. Thinner bands represent smaller amounts of DNA.
Factors affecting gel results
Several experimental factors influence how far DNA fragments travel through the gel. This is why standard ladders are essential - they provide a reference that accounts for these variations:
- Voltage: Higher voltage creates a stronger electrical force, causing DNA fragments to migrate further toward the positive electrode. Lower voltage results in slower, shorter migration.
- Gel composition: Gels with higher agarose concentrations are denser with smaller pores, making it more difficult for larger fragments to move through. This increases separation between different fragment sizes.
- Buffer concentration: Greater concentrations of ions in the buffer improve electrical conductivity, allowing current to flow more effectively through the gel and DNA to travel further.
- Time: The longer the electrical current runs, the further DNA fragments travel. However, if the current runs for too long, smaller fragments may migrate completely out of the gel.
Why Standard Ladders are Essential
Because these factors vary between experiments, you cannot use the absolute distance travelled to determine fragment size. You must always compare sample bands to the standard ladder run under identical conditions. Without this reference, your measurements would be meaningless!
Applications of polymerase chain reaction and gel electrophoresis
The combination of PCR and gel electrophoresis has revolutionised molecular biology and medicine. These techniques work together to amplify specific DNA sequences and then analyse them, enabling applications ranging from disease diagnosis to forensic investigation.
Genetic testing using gel electrophoresis
Genetic testing involves screening an individual's DNA for anomalies that may make them susceptible to particular diseases or disorders. Gel electrophoresis plays a crucial role in detecting genetic mutations.
Genetic disorders occur when individuals possess mutated alleles that prevent cells and organs from functioning properly. These mutations can be remarkably small - sometimes just a change in a single nucleotide or the deletion of a few base pairs. Despite their small size, such mutations can have severe consequences.
Cystic fibrosis testing
Worked Example: Detecting Cystic Fibrosis Using Gel Electrophoresis
Cystic fibrosis serves as an excellent example of genetic testing using gel electrophoresis. This recessive genetic disorder commonly involves the deletion of just three nucleotides in the CFTR gene. This tiny deletion results in thick, sticky mucus in organs like the lungs, causing breathing difficulties and reducing lifespan.
The Testing Process:
Step 1 - DNA Extraction: DNA is extracted from a blood sample. In Australia, newborn babies routinely undergo a heel prick test at birth for this purpose.
Step 2 - PCR Amplification: The extracted DNA undergoes PCR using primers specifically designed to amplify the region of the CFTR gene where the mutation occurs. These primers attach to sequences on either side of the mutation site, ensuring that only this small section is amplified rather than the entire genome.
Step 3 - Gel Electrophoresis: After PCR amplification, the DNA sample is loaded into an agarose gel alongside three essential controls:
- A standard ladder to determine fragment sizes
- A sample containing a known healthy CFTR gene (negative control)
- A sample containing a known mutated CFTR gene (positive control)
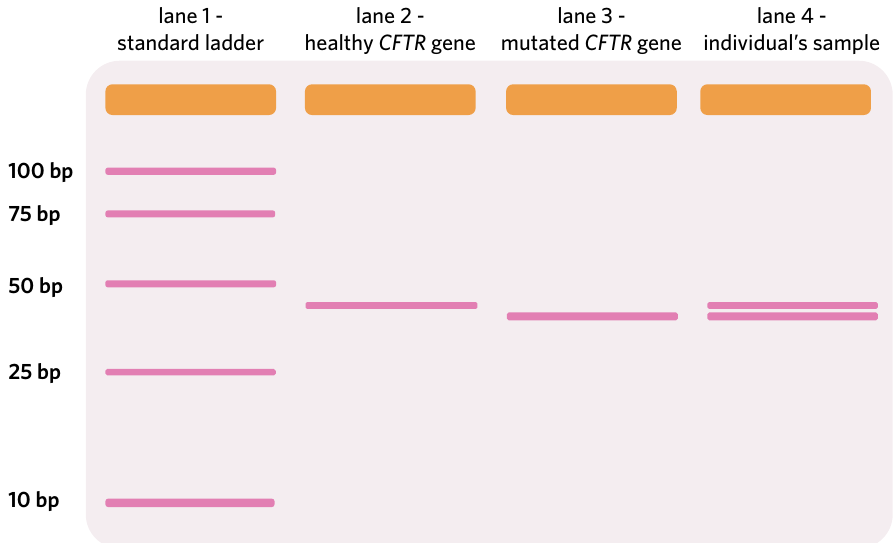
Interpreting Results:
Humans are diploid organisms, meaning we carry two copies of every gene - one inherited from each parent. This creates three possible genetic combinations:
- Homozygous dominant: Two normal CFTR alleles → individual does not have cystic fibrosis
- Homozygous recessive: Two mutated CFTR alleles → individual has cystic fibrosis
- Heterozygous: One normal and one mutated CFTR allele → individual is a carrier but does not have cystic fibrosis
In the gel shown, the isolated healthy CFTR gene produces a band at approximately 40 bp. The individual being tested shows two bands - one matching the healthy allele and one matching the mutated allele. This indicates the person is heterozygous (a carrier). Since cystic fibrosis is a recessive disorder, this individual will not develop the disease but could pass the mutated allele to their children.
DNA profiling
DNA profiling is the process of identification based on an individual's genetic information. This technique has transformed forensic science, enabling investigators to match DNA samples from crime scenes to suspects with remarkable accuracy.
Short tandem repeats
While we could theoretically sequence an entire genome to identify a DNA sample, this approach is both expensive and time-consuming. Instead, scientists analyse short tandem repeats (STRs) - small sections of repeated nucleotides that vary in length between individuals.
Why STRs are Perfect for DNA Profiling
STRs are found in the non-coding regions of autosomal chromosomes, meaning they don't code for proteins and aren't affected by natural selection. This allows them to accumulate variations through mutations at a higher rate than coding regions. Each person has hundreds of variant STRs throughout their DNA, creating a unique genetic fingerprint.
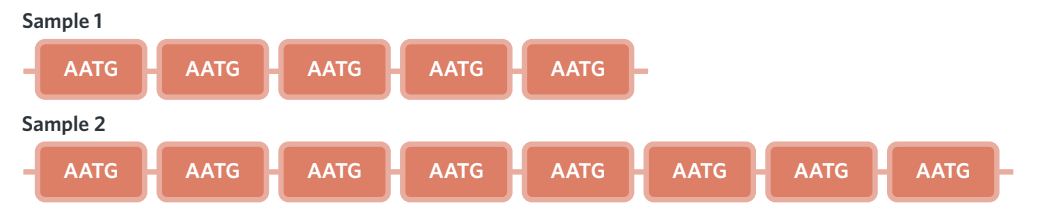
If the STRs in two DNA samples match at multiple locations, we can confidently conclude that both samples came from the same individual (or possibly identical twins).
Forensic applications
DNA profiling has revolutionised criminal investigations. Even minute DNA samples from crime scenes - such as traces of blood, hair follicles, or skin cells - can be amplified using PCR to provide sufficient material for analysis. Scientists then use gel electrophoresis to analyse specific STRs, comparing crime scene evidence to DNA samples from suspects.
The process involves:
- Extracting DNA from crime scene samples
- Amplifying specific STR regions using PCR
- Running gel electrophoresis on multiple STR loci
- Comparing banding patterns between crime scene evidence and suspect samples
For DNA profiling, scientists typically analyse multiple STR loci simultaneously. Each STR locus is examined separately in its own gel section. Individuals who are heterozygous for an STR will show two bands (one from each parent), whilst those who are homozygous will show a single, thicker band.
Worked Example: Analysing a Forensic Case
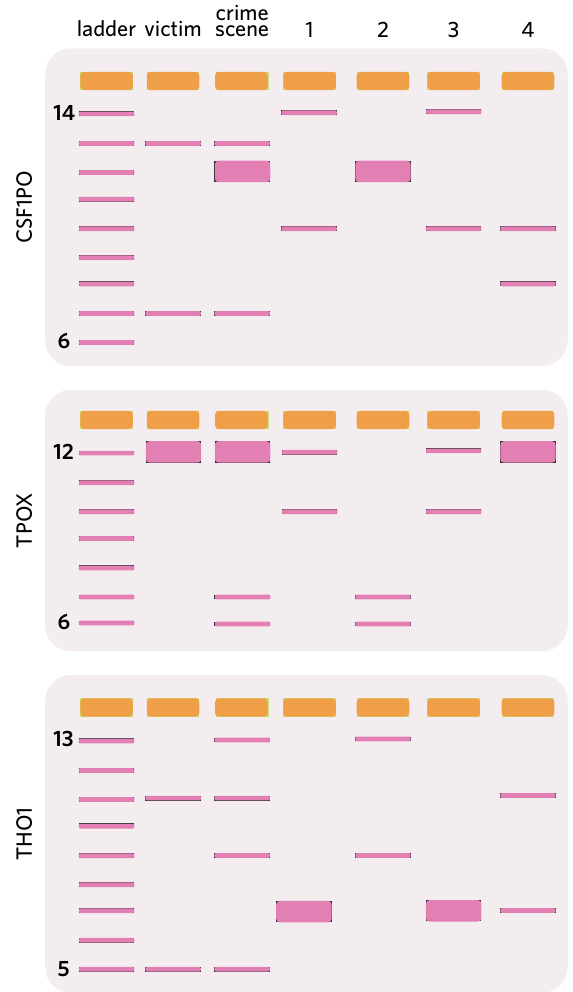
Here is a comparison of three common STRs (CSF1PO, TPOX, and THO1) across multiple samples:
| STR Locus | Victim | Crime Scene | Individual 1 | Individual 2 | Individual 3 | Individual 4 |
|---|---|---|---|---|---|---|
| CSF1PO | 7, 13 | 7, 12, 12, 13 | 10, 14 | 12, 12 | 10, 14 | 8, 10 |
| TPOX | 12, 12 | 6, 7, 12, 12 | 10, 12 | 6, 7 | 10, 12 | 12, 12 |
| THO1 | 5, 11 | 5, 9, 11, 13 | 7, 7 | 9, 13 | 7, 7 | 7, 11 |
The numbers represent how many times the nucleotide sequence repeats at each STR locus. From these results, we can draw several conclusions:
Finding 1 - Crime Scene Match: The crime scene sample contains DNA from both the victim and individual 2, as all the STR values present in the victim's profile (7, 13, 12, 12, 5, 11) appear in the crime scene sample, as do individual 2's STR values (12, 12, 6, 7, 9, 13). This places individual 2 at the crime scene.
Finding 2 - Identical Profiles: Individuals 1 and 3 have identical STR profiles across all three loci tested. This means they are either the same person or identical twins, as identical twins share the same DNA sequence.
Finding 3 - Family Relationships: Individuals 3 and 4 share at least one STR allele at every locus tested, suggesting they are likely related - possibly as parent and child or siblings. Close relatives share many STR alleles because they inherit them from common ancestors.
Additional applications
Beyond criminal investigations, DNA profiling has numerous other applications:
- Parental testing: Because children inherit half their STRs from each parent (STRs are found on autosomal chromosomes), DNA profiling can confirm biological relationships. A child must have at least one STR allele at each locus that matches each parent.
- Identifying deceased individuals: DNA profiling can identify victims of accidents or disasters by comparing DNA samples to known relatives or existing databases.
- Organ donor matching: DNA profiling helps match potential organ donors with recipients to reduce rejection risks.
- Reuniting families: DNA databases can help adopted children or separated family members find biological relatives.
Remember!
Key Points to Remember:
-
Gel electrophoresis separates DNA fragments based on size using an electrical current - smaller fragments travel further through the gel than larger ones.
-
The technique requires four key steps: loading DNA samples into wells, applying electrical current, allowing fragments to separate, and visualising results using fluorescent dye under UV light.
-
Standard ladders containing DNA fragments of known sizes are essential for determining the size of unknown DNA fragments, as various experimental factors affect how far fragments travel.
-
Genetic testing uses gel electrophoresis to detect disease-causing mutations by comparing an individual's DNA to healthy and mutated control samples.
-
DNA profiling analyses short tandem repeats (STRs) to identify individuals in forensic investigations, establish parental relationships, and match DNA samples with high accuracy.