1a & 1b – To Investigate Cells Using a Light Microscope (LC 2027) (Leaving Cert Biology): Revision Notes
1a & 1b – To Investigate Cells Using a Light Microscope
Introduction
These investigations allow you to examine living cells using a light microscope. Investigation 1a focuses on observing animal cells (cheek cells), while Investigation 1b examines plant cells (onion cells). Both investigations follow similar procedures but use different staining techniques to make cellular structures visible.
Understanding magnification
Before starting any microscopy work, you need to understand how magnification works. The total magnification of your image depends on two lenses working together.
Worked Example: Calculating Total Magnification
The formula is: Total Magnification = Eyepiece Lens × Objective Lens
Step 1: Using a 10× eyepiece with a 10× objective lens
Step 2: Using a 10× eyepiece with a 40× objective lens
This calculation is essential for understanding how much larger your specimen appears compared to its actual size.
Parts of a light microscope
Understanding your microscope is crucial for successful investigations. Each component has a specific function that contributes to producing a clear, magnified image.
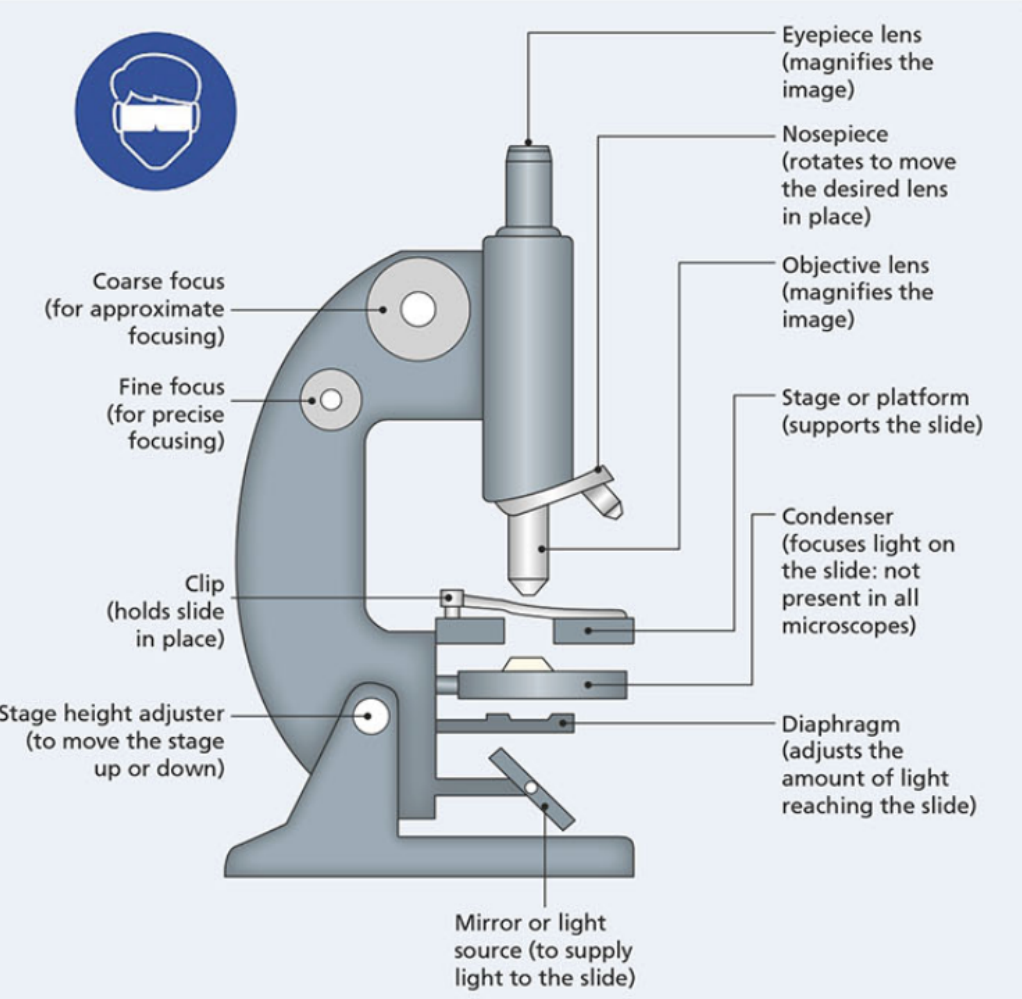
Key components include:
- Eyepiece lens - magnifies the image formed by the objective lens
- Objective lenses - provide the primary magnification of the specimen
- Stage - supports the microscope slide containing your specimen
- Condenser - focuses light onto the specimen from below
- Diaphragm - controls the amount of light passing through the specimen
- Coarse focus knob - allows major adjustments to bring the image into approximate focus
- Fine focus knob - enables precise focusing for sharp, clear images
Safety Note: Always wear safety glasses when using chemicals and handle microscope slides carefully to prevent breakage.
Investigation 1a - examining cheek cells (animal cells)
Preparing the slide
The first step involves collecting and preparing your cheek cell sample:
- Sample collection - Gently scrape the inside of your mouth using a cotton wool bud or wooden spatula to collect cheek cells
- Cell distribution - Spread the collected cells evenly onto a clean microscope slide to prevent clumping
- Adding water - Place a small drop of water onto the cells to prevent them from drying out
- Staining - Add one or two drops of methylene blue stain, which colours the nucleus dark blue and the cytoplasm light blue, making cellular structures more visible
- Cover slip application - Lower a cover slip at an angle to eliminate air bubbles and protect the objective lens from moisture
Examining under the microscope
Once your slide is prepared, follow these systematic steps:
- Initial setup - Turn on the microscope light and adjust the mirror to ensure proper illumination
- Stage positioning - Lower the stage completely and place your slide with cells positioned over the central opening
- Low power examination - Begin with the lowest power objective lens to locate cells and get a general overview
- Focusing - Use the coarse focus knob first, then fine-tune with the fine focus knob
- High power observation - Once cells are located, switch to higher magnification for detailed examination
- Light adjustment - Modify illumination using the condenser, diaphragm, or mirror angle for optimal contrast
What you should observe: Cheek cells appear as irregular, flattened shapes with visible nuclei (dark blue) and cytoplasm (light blue). Unlike plant cells, they lack rigid cell walls.
Investigation 1b - examining onion cells (plant cells)
Preparing the slide
Onion cells require a different preparation method due to their plant origin:
- Tissue preparation - Remove the outer, dry layers from a fresh onion and cut it into sections
- Cell layer isolation - Use forceps or your fingers to peel off a thin, transparent layer of cells from the inner curve of an onion section
- Slide preparation - Quickly place this thin strip of cells onto a microscope slide (avoid delays as the cells may curl up)
- Hydration options - Add either water for unstained cells OR iodine solution for stained cells (iodine creates a red-yellow stain that makes the nucleus orange and cytoplasm yellow)
- Cover slip placement - Apply a cover slip at an angle, similar to Investigation 1a
Examining under the microscope
The examination process follows the same systematic approach as Investigation 1a:
- Progressive magnification - Start with low power to locate cells, then increase magnification for detailed observation
- Comparative analysis - Examine cells under both low and high power to understand different levels of detail
- Structure identification - Focus on identifying key plant cell features that distinguish them from animal cells
What you should observe: Onion cells display a distinctive rectangular shape with clearly defined cell walls. The cells fit together like bricks in a wall pattern, demonstrating the rigid structure that plant cell walls provide.
Key differences between cell types
Understanding the fundamental differences between animal and plant cells is crucial:
Key Differences Between Cell Types:
Animal cells (cheek cells):
- Irregular, flexible shape due to absence of cell walls
- Cell membrane provides structure but allows shape changes
- Nucleus and cytoplasm clearly visible when stained
- Generally smaller than plant cells
Plant cells (onion cells):
- Regular, rectangular shape due to rigid cell walls
- Cell walls provide structural support and protection
- Cells fit together in organised patterns
- Typically larger than animal cells
- More uniform in size and shape
Exam tips
Essential Exam Preparation Points:
- Always start observations at low power before switching to high power
- Practice calculating total magnifications using different lens combinations
- Be able to explain why different stains are used for different cell types
- Remember that both investigations provide primary data for analysis
- Understand the function of each microscope component and how it affects your observations
Key Points to Remember:
-
Magnification calculation: Total magnification = Eyepiece lens × Objective lens - essential for exam questions
-
Progressive focusing: Always start with low power magnification and coarse focus, then progress to high power with fine focus adjustments
-
Staining purposes: Methylene blue stains animal cell nuclei dark blue, while iodine stains plant cell nuclei orange - this makes cellular structures visible
-
Cell shape differences: Animal cells (cheek) are irregular and flexible, while plant cells (onion) are rectangular with rigid cell walls
-
Safety and technique: Use proper slide preparation techniques, wear safety equipment, and handle materials carefully to obtain clear, professional results