3.1 – Calculations of Refraction of Light (Leaving Cert Physics): Revision Notes
3.1 – Calculations of Refraction of Light
What is this experiment about?
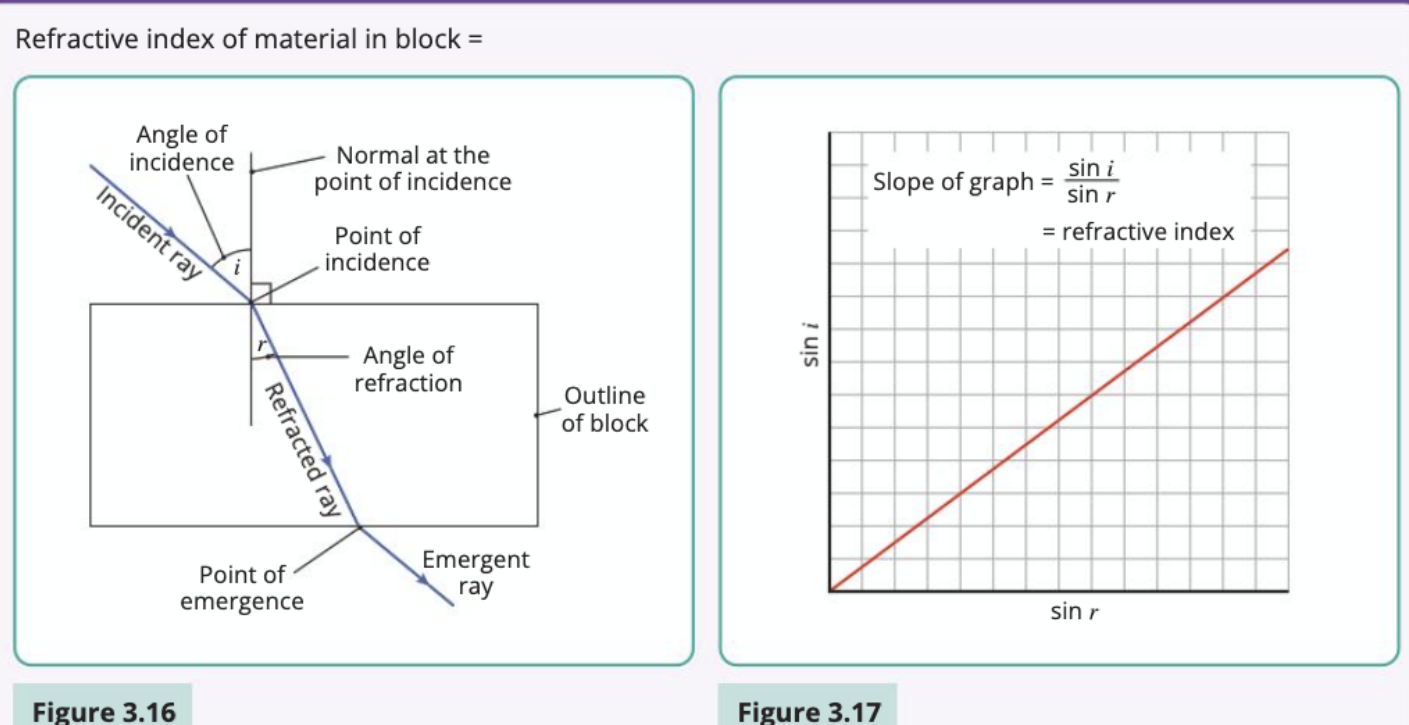
This experiment focuses on investigating the mathematical relationship between light rays as they pass through different materials. When light travels from one medium to another (like from air into glass), it changes direction - this phenomenon is called refraction. The key relationship we're exploring is known as Snell's Law, which allows us to calculate exactly how much the light will bend.
Experimental aims
This practical investigation has two main objectives:
Primary Objectives:
- Verify the constant ratio: Demonstrate that the value of sin i/sin r remains the same regardless of the angle at which light enters the glass block
- Confirm refractive index: Show that this constant ratio equals the known refractive index of the glass material
Understanding Snell's Law
The fundamental equation governing refraction is:
Snell's Law Formula:
Where:
- n = refractive index of the material
- i = angle of incidence (measured from the normal)
- r = angle of refraction (measured from the normal)
The normal is an imaginary line drawn perpendicular to the surface at the point where light enters the material.
Equipment needed
To conduct this experiment, you'll require:
- Power supply and ray box (or laser pointer)
- Rectangular glass block with known refractive index
- Sheet of white paper
- Sharp pencil
- Ruler
- Protractor for angle measurement
Experimental method
Setting up the experiment
- Prepare the workspace: Place the glass block on a sheet of paper resting on a flat surface
- Mark the outline: Carefully trace around the glass block with a pencil, ensuring it remains in the marked position throughout
- Create the incident ray: Use the ray box to shine a narrow beam of light onto one face of the glass block
- Mark key points: With a pencil, mark where the incident ray hits the block and where the refracted ray emerges on the other side, ensuring the dots are reasonably far apart for accuracy
Positioning Tip: Keep the incident and emergent ray marks as far apart as possible to improve measurement accuracy and reduce percentage errors.
Taking measurements
- Remove the equipment: Carefully remove the ray box and glass block from the paper
- Draw the ray paths: Connect the marked points to show both the incident ray (entering the block) and the emergent ray (leaving the block)
- Construct the normal: At the point of incidence, draw a line perpendicular to the glass surface using a protractor
- Measure the angles: Record both the angle of incidence (i) and angle of refraction (r) using the protractor
- Repeat for different angles: Perform steps 3-8 using different angles of incidence to collect multiple data points
Data collection
Record your measurements in a systematic way:
| i | r | sin i | sin r | sin i/sin r |
|---|---|---|---|---|
Average value of sin i/sin r = ___________
Data analysis methods
Method 1: Calculating the Average Ratio
Step 1: Complete the calculations Use a calculator to determine , , and for each measurement
Step 2: Find the average Calculate the mean value of all your ratios - this should approximately equal the known refractive index of the glass
Method 2: Graphical Analysis
Step 1: Plot the graph Create a graph with on the x-axis and on the y-axis
Step 2: Look for linearity All points should lie on (or very close to) a straight line passing through the origin
Step 3: Calculate the slope The gradient of this line equals the refractive index of the glass block
Step 4: Verify the relationship This straight-line relationship confirms that , validating Snell's Law
Sources of experimental error
Understanding potential errors helps improve experimental technique:
Systematic Errors
- Block positioning: If the glass block moves during the experiment, this introduces consistent errors in angle measurements
- Ray spacing: Incident and emergent ray marks that are too close together reduce measurement accuracy
Random Errors
- Drawing precision: Inaccurate drawing of ray paths affects angle measurements
- Protractor use: Care must be taken to avoid parallax errors when reading angles
- Pencil sharpness: Using a blunt pencil reduces marking precision
- Extreme angles: Very small angles of incidence lead to large percentage errors in measurements
Exam tips
Key Exam Strategies:
- Always draw the normal line first - all angles are measured from this reference line
- Use the largest possible angles that still give clear refraction to minimise percentage errors
- When plotting graphs, ensure your line passes through the origin - if it doesn't, check for systematic errors
- Remember that the refractive index is always greater than 1 for light travelling from air into denser materials
Remember!
Key Points to Remember:
- Snell's Law states that , where n is the refractive index
- The ratio remains constant for a given material, regardless of the angle of incidence
- A graph of versus produces a straight line through the origin with slope equal to the refractive index
- Accurate measurement technique is crucial - small errors in angle measurement lead to large errors in the final result
- Both tabular calculation and graphical methods should give the same value for the refractive index if the experiment is conducted properly