Back Off Bacteria (VCE SSCE Biology): Revision Notes
Back Off Bacteria
Introduction
Bacteria are tiny, single-celled organisms classified as prokaryotes. This means they lack a nucleus and other membrane-bound organelles. Many species of bacteria live symbiotically in and on our bodies, meaning they coexist with us without causing harm. In fact, some bacteria are beneficial and help with processes like digestion.
Did you know? The human body contains trillions of bacterial cells - roughly the same number as human cells! Most of these bacteria are helpful and essential for our health, particularly in our digestive system.
However, problems arise when a species of bacteria is introduced to an area of the body where it doesn't normally live. When this happens, the bacteria can become pathogenic, meaning it causes disease. We describe a person who has an invasion of pathogenic bacteria as having an infection.
The discovery of antibiotics
Before the 20th century, bacterial infections were a major cause of death. Everything changed in 1928 when Alexander Fleming discovered penicillin, a drug derived from Penicillium moulds. Penicillin is a type of antibiotic - a medication with antimicrobial effects that works against bacteria.
The challenge with antibiotics is that different types work against different bacteria. When a patient presents with an infection, doctors typically prescribe a broad-spectrum antibiotic first. These antibiotics affect a wide variety of bacteria and often resolve the infection. However, if the infection persists, further testing is needed to identify which specific antibiotics the bacteria are sensitive to.
Antibiotic susceptibility testing
This investigation allows you to perform the same type of testing that microbiologists conduct in hospital laboratories. You will work with bacterial samples from two patients:
- Patient A: Has a urinary tract infection (UTI) caused by Escherichia coli
- Patient B: Has a skin infection caused by Staphylococcus epidermidis that requires immediate treatment
Your task is to determine which antibiotic each patient should be prescribed based on experimental results.
Aim
To investigate the effect that antibiotics have on bacterial growth and survival.
Materials
- Live broth cultures of Escherichia coli and Staphylococcus epidermidis
- 3 × sterile nutrient agar plates
- 2 × sterile Mastrings (or equivalent antimicrobial susceptibility disc)
- 2 × sterile 5 mL pipettes
- Forceps
- 1 × Bunsen burner
- Sticky tape
- 1 × ruler
- 1 × marking pen
- 1 × incubator set to 37 °C
- Lab coats
- Safety glasses
- Gloves
Safety Note: This investigation uses live bacterial cultures. Always wear appropriate personal protective equipment (lab coat, safety glasses, gloves) and follow proper aseptic technique throughout the experiment.
Method
Part A: Preparation of agar plates
Step 1: Label the underside of the three agar plates using the marking pen. One plate should be labelled 'Patient A', another 'Patient B', and the third 'No patient'. Also add the date and your initials to each plate. Labelling the underside prevents the label from being obscured when bacteria grow on the surface.
Step 2: Using one of the sterile pipettes, carefully remove 0.1 mL of the live Escherichia coli broth culture and apply it to the surface of the agar plate labelled 'Patient A'. Dispose of the pipette appropriately when finished.
Step 3: Replace the lid immediately to prevent contamination. Spread the bacterial broth evenly across the agar surface by gently swirling the plate in your hands. Hold the lid firmly in place to prevent spillage.
Step 4: Using a fresh sterile pipette, remove 0.1 mL of the live Staphylococcus epidermidis broth culture and apply it to the surface of the agar plate labelled 'Patient B'. Dispose of the pipette when done.
Step 5: Again, replace the lid and spread the broth evenly across the agar surface by gentle swirling. Leave both patient plates on the bench for two minutes. This waiting period allows the bacteria to penetrate into the nutrient agar.
Why wait two minutes? This brief waiting period allows the liquid bacterial culture to be absorbed into the agar, ensuring the bacteria establish themselves on the growth medium before you add the antibiotic discs.
Step 6: Sterilise the forceps by holding the ends in the flame of the Bunsen burner until they glow red. Then allow them to cool before use. This kills any microorganisms on the forceps that could contaminate your plates.
Critical Technique: Always sterilize forceps between uses! Contamination from unsterilized equipment can introduce unwanted bacteria and invalidate your results. Wait for the forceps to cool completely before touching anything with them.
Step 7: Using the sterilised forceps, carefully place one Mastring onto the centre of the 'Patient A' plate.
Step 8: Repeat the sterilisation process (step 6), then place one Mastring onto the centre of the 'Patient B' plate and another onto the 'No patient' plate.
Step 9: Mastrings are specially designed tools used to determine bacterial sensitivity to various antibiotics. Each arm of the ring contains a different antibiotic, identifiable by either a code or colour. Ask your teacher to show you the Mastring packaging to identify which antibiotics your Mastring contains.
Step 10: Place lids on all three plates and seal them with sticky tape. This prevents contamination and stops the lids from coming off during incubation. Place the sealed plates in an incubator set to 37 °C for 24-36 hours. Your teacher will specify the exact incubation time. The temperature of 37 °C mimics human body temperature, providing optimal conditions for bacterial growth.
Why 37 °C? This temperature matches normal human body temperature, creating ideal conditions for the bacteria to grow as they would in an infected patient. This ensures your results reflect how the antibiotics would work in a real infection.
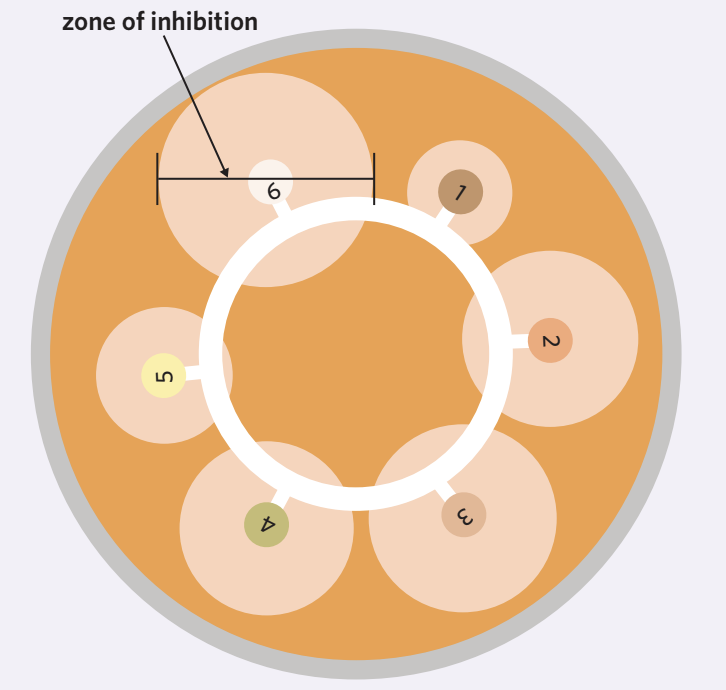
Part B: Measuring the zone of inhibition
Step 11: After the incubation period, carefully examine the bacterial growth on each plate. Observe the pattern of growth around each antibiotic disc in the Mastring. In the Results section, you'll sketch what you observe in each Petri dish.
Step 12: Measure the zone of inhibition for each antibiotic using a ruler. The zone of inhibition is the diameter of the clear area around each disc where no bacteria has grown. This measurement indicates how sensitive the bacteria are to that particular antibiotic. A larger zone of inhibition means the antibiotic is more effective against that specific type of bacteria. Antibiotics with smaller zones, or no zone at all, are less effective or ineffective. Record all measurements in the results table.
Understanding Zones of Inhibition: Think of the zone of inhibition as a protective shield created by the antibiotic. The larger the shield (clear zone), the more powerful that antibiotic is against that particular bacteria. If there's no clear zone, the bacteria are resistant to that antibiotic.
Results
Use the circles below to sketch the bacterial growth patterns you observe on each plate after incubation. Draw the Mastring in the centre and show the zones of inhibition around each antibiotic disc.
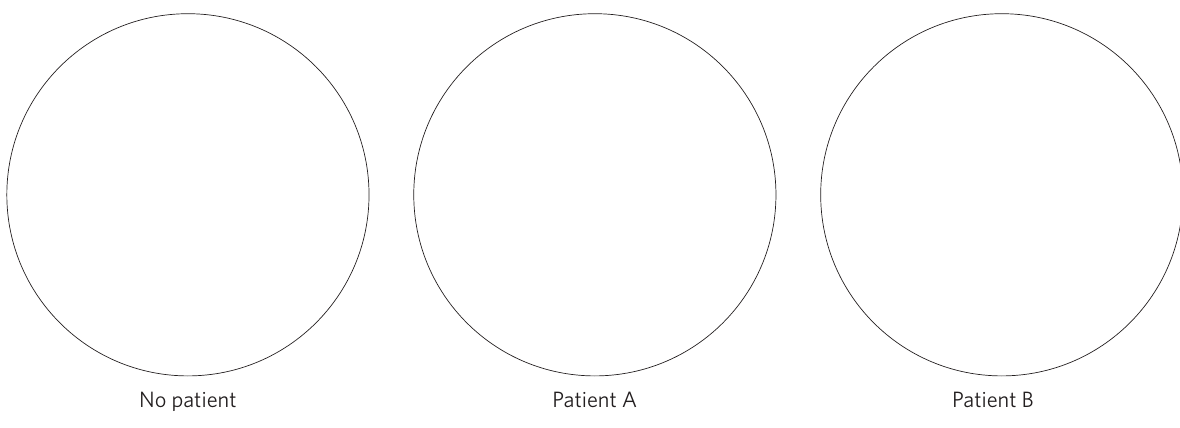
Record your zone of inhibition measurements in the table below. Measure the diameter (in millimetres) of the clear zone around each antibiotic disc.
| Antibiotic | Diameter of zone of inhibition (mm) | ||
|---|---|---|---|
| No patient | Patient A | Patient B | |
Discussion questions
These questions will help you understand the scientific concepts behind the investigation:
- Identify three differences between prokaryotic cells such as bacteria and eukaryotic cells such as blood cells or nerve cells.
- Describe the difference between bacteriostatic and bactericidal antibiotics.
- Identify one key target of antibiotics.
- Propose which antibiotic should be prescribed to each patient.
- Based on the results in this experiment, which antibiotic would you prescribe to a patient if you were unable to conduct tests to determine the organism causing their infection? Justify your answer.
- Explain why it is important to heat the forceps before using them.
- State the purpose of the 'No patient' dish in this experiment.
- Identify the independent and dependent variables in this experiment.
- Considering your method, what steps could you add in or modify to increase the accuracy and precision of your experiment?
- Identify any controlled variables in this experiment.
Writing your conclusion
Your conclusion should be a well-structured paragraph that summarises your investigation. Make sure to include:
- Whether the aim was achieved by referring to your actual results
- Limitations in the experiment (things that may have affected your results)
- Potential ways to improve the experiment if you were to repeat it
- Broader implications of your research or further areas of exploration that stem from your findings
Strong Conclusion Tip: A good scientific conclusion doesn't just state what happened - it explains what the results mean, acknowledges limitations, and suggests how future investigations could build on this work.
Remember!
Key Points to Remember:
-
Bacteria are single-celled prokaryotic organisms. While many live harmlessly on our bodies, some can become pathogenic and cause infections when introduced to areas where they don't normally live.
-
Antibiotics are medications with antimicrobial effects against bacteria. Different antibiotics work against different types of bacteria.
-
The zone of inhibition is the clear area around an antibiotic disc where bacteria cannot grow. A larger zone indicates the antibiotic is more effective against that particular bacterial species.
-
Broad-spectrum antibiotics work against many different types of bacteria and are often prescribed first. If the infection persists, specific testing can identify which antibiotics will be most effective.
-
This type of antibiotic susceptibility testing is routinely performed in hospital laboratories to ensure patients receive the most appropriate treatment for their bacterial infections.