Effect of Lightwaves on Photosynthesis (VCE SSCE Biology): Revision Notes
Effect of Lightwaves on Photosynthesis
Introduction
This controlled experiment investigates how different colours of light affect the rate of photosynthesis in plants. Understanding this relationship helps us learn which wavelengths of light are most effective for plant growth.
The principle behind the experiment
When plant cells carry out photosynthesis, they produce oxygen as a by-product. In C3 plants, the mesophyll cells inside leaves are responsible for most photosynthesis. Normally, oxygen exits the leaf through tiny pores called stomata.
However, when leaves are placed in water, they cannot release oxygen as efficiently. Instead, the oxygen becomes trapped in the air spaces within the leaf tissue. This trapped oxygen makes the leaves more buoyant (able to float).
Key principle: The greater the rate of photosynthesis, the more oxygen is produced, and the more buoyant the leaf tissue becomes. By measuring how quickly leaf discs float to the surface, we can determine the rate of photosynthesis.
Light properties affecting photosynthesis
Two important properties of light can influence photosynthesis:
- Light intensity: How bright the light is
- Light wavelength (colour): The specific colour of light the plant receives
This experiment focuses on investigating which colour of light produces the highest rate of photosynthesis by exposing leaf discs to green, red, and blue light using coloured cellophane filters.
Aim
To determine which colour of light leads to the greatest rate of photosynthesis.
Safety considerations
Risk assessments should be completed before beginning this practical investigation. Handle glassware carefully and ensure the lamp does not overheat.
Materials
- Leaves (thin, smooth leaves work best - ideally dark green on top, paler underneath)
- 4 large syringes (without needles)
- 4 × 250 mL beakers
- Tweezers
- Single hole punch
- 6 pieces of coloured cellophane (2 green, 2 red, 2 blue)
- Cling wrap
- 0.2% sodium bicarbonate solution (with a small amount of dishwashing detergent added)
- Stopwatch
- Glass stirrer
- Lamp
Note on sodium bicarbonate solution: Sodium bicarbonate provides a source of carbon dioxide for photosynthesis. The detergent reduces surface tension, allowing the solution to penetrate the leaf tissue more easily.
Method
This investigation works best with groups of 3-4 students.
Step 1: Prepare the leaf discs
Cut 40 leaf discs from fresh leaves using a single hole punch. Select smooth, thin areas of the leaf and avoid large veins, as these can interfere with results.
Step 2: Wrap the beakers
Prepare four small beakers by wrapping each in different materials:
- Beaker 1: Cling wrap (clear)
- Beaker 2: Green cellophane
- Beaker 3: Red cellophane
- Beaker 4: Blue cellophane
Set aside a second piece of each material to use as a 'lid' later. Leave the tops open for now.
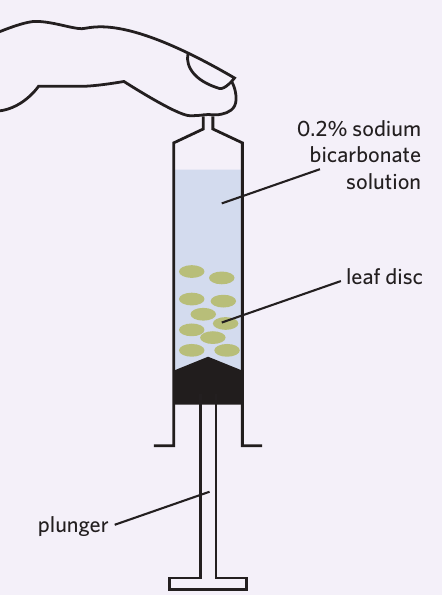
Step 3: Load the syringes
Remove the plungers from four syringes. Using tweezers, carefully place 10 leaf discs into each syringe barrel.
Step 4: Replace the plungers
Carefully replace each plunger, taking care not to crush any leaf discs.
Step 5: Add sodium bicarbonate solution
Fill each syringe with 0.2% sodium bicarbonate solution by pulling up the plunger to draw in the liquid.
Step 6: Remove air from leaf discs
This critical step removes air from the leaf spaces and replaces it with the sodium bicarbonate solution:
- Place a finger over the syringe opening (where a needle would attach)
- Pull firmly on the plunger for 30 seconds
- After 30 seconds, release the plunger
This creates a pressure drop that forces the solution into the air spaces within the leaf tissue, bathing the mesophyll cells with water and carbon dioxide.
Tip: Shake the syringe gently while pulling to help dislodge trapped air bubbles.
Step 7: Continue until discs sink
Repeat the pulling and releasing process at 30-second intervals until all leaf discs sink to the bottom of the syringe. When they sink, you know the air spaces have been filled with solution. Do this for all four syringes.
Troubleshooting: If discs won't sink after three attempts, add a few more drops of detergent to the solution and continue.
Step 8: Prepare beakers for transfer
Ensure beakers are ready. You may add some sodium bicarbonate solution to the beakers so they'll be moderately full when the syringe contents are added.
Step 9: Transfer leaf discs
Transfer the leaf disc solutions from each syringe into its corresponding wrapped beaker. The discs should sink to the bottom.
Step 10: Arrange discs and cover beakers
Use a glass stirrer to gently spread the discs on the bottom so they don't overlap or interfere with each other. Place the matching cellophane or cling wrap 'lid' on each beaker.
Step 11: Expose to light and record results
Place all four beakers under the lamp. Start the stopwatch and record how long it takes for five leaf discs to rise to the surface in each beaker. Keep the stopwatch running continuously until all four beakers have finished.
Record the time when five discs have risen in each beaker, not all ten. This provides a consistent measurement point.

Results
| Beaker | Time |
|---|---|
| Cling wrap | |
| Green cellophane | |
| Red cellophane | |
| Blue cellophane |
Expected pattern: Different colours of light will produce different rates of photosynthesis, shown by different times for the discs to float. Shorter times indicate faster photosynthesis.
Understanding the experiment
Variables in this experiment
Independent variable: The colour (wavelength) of light the leaf discs are exposed to (green, red, blue, or clear)
Dependent variable: The rate of photosynthesis, measured by the time taken for five leaf discs to rise to the surface
Controlled variables (kept constant):
- Number of leaf discs (10 per beaker)
- Volume of sodium bicarbonate solution
- Type and thickness of leaves
- Distance from the lamp
- Light intensity from the lamp
- Temperature
- Concentration of sodium bicarbonate solution
Control group: The beaker wrapped in cling wrap serves as the control. It receives white light (all wavelengths) without any colour filter, providing a baseline for comparison.
Key concepts to understand
Why do we use sodium bicarbonate?
Sodium bicarbonate dissolves in water to release carbon dioxide (), which is essential for photosynthesis. This ensures the leaf cells have access to this crucial reactant.
Why wait for five discs rather than all ten?
Waiting for five discs provides a consistent and practical measurement endpoint. Some discs may be damaged or may not respond uniformly, so using five discs ensures we're measuring a reliable average response.
Why was timing important?
Any differences in the time leaf discs spent in syringes or beakers before lamp exposure could affect results. Leaves that spent longer in the dark might have depleted their energy stores differently, affecting their initial photosynthesis rate.
Key discussion points
Photosynthesis inputs and outputs
Inputs (reactants):
- Carbon dioxide ()
- Water ()
- Light energy
Outputs (products):
- Glucose ()
- Oxygen ()
The two stages of photosynthesis
Light-dependent reactions:
- Occur in the thylakoid membranes
- Require light energy
- Produce ATP and NADPH
- Release oxygen
Light-independent reactions (Calvin cycle):
- Occur in the stroma
- Use ATP and NADPH from light-dependent reactions
- Fix carbon dioxide into glucose
- Do not directly require light (but depend on products from light-dependent stage)
How light intensity affects photosynthesis
Light intensity is a limiting factor for photosynthesis. As light intensity increases, the rate of photosynthesis increases, but only up to a certain point. Beyond this, other factors (like CO₂ concentration or temperature) become limiting, and increasing light intensity further won't increase the rate.
Experimental limitations and improvements
Potential limitations:
- Leaf discs may vary in thickness or chlorophyll content
- Some discs might be damaged during punching or handling
- Temperature could change during the experiment if the lamp heats the beakers unevenly
- Timing between trials might not be perfectly synchronized
Possible improvements:
- Use more replicates (more than 10 discs per treatment)
- Measure the actual light intensity reaching each beaker
- Control temperature using a water bath
- Measure the amount of light transmitted through each cellophane colour
- Use fresh leaves from the same plant to reduce variation
Writing your conclusion
A good conclusion should include:
- Whether the aim was achieved (state which colour produced the fastest photosynthesis based on your results)
- Reference to specific data from your results table
- Discussion of experimental limitations
- Suggestions for improvement
- Broader implications (e.g., what this means for growing plants indoors or in greenhouses)
Remember!
Key Points to Remember:
- Buoyancy indicates photosynthesis rate: More oxygen production = faster floating = higher photosynthesis rate
- The independent variable is light colour: This is what we deliberately changed between treatments
- The dependent variable is time for discs to rise: This measures the rate of photosynthesis
- The control (cling wrap) is essential: It provides a baseline with unfiltered white light for comparison
- Leaf discs must sink initially: This ensures air spaces are filled with sodium bicarbonate solution, providing for photosynthesis