Photosynthesis in Algae (VCE SSCE Biology): Revision Notes
Photosynthesis in Algae
Introduction
This investigation is a controlled experiment that explores how photosynthesis works in algae. Algae are a group of photosynthesizing protists commonly found in aquatic environments like ponds, rivers, and oceans.
When scientists want to measure how quickly photosynthesis is occurring, they often track changes in carbon dioxide (CO₂) levels in the surrounding environment. This works because CO₂ is a key raw material used in photosynthesis. As algae photosynthesize more rapidly, they use up more CO₂ from their surroundings, causing environmental CO₂ levels to decrease.
In this practical investigation, you'll observe algae photosynthesizing in the classroom by measuring changes in CO₂ levels around algae samples. To make these CO₂ changes visible, a pH indicator called hydrogen carbonate indicator is added to the algae. This indicator changes colour depending on the pH of the solution.
Understanding pH Indicators
pH indicators are special chemicals that change colour based on the acidity or alkalinity of a solution. In this experiment, the hydrogen carbonate indicator allows you to see invisible changes in CO₂ levels by showing visible colour changes. This makes it possible to track photosynthesis without expensive equipment.
Here's the key relationship to understand: when algae photosynthesize, they remove CO₂ from their surroundings. This causes the pH to increase. Therefore:
- Increase in pH = Decrease in CO₂ = Increase in photosynthesis rate
- Decrease in pH = Increase in CO₂ = Decrease in photosynthesis rate
The Core Relationship
Higher pH = Less CO₂ = More photosynthesis happening
This is the fundamental relationship that makes this entire experiment work. As algae photosynthesize, they consume CO₂, which causes pH to rise. By measuring pH changes, you're indirectly measuring how fast photosynthesis is occurring.
Aim
To determine whether the algal density affects the rate of photosynthesis.
Materials and apparatus
- 100 algal balls
- 5 × 7 mL empty dram vials
- 10 mL hydrogen carbonate indicator (pH indicator)
- 1 pH colour chart
- 2 mL distilled water
- 2 × 2 mL plastic pipettes
- Light source
- 1 strainer
- 1 spoon
- 1 tape measure
Method
Follow these steps carefully to set up and conduct the experiment:
Setting up the vials:
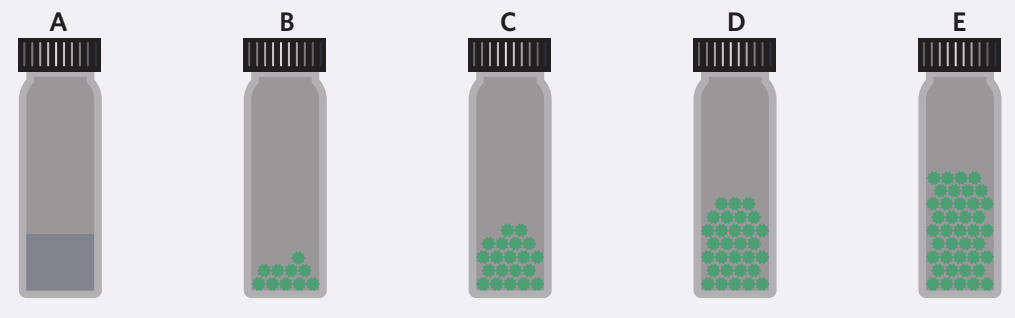
- Label your five vials with the letters A, B, C, D, and E.
- Using a pipette, add 2 mL of distilled water into vial A. This is your control vial with no algae.
- Add different numbers of algal balls to the remaining vials:
- Vial B: 10 algal balls
- Vial C: 20 algal balls
- Vial D: 30 algal balls
- Vial E: 40 algal balls
Tip: Using the Strainer
Using the strainer can make it easier to distribute the algal balls evenly between vials. Gently scoop the algal balls and let excess water drain before transferring them to each vial.
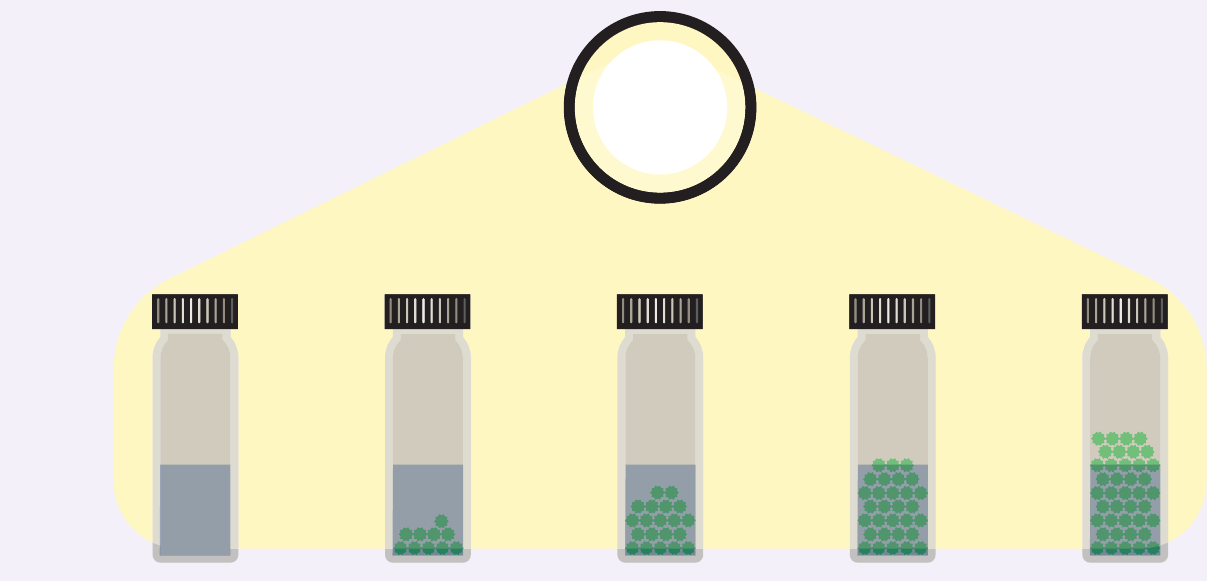
Adding the pH indicator:
- Using your pipette, add 2 mL of hydrogen carbonate indicator into all five vials, then secure their lids tightly.
- Before exposing the vials to any light, estimate the pH of the solution in each vial by comparing the colour to the pH colour chart. Record both the colour and pH value in the first column of your results table.
Initial pH Recording is Crucial
Taking this baseline measurement before light exposure is essential. It shows you the starting point before photosynthesis begins, allowing you to see how much change occurs during the experiment.
Light exposure and observations:
- Place each vial at an equal distance from your light source. Use the tape measure to ensure the distance is the same for all vials. This is a crucial controlled variable.
- Record the colour and pH of each solution after 10 minutes, 20 minutes, and 30 minutes of light exposure.
Results
Create a results table to record your observations. You should note both the colour of the indicator and the estimated pH at each time point.
| Vial | Prior to light exposure | 10 minutes after light exposure | 20 minutes after light exposure | 30 minutes after light exposure |
|---|---|---|---|---|
| A | ||||
| B | ||||
| C | ||||
| D | ||||
| E |
For each cell, record both the colour and pH value you observe.
Recording Observations Accurately
Be as specific as possible when recording colours. Instead of just "yellow," you might write "yellow-orange" or "pale yellow." This level of detail will help you identify trends more clearly when analyzing your results.
Discussion questions
After completing the experiment, work through these questions to deepen your understanding:
- Write out both the simplified chemical and worded equations for photosynthesis.
- This helps you connect the experiment to the underlying chemistry.
Photosynthesis Equations
Worded equation: Carbon dioxide + Water → Glucose + Oxygen
Chemical equation:
Notice how CO₂ is consumed in this process - this is why photosynthesis causes CO₂ levels to decrease in the surrounding environment.
- List the main functions of glucose in plant cells.
- Understanding what plants do with the glucose they make during photosynthesis.
- Identify the overall trend in colour and pH change over the course of the experiment.
- Look for patterns in how the pH changed over time and how this related to algal density.
- Using your results, explain whether there is a link between the number of algal balls and the rate of photosynthesis.
- This directly addresses the aim of the investigation.
- Identify the independent and dependent variables in this experiment.
- Independent variable: The number of algal balls (algal density)
- Dependent variable: The pH change (indicating rate of photosynthesis)
- Explain why each vial was placed at an equal distance from the light source.
- This ensures that all vials receive the same amount of light, making it a fair test. Light intensity affects photosynthesis rate, so this must be controlled.
Why Equal Distance Matters
Light intensity decreases with distance from the source. If vials were at different distances, they would receive different amounts of light energy. This would mean you couldn't determine whether changes in photosynthesis rate were due to algal density or light intensity - confounding your results.
- Considering your method, what steps could you add in or modify to increase the accuracy and precision of your experiment?
- Think about repeated trials, more precise pH measurement, longer observation periods, or additional controls.
Conclusion
When writing up your conclusion, include these key elements:
- Achievement of aim: Did you successfully determine whether algal density affects photosynthesis rate? Refer to specific results to support your answer.
- Limitations: What factors might have affected the accuracy of your results? Consider measurement precision, time constraints, or environmental factors.
- Improvements: What changes would make the experiment more reliable or accurate? This might include using a pH probe instead of indicator, running more trials, or testing more algal densities.
- Broader implications: Why does this matter? Consider applications like monitoring algal blooms in water bodies, understanding aquatic ecosystems, or exploring how different organisms contribute to oxygen production.
Writing Strong Conclusions
A good scientific conclusion doesn't just state whether your hypothesis was supported. It also acknowledges limitations, suggests improvements, and connects your findings to broader scientific understanding. This demonstrates critical thinking and scientific maturity.
Key Points to Remember
-
Algae are photosynthesizing protists that live in aquatic environments and produce oxygen through photosynthesis.
-
The pH-CO₂-photosynthesis relationship: Higher pH means less CO₂ (because it's being used up), which indicates faster photosynthesis.
-
Experimental design matters: Keeping variables like light distance constant ensures you're only testing the effect of algal density, making it a fair and valid experiment.
-
Controls are essential: Vial A (with no algae) helps you see what happens when photosynthesis isn't occurring, giving you a baseline for comparison.
-
More algae should mean more photosynthesis and therefore a greater pH increase, assuming light and other factors aren't limiting.