Texture of Soil - Sedimentation (Leaving Cert Agricultural Science): Revision Notes
Texture of Soil - Sedimentation
What is soil texture?
Soil texture refers to the relative proportions of different sized particles in soil. These particles include gravel, sand, silt, and clay, along with organic matter called humus. Understanding soil texture is crucial for farmers because it affects water retention, drainage, nutrient availability, and how easily crops can grow.
Soil texture is one of the most important physical properties of soil that farmers need to understand. It determines how water moves through soil, how well nutrients are held, and how easy it is for plant roots to penetrate and grow.
Understanding the sedimentation method
Sedimentation works on a simple principle: when soil particles are mixed with water and left to settle, different sized particles will settle at different rates. Heavier, larger particles sink quickly, while lighter, smaller particles take longer to settle or may remain suspended in the water.
The settling order from bottom to top is:
- Gravel (largest, heaviest) - settles first
- Sand (medium-large particles) - settles quickly
- Silt (fine particles) - settles more slowly
- Clay (very fine particles) - settles very slowly
- Suspended clay - remains floating in water
- Humus (organic matter) - floats on surface
This method works because of Stokes' Law - the principle that larger, denser particles fall through a liquid faster than smaller, less dense particles. This allows us to separate and measure different soil components based on their settling rates.
Required apparatus
To carry out this experiment, you'll need:
- Soil sample (representative of the area being tested)
- 250ml graduated cylinder (for accurate volume measurements)
- Water (preferably distilled for best results)
- Rubber stopper (to seal the cylinder during shaking)
Each piece of equipment serves a specific purpose: the graduated cylinder allows precise volume measurements, the rubber stopper enables thorough mixing without spillage, and distilled water prevents interference from dissolved minerals that might affect settling patterns.
Step-by-step method
- Sample collection: Gather a representative soil sample from the area you want to test
- Measure the soil: Place exactly 50cm³ of soil into the graduated cylinder using a measuring spoon
- Add water and mix: Fill the cylinder three-quarters full with water, place the stopper firmly, and shake vigorously for at least 2 minutes to ensure all particles are properly suspended
- Allow settlement: Leave the cylinder undisturbed overnight (approximately 24 hours) to allow complete sedimentation
- Measure the layers: Carefully examine the settled layers and measure the volume of each component using the cylinder's graduations
- Calculate percentages: Work out what percentage each component represents of the total soil volume
Common Mistakes to Avoid:
- Don't rush the settling time - incomplete settling leads to inaccurate results
- Avoid disturbing the cylinder during settlement as this mixes the layers
- Make sure to shake thoroughly at the start - poorly mixed samples won't separate properly
Understanding the results
After settling, you'll observe distinct layers in your cylinder, with each layer representing different particle sizes.
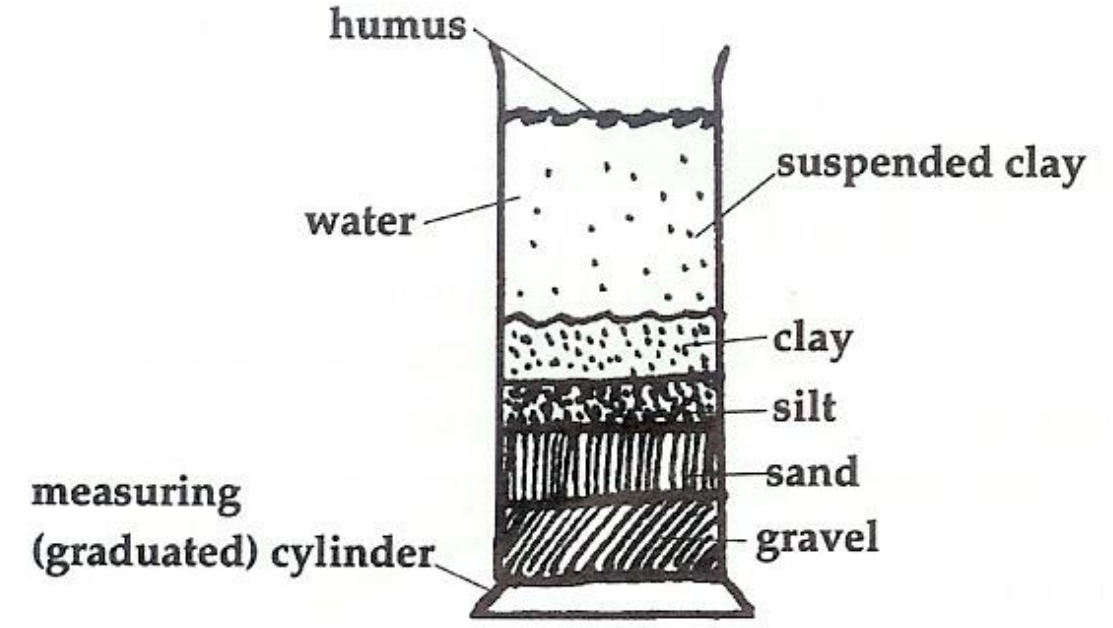
The diagram shows the typical pattern you'll see after sedimentation is complete. Each layer tells you something important about your soil's composition.
The clarity of layer boundaries indicates how well your soil components have separated. Well-defined layers suggest a good mix of particle sizes, while blurred boundaries might indicate similar-sized particles or incomplete settling.
Recording and calculating your results
For each layer, you'll need to:
- Record the volume in cm³
- Calculate the percentage using the formula:
Worked Example: Calculating Sand Percentage
If you find 15cm³ of sand in your 50cm³ soil sample:
Step 1: Identify the values
- Volume of sand = 15cm³
- Total soil volume = 50cm³
Step 2: Apply the formula
Therefore, your soil sample contains 30% sand.
Key observations to note
- Clay particles may remain suspended for days because they're extremely fine
- Humus floats because it's less dense than mineral particles
- Clear water above the settled layers indicates good separation
- Cloudy water suggests some particles are still settling
If your water remains very cloudy after 24 hours, you may need to wait longer for complete settling, or your soil may have an unusually high clay content that requires additional time to fully separate.
Exam tips
- Always state the total volume of soil used (50cm³) in your calculations
- Remember to leave the sample undisturbed for the full settling period
- When measuring layers, read from the bottom of the meniscus
- Show your working clearly when calculating percentages
- Explain why different particles settle at different rates (particle size and density)
Exam Success Tips: In exam questions, always explain the scientific principle behind sedimentation - that particle size and density determine settling rate. This demonstrates your understanding of the underlying physics, not just the practical method.
Key Points to Remember:
- Soil texture is determined by the proportions of sand, silt, clay and organic matter
- Sedimentation separates particles based on size and weight - largest particles settle first
- Key equipment includes a graduated cylinder, stopper, water, and soil sample
- Settlement takes time - allow at least 24 hours for complete separation
- Calculations involve measuring volumes and converting to percentages of the total soil sample
- Results help farmers understand drainage, water retention, and nutrient-holding capacity of their soil